亮度意味着更改每个图像像素的值。可以通过以任何常数增加或减少图像的像素值来完成此更改。本文深入介绍了如何使用OpenCV更改图像亮度。
Input :
Original Image

Output :
-> Original Image
-> Image with brightness increased by 100
-> Image with brightness increased by 50
-> Image with brightness decreased by 100
-> Image with brightness decreased by 50
代码:CPP代码以控制图像亮度
// c++ code explaining how to
// increase or decrease the brightness of
// an image

// loading library files
#include
#include
#include

using namespace cv;
using namespace std;

int main(int argc, char** argv)
{
    // Loading the Image File under testing
    Mat image = imread("C:\\Users\\dell\\Desktop\\abc.jpg");

    // Check whether the image is present or not
    if (image.empty()) {
        cout << "Could not open or find the image" << endl;

        // waiting for any  key to be pressed
        return -1;
    }

    // Declaring the Brightness Instances

    Mat imageBrighnessHigh50;
    // increasing the brightness level by 50
    image.convertTo(imageBrighnessHigh50, -1, 1, 50);

    Mat imageBrighnessHigh100;
    // increasing the brightness level by 100
    image.convertTo(imageBrighnessHigh100, -1, 1, 100);

    Mat imageBrighnessLow50;
    // decreasing the brightness level by 50
    image.convertTo(imageBrighnessLow50, -1, 1, -50);

    Mat imageBrighnessLow100;
    // decreasing the brightness level by 100
    image.convertTo(imageBrighnessLow100, -1, 1, -100);

    // Declaring the windows
    // for images belonging to different brightness level
    String windowNameOriginalImage = "Original Image";
    String windowNameBrightnessHigh50 = "Brightness Increased by 50";
    String windowNameWithBrightnessHigh100 = "Brightness Increased by 100";
    String windowNameBrightnessLow50 = "Brightness Decreased by 50";
    String windowNameBrightnessLow100 = "Brightness Decreased by 100";

    // Running the window instance
    // and opening it
    namedWindow(windowNameOriginalImage, WINDOW_NORMAL);
    namedWindow(windowNameBrightnessHigh50, WINDOW_NORMAL);
    namedWindow(windowNameWithBrightnessHigh100, WINDOW_NORMAL);
    namedWindow(windowNameBrightnessLow50, WINDOW_NORMAL);
    namedWindow(windowNameBrightnessLow100, WINDOW_NORMAL);

    // Loading images inside the above created Windows
    imshow(windowNameOriginalImage, image);
    imshow(windowNameBrightnessHigh50, imageBrighnessHigh50);
    imshow(windowNameWithBrightnessHigh100, imageBrighnessHigh100);
    imshow(windowNameBrightnessLow50, imageBrighnessLow50);
    imshow(windowNameBrightnessLow100, imageBrighnessLow100);

    // waiting for any key to be pressed
    waitKey(0);

    // closing all the windows instances
    // when any key is pressed.
    destroyAllWindows();

    return 0;
}
输入 : 
输出 :
原始图片

亮度等级提高50 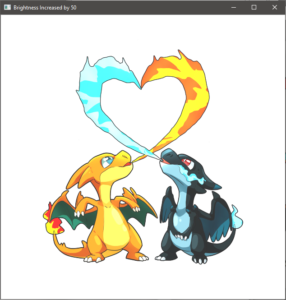
亮度等级提高100 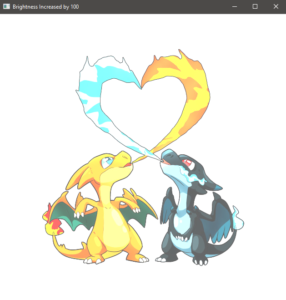
亮度等级降低50 
亮度等级降低100 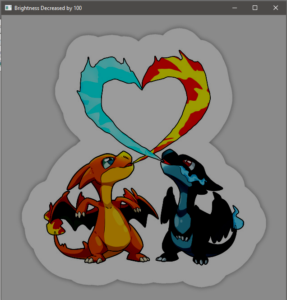
解释 :
// Declaring the Brightness Instances

Mat imageBrighnessHigh50;
// increasing the brightness level by 50
image.convertTo(imageBrighnessHigh50, -1, 1, 50);

Mat imageBrighnessHigh100;
// increasing the brightness level by 100
image.convertTo(imageBrighnessHigh100, -1, 1, 100);

Mat imageBrighnessLow50;
// decreasing the brightness level by 50
image.convertTo(imageBrighnessLow50, -1, 1, -50);

Mat imageBrighnessLow100;
// decreasing the brightness level by 100
image.convertTo(imageBrighnessLow100, -1, 1, -100);
这些代码行会将图像像素值更改指定的数量。然后将最终更改的图像存储到给定的输出图像。如果指定的量为正(上面的值为50),则亮度级别将增加;否则,如果指定的量为负,则亮度级别将降低。
MAT函数:
“ MAT”函数将每个图像像素值更改为目标数据类型,并根据增加或减少值进行更改。
Parameters :

m      : Output Image
rtype  : Output Image type, Output Image type is same as input
         if it is set to -ve value
alpha  : Input image pixel are multiplied with this number prior
         to its assignment to output image
beta   : adding this value to each input image pixel
要从最佳影片策划和实践问题去学习,检查了C++基础课程为基础,以先进的C++和C++ STL课程基础加上STL。要完成从学习语言到DS Algo等的更多准备工作,请参阅“完整面试准备课程” 。