浮动操作按钮是一个圆形图标按钮,它悬停在内容上以促进应用程序中的主要操作。浮动操作按钮最常用于 Scaffold.floatingActionButton 字段。
构造函数:
Syntax:
FloatingActionButton({Key key,
Widget child,
String tooltip,
Color foregroundColor,
Color backgroundColor,
Color focusColor,
Color hoverColor,
Color splashColor,
Object heroTag: const _DefaultHeroTag(),
double elevation,
double focusElevation,
double hoverElevation,
double highlightElevation,
double disabledElevation,
@required VoidCallback onPressed,
MouseCursor mouseCursor,
bool mini: false,
ShapeBorder shape,
Clip clipBehavior: Clip.none,
FocusNode focusNode,
bool autofocus: false,
MaterialTapTargetSize materialTapTargetSize,
bool isExtended: false})
特性:
- autofocus:这个属性接受一个布尔值作为一个对象(final)来决定按钮是否会在初始焦点上被选中。
- backgroundColor : 按钮的背景颜色。
- child:要显示的小部件。
- clipBehaviour:该属性以clip枚举为对象来决定内容是否被裁剪。
- disabledElevation:以双精度值作为对象,此属性决定按钮禁用时按钮在 z 坐标上的位置。
- 海拔:同样,这个属性接受一个双重作为对象。它控制着按钮在 z 坐标上的位置。
- focusColor:该属性决定了输入焦点时按钮填充的颜色。它接受Color类作为对象。
- focusElevtion:它决定了按钮在 z 轴上的位置,以在输入焦点时放置按钮。
- focusNode:它为按钮提供了一个额外的焦点节点。
- foregroundColor:它控制按钮内文本和图标的默认颜色。
- heorTag:这是为按钮中的小部件之一添加英雄标签。
- highlightElevation:此属性控制用户与其交互时放置按钮的 z 轴位置。
- hoverColor:此属性将Color类作为对象。它控制悬停事件时要在按钮中绘制的颜色。
- hoverElevation:这个属性接受一个双精度值作为参数来决定按钮在 z 轴上的高度,按钮应该在悬停时放置。
- isExtended:这个属性接受一个布尔值作为对象。如果设置为 true,则该按钮将成为扩展的浮动操作按钮。
- materialTapTargetSize:此属性用于控制按钮的点击目标大小。
- mini :它控制按钮的大小。
- mouseCursor:此属性将MouseCursor属性作为对象。它在与按钮交互时控制鼠标指针的光标。
- onPressed :回调函数。
- splashColor: FloatingActionButton 的初始颜色。
- shape:按钮的形状。
- 我们也有floatingActionButtonLocation来设置按钮的位置。
例子:
主要的。dart文件。
Dart
import 'package:flutter/material.dart';

void main() {
  runApp(MyApp());
}

class MyApp extends StatelessWidget {
  // This widget is the root of your application.
  @override
  Widget build(BuildContext context) {
    return MaterialApp(
      title: 'FAB',
      theme: ThemeData(
        primarySwatch: Colors.blue,
      ),
      home: MyHomePage(),
      debugShowCheckedModeBanner: false,
    );
  }
}

class MyHomePage extends StatefulWidget {
  @override
  _MyHomePageState createState() => _MyHomePageState();
}

class _MyHomePageState extends State {
  int i=0;

  @override
  Widget build(BuildContext context) {
    return Scaffold(
      backgroundColor: Colors.lightBlue[50],
      appBar: AppBar(
        title: Text("FloatingActionButton",),
        backgroundColor: Colors.green,
        actions: [
          Text("GFG",textScaleFactor: 3,)
        ],
      ),
      body: Center(
        child: Column(
          mainAxisAlignment: MainAxisAlignment.center,
          children: [
          Text("Floating action button pressed this many times"),
          Text("$i",textScaleFactor: 3,)
        ],),
      ),
      floatingActionButtonLocation: FloatingActionButtonLocation.centerDocked,
      floatingActionButton: FloatingActionButton(
        // isExtended: true,
        child: Icon(Icons.add),
        backgroundColor: Colors.green,
        onPressed: () {
          setState(() {
            i++;
          });
        },
      ),
    );
  }
}
输出:
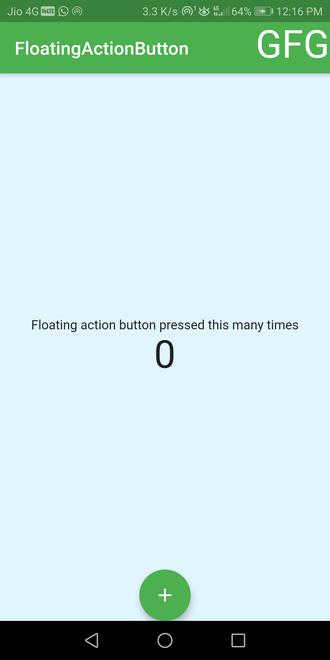
如果属性定义如下:
floatingActionButtonLocation: FloatingActionButtonLocation.centerDocked,
floatingActionButton: FloatingActionButton(
        child: Icon(Icons.add),
        backgroundColor: Colors.green,
        onPressed: () {
          setState(() {
            i++;
          });
        },
      ),
可以观察到以下设计更改:

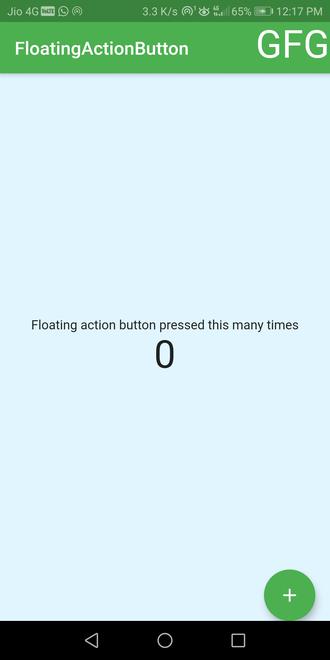
如果属性定义如下:
floatingActionButtonLocation: FloatingActionButtonLocation.endDocked,
floatingActionButton: FloatingActionButton(
        child: Icon(Icons.add),
        backgroundColor: Colors.green,
        onPressed: () {
          setState(() {
            i++;
          });
        },
      ),
可以观察到以下设计更改:

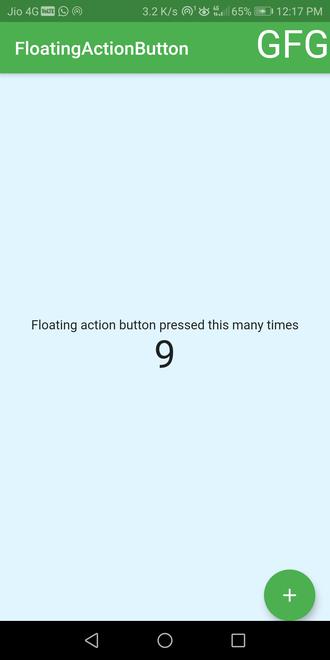
如果属性定义如下:
floatingActionButtonLocation: FloatingActionButtonLocation.endDocked,
floatingActionButton: FloatingActionButton(
        child: Icon(Icons.add),
        backgroundColor: Colors.green,
        onPressed: () {
          setState(() {
            i++;
          });
        },
      ),
      // counter i is 9 when we tapped the button 9 times
可以观察到以下设计更改:

解释:
- 创建一个浮动操作按钮并给它一个子项。
- 添加回调onPressed函数以增加计数器变量i。
- 如果需要,提供背景颜色。
- 使用floatingActionButtonLocation设置按钮的位置。
完整代码可在https://github.com/singhteekam/GFG-Articles/tree/master/floatingActionButton_in_flutter 上获得
想要一个更快节奏和更具竞争力的环境来学习 Android 的基础知识吗?
单击此处前往由我们的专家精心策划的指南,旨在让您立即做好行业准备!