Flutter – 在Flutter页面之间共享数据
在本文中,我们将找到问题陈述“在flutter中将数据从一页导入/发送到另一页”的解决方案。在进入主题之前,有一些先决条件。
先决条件:
- dart编程语言的基础知识。
- 在 VS 代码中设置Flutter或在 Android Studio 中设置Flutter 。
- 创建第一个flutter应用程序 |你好世界。
让我们通过创建一个包含两个页面的简单应用程序来深入了解这篇文章。我们使用VS code IDE进行开发。
使用的关键术语:
- 导航类。
- MaterialPageRoute 类。
- TextEditingController 类。
执行:
第 1 步:创建一个新的Flutter应用程序:
- 使用命令ctrl+shift+p打开命令面板。
- 在调色板中输入Flutter: New Project 。

注意:如果您使用的是Android Studio IDE,则使用路径File-> New-> New Flutter Project。
第 2 步:添加文本字段以从用户那里获取数据:
- 创建文本字段以获取用户的输入。
- 为适当的 TextField 创建TextEditingController 类。
句法:
TextEditingController object_name = TextEditingController();- 使用控制器属性在TextField 类中提及控制器的对象名称。参考以下代码:
child: TextField(
            // controller attribute.
               controller: controller_object_name,
               decoration: InputDecoration(
                  border: OutlineInputBorder(),
                  labelText: "Enter your Phone Number"
               ),
       ),
第 3 步:发送数据并导航到下一页:
- 为了导航到下一页,我们使用Navigator和main.dart 的上下文。
- 为了在导航到下一页时将数据作为参数发送,我们使用MaterialPageRoute类和构建器作为下一页类的构造函数。
- 我们应该在onPressed:()函数中创建一个Button ,通过点击它来执行上述功能。为此,我们将使用ElevatedButton类来创建按钮。
ElevatedButton(
                onPressed: () {
                //Navigator for next page.
                  Navigator.of(context).push(
                    MaterialPageRoute(
                    //Builder for the nextpage class's constructor.
                        builder: (context) => nextpage(
                              name: _name.text,
                              email: _email.text,
                              phoneno: _phoneno.text,
                            )),
                          );
                    },
                child: Text("SEND")
                ),
主要的。dart
Dart
import 'package:flutter/material.dart';
import 'package:geeksforgeeks/nextpage.dart';

void main() {
  runApp(const MyApp());
}

class MyApp extends StatelessWidget {
  const MyApp({Key? key}) : super(key: key);

  @override
  Widget build(BuildContext context) {
    return MaterialApp(
      title: 'Flutter Demo',
      theme: ThemeData(
        primarySwatch: Colors.green,
      ),
      home: const MyHomePage(title: 'GeeksForGeeks'),
    );
  }
}

class MyHomePage extends StatefulWidget {
  const MyHomePage({Key? key, required this.title}) : super(key: key);
  final String title;
  @override
  State createState() => _MyHomePageState();
}

class _MyHomePageState extends State {

  // To listen to the changes in the textfield.
  TextEditingController _name = TextEditingController();
  TextEditingController _email = TextEditingController();
  TextEditingController _phoneno = TextEditingController();
  @override
  Widget build(BuildContext context) {
    return Scaffold(
      appBar: AppBar(
        title: Text(widget.title),
      ),
      body: Center(
        child: Column(
          mainAxisAlignment: MainAxisAlignment.center,
          children: [
            Padding(
              padding: const EdgeInsets.all(25),
              child: TextField(

                // To set the appropriate controller to the text field.
                controller: _name,
                decoration: InputDecoration(
                    border: OutlineInputBorder(), labelText: "Enter your Name"),
              ),
            ),
            Padding(
              padding: const EdgeInsets.all(25),
              child: TextField(
                controller: _email,
                decoration: InputDecoration(
                    border: OutlineInputBorder(),
                    labelText: "Enter your Email"),
              ),
            ),
            Padding(
              padding: const EdgeInsets.all(25),
              child: TextField(
                controller: _phoneno,
                decoration: InputDecoration(
                    border: OutlineInputBorder(),
                    labelText: "Enter your Phone Number"),
              ),
            ),

               // Button to go to nextpage.
            ElevatedButton(
                onPressed: () {

                  // Navigator to the next page.
                  Navigator.of(context).push(
                    MaterialPageRoute(

                        // Builder for the nextpage class's constructor.
                        builder: (context) => nextpage(

                              // Data as arguments to send to next page.
                              name: _name.text,
                              email: _email.text,
                              phoneno: _phoneno.text,
                            )),
                  );
                },
                child: Text("SEND"))
          ],
        ),
      ),
    );
  }
}
Dart
import 'package:flutter/material.dart';

class nextpage extends StatelessWidget {
  String name, email, phoneno;

  // Constructor to get the data from the previous page.
  nextpage({required this.name, required this.email, required this.phoneno});

  @override
  Widget build(BuildContext context) {

    // To listen to the changes in the textfield.
    TextEditingController _name = TextEditingController(text: name);
    TextEditingController _email = TextEditingController(text: email);
    TextEditingController _phoneno = TextEditingController(text: phoneno);

    return Scaffold(
      appBar: AppBar(
        title: Text('Next Page'),
      ),
      body: Center(
        child: Column(
          mainAxisAlignment: MainAxisAlignment.center,
          children: [
            Padding(
              padding: const EdgeInsets.all(25),
              child: TextField(

                // To set the appropriate controller to the text field.
                controller: _name,
                decoration: InputDecoration(
                  border: OutlineInputBorder(),
                  labelText: "Name",
                ),
              ),
            ),
            Padding(
              padding: const EdgeInsets.all(25),
              child: TextField(
                controller: _email,
                decoration: InputDecoration(
                  border: OutlineInputBorder(),
                  labelText: "Email",
                ),
              ),
            ),
            Padding(
              padding: const EdgeInsets.all(25),
              child: TextField(
                controller: _phoneno,
                decoration: InputDecoration(
                  border: OutlineInputBorder(),
                  labelText: "Number",
                ),
              ),
            ),
          ],
        ),
      ),
    );
  }
}
第 4 步:创建新的dart文件:
- 使用路径File-> New File创建一个名为nextpage的新dart文件。dart在lib文件夹中。
- 导入包'包:flutter/材料。dart'。这个包用于实现应用程序的材料设计。
- 创建扩展StatelessWidget的类nextpage() 。
- 为该类创建一个构造函数,以从上一页的类中接收参数并将参数保存为变量。
String name, email, phoneno;
nextpage({required this.name, required this.email, required this.phoneno});- 创建 Textfields 及其相应的TextEditingController并使用text属性在相应的文本字段中设置上一页的数据。参考以下代码:
TextEditingController object_name = TextEditingController(text: data);
下一页。dart
Dart
import 'package:flutter/material.dart';

class nextpage extends StatelessWidget {
  String name, email, phoneno;

  // Constructor to get the data from the previous page.
  nextpage({required this.name, required this.email, required this.phoneno});

  @override
  Widget build(BuildContext context) {

    // To listen to the changes in the textfield.
    TextEditingController _name = TextEditingController(text: name);
    TextEditingController _email = TextEditingController(text: email);
    TextEditingController _phoneno = TextEditingController(text: phoneno);

    return Scaffold(
      appBar: AppBar(
        title: Text('Next Page'),
      ),
      body: Center(
        child: Column(
          mainAxisAlignment: MainAxisAlignment.center,
          children: [
            Padding(
              padding: const EdgeInsets.all(25),
              child: TextField(

                // To set the appropriate controller to the text field.
                controller: _name,
                decoration: InputDecoration(
                  border: OutlineInputBorder(),
                  labelText: "Name",
                ),
              ),
            ),
            Padding(
              padding: const EdgeInsets.all(25),
              child: TextField(
                controller: _email,
                decoration: InputDecoration(
                  border: OutlineInputBorder(),
                  labelText: "Email",
                ),
              ),
            ),
            Padding(
              padding: const EdgeInsets.all(25),
              child: TextField(
                controller: _phoneno,
                decoration: InputDecoration(
                  border: OutlineInputBorder(),
                  labelText: "Number",
                ),
              ),
            ),
          ],
        ),
      ),
    );
  }
}
输出:
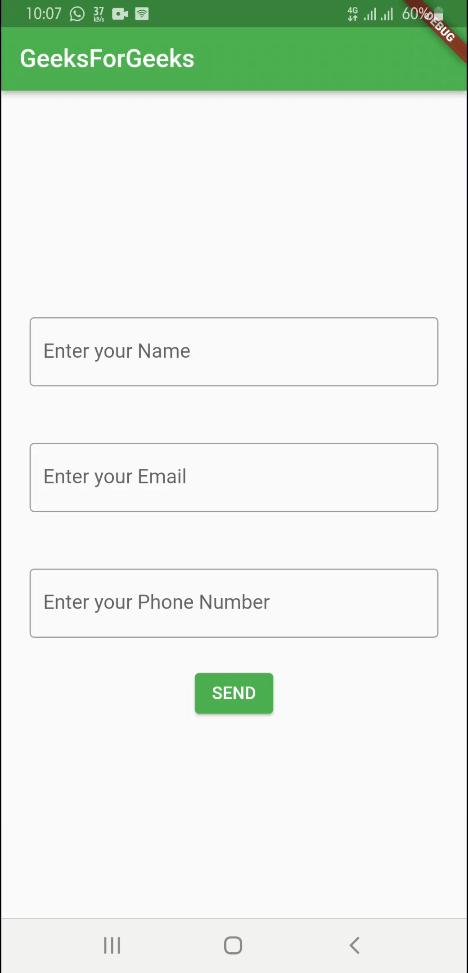
结果应用程序