- c stack (1)
- Python中的Stack
- c stack - 任何代码示例
- C++ STL-stack(1)
- C++ STL-stack
- flutter 卡(1)
- flutter 表
- Flutter
- flutter 卡
- flutter 表(1)
- Flutter(1)
- Flutter
- C++ STL中的stack empty()和stack size()(1)
- C++ STL中的stack empty()和stack size()
- Python中的 numpy.stack()(1)
- Python中的 numpy.stack()
- JavaScript中Stack的实现
- JavaScript中Stack的实现(1)
- std::stack - C++ (1)
- Scala Stack +:() 方法示例
- Scala Stack :() 方法与示例(1)
- Scala Stack :+() 方法与示例(1)
- Scala Stack++ 方法与示例(1)
- Scala Stack ++:() 方法与示例
- Scala Stack :+() 方法与示例
- Scala Stack :() 方法与示例
- Scala Stack +:() 方法示例(1)
- Scala Stack ++:() 方法与示例(1)
- Scala Stack++ 方法与示例
📅 最后修改于: 2021-01-02 04:58:36 🧑 作者: Mango
颤振堆栈
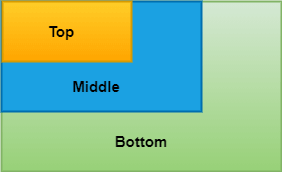
堆栈是Flutter中的一个小部件,其中包含一个小部件列表,并将它们放置在另一个小部件的顶部。换句话说,该堆栈允许开发人员将多个小部件重叠到一个屏幕中,并从下到上进行渲染。因此,第一个小部件是最底部的项目,最后一个小部件是最顶部的项目
与堆栈小部件有关的关键点
以下是Flutter堆栈小部件的关键点:
- 堆栈中的子窗口小部件可以是定位的或非定位的。
- 定位项包装在“定位”小部件中,并且必须具有一个非null属性
- 未定位的子窗口小部件自身对齐。它根据堆栈的对齐方式显示在屏幕上。子级的默认位置在左上角。
- 我们可以使用alignment属性来更改小部件的对齐方式。
- 堆栈按顺序放置子小部件,第一个子在底部,最后一个子在顶部。如果要重新排列子级小部件的顺序,则需要以新顺序重新构建堆栈。默认情况下,每个堆栈的第一个窗口小部件与其他窗口小部件相比具有最大大小。
如何在Flutter中使用堆栈小部件?
下面的示例有助于快速理解堆栈小部件的用法,其中包含三个尺寸逐渐缩小的容器:
Stack(
  children: [
    // Max Size
    Container(
      color: Colors.green,
    ),
    Container(
      color: Colors.blue,
    ),
    Container(
      color: Colors.yellow,
    )
  ],
),
它将给出以下输出:

堆栈小部件的属性
以下是与堆栈小部件一起使用的属性:
alignment :确定子控件在堆栈中的位置。它可以是顶部,底部,中心,右中角等。
Stack(
  alignment: Alignment.topCenter, // Center of Top
  children: [ ]
)
textDirection :它确定文本方向。它可以绘制文本为ltr(从左到右)或rtl(从右到左)。
Stack(
  textDirection: TextDirection.rtl, // Right to Left
  children: [ ]
)
fit :它将控制堆栈中未定位的子小部件的大小。它具有三种类型:松散,扩展和通过。用于将子窗口小部件设置为小尺寸的松散控件,expand属性使子窗口小部件尽可能地大,并且传递根据其父窗口小部件来设置子窗口小部件。
Stack(
  fit: StackFit.passthrough,
  children: [ ]
)
溢出:当子控件的内容在堆栈之外溢出时,它控制子控件的可见或修剪。
Stack(
  overflow: Overflow.clip, // Clip the Content
  children: [ ]
)
clipBehavior :确定是否将内容剪切。
已定位
它不是堆栈参数,但可以在堆栈中使用以找到子窗口小部件。以下是定位堆栈的构造函数:
const Positioned({
Key key,
this.left,
this.top,
this.right,
this.bottom,
this.width,
this.height,
@required Widget child,
})
堆栈小部件示例
以下代码说明了如何在Flutter中使用堆栈小部件。在这段代码中,我们将尝试堆栈小部件的大多数基本属性。
import 'package:flutter/material.dart';

void main() => runApp(MyApp());

/// This Widget is the main application widget.
class MyApp extends StatelessWidget {
  @override
  Widget build(BuildContext context) {
    return MaterialApp(
      home: MyStackWidget(),
    );
  }
}

class MyStackWidget extends StatelessWidget {
  @override
  Widget build(BuildContext context) {
    return MaterialApp(
      home: Scaffold(
        appBar: AppBar(
          title: Text("Flutter Stack Widget Example"),
        ),
        body: Center(
          child: Stack(
            fit: StackFit.passthrough,
            overflow: Overflow.visible,
            children: [
              // Max Size Widget
              Container(
                height: 300,
                width: 400,
                color: Colors.green,
                child: Center(
                  child: Text(
                    'Top Widget: Green',
                    style: TextStyle(color: Colors.white, fontSize: 20),
                  ),
                ),
              ),
              Positioned(
                top: 30,
                right: 20,
                child: Container(
                  height: 100,
                  width: 150,
                  color: Colors.blue,
                  child: Center(
                    child: Text(
                      'Middle Widget',
                      style: TextStyle(color: Colors.white, fontSize: 20),
                    ),
                  ),
                ),
              ),
              Positioned(
                top: 30,
                left: 20,
                child: Container(
                  height: 100,
                  width: 150,
                  color: Colors.orange,
                  child: Center(
                    child: Text(
                      'Bottom Widget',
                      style: TextStyle(color: Colors.white, fontSize: 20),
                    ),
                  ),
                )
              ),
            ],
          ),
        )
      ),
    );
  }
}
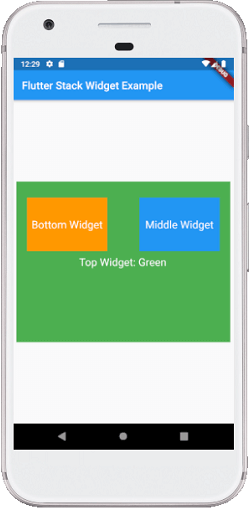
输出:
当我们运行该应用程序时,我们应该获得与以下屏幕截图类似的屏幕UI:

Flutter IndexedStack
它是Flutter中的另一个堆栈小部件,通过指定其索引一次仅显示一个元素。请参阅以下代码段:
IndexedStack(
  index: 1,
  children: [
    Container(
      color: Colors.green,
    ),
    Container(
      color: Colors.blue,
    ),
    Container(
      color: Colors.yellow,
    )
  ],
)
IndexedStack像常规堆栈一样将子级作为子级,但是一次仅显示一个子级。因此,它不是堆栈。我们使用它来根据需要轻松地在一个孩子与另一个孩子之间切换。
IndexedStack小部件示例
以下代码说明了如何在Flutter中使用索引堆栈小部件:
import 'package:flutter/material.dart';

void main() => runApp(MyApp());

/// This Widget is the main application widget.
class MyApp extends StatelessWidget {
  @override
  Widget build(BuildContext context) {
    return MaterialApp(
      home: MyStackWidget(),
    );
  }
}

class MyStackWidget extends StatelessWidget {
  @override
  Widget build(BuildContext context) {
    return MaterialApp(
      home: Scaffold(
        appBar: AppBar(
          title: Text("Flutter Stack Widget Example"),
        ),
        body: Center(
          child: IndexedStack(
            index: 0,
            children: [
              Container(
                height: 300,
                width: 400,
                color: Colors.green,
                child: Center(
                  child: Text(
                    'First Widget',
                    style: TextStyle(color: Colors.white, fontSize: 20),
                  ),
                ),
              ),
              Container(
                height: 250,
                width: 250,
                color: Colors.blue,
                child: Center(
                  child: Text(
                    'Second Widget',
                    style: TextStyle(color: Colors.white, fontSize: 20),
                  ),
                ),
              ),
            ],
          ),
        )
      ),
    );
  }
}
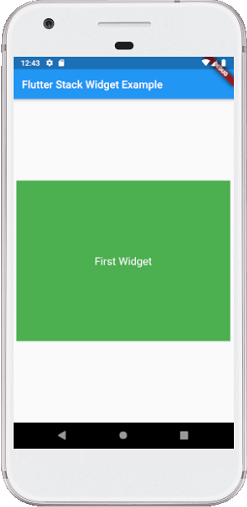
输出:
当我们运行该应用程序时,我们应该获得与以下屏幕截图类似的屏幕UI:

可以在Flutter中将堆栈包装在堆栈中吗?
是的,可以在Flutter中将堆栈包装在堆栈中。我们可以通过使用height和width属性将第二个堆栈包装在容器中来完成此操作。
请参阅以下代码以更清楚地了解它:
import 'package:flutter/material.dart';

void main() => runApp(MyApp());

class MyApp extends StatelessWidget {
  @override
  Widget build(BuildContext context) {
    return MaterialApp(
      home: MyStackWidget(),
    );
  }
}

class MyStackWidget extends StatelessWidget {
  @override
  Widget build(BuildContext context) {
    return MaterialApp(
      home: Scaffold(
        appBar: AppBar(
          title: Text("Flutter Stack Widget Example"),
        ),
        body: Center(
          child: Stack(
            children: [
              Positioned(
                top: 100,
                child: Text(
                    "Stack#1",
                    style: TextStyle(color: Colors.black, fontSize: 20)
                ),
              ),
              Positioned(
                top: 150.0,
                child: Container(
                  height: 220,
                  width: 220,
                  color: Colors.green,
                  child: Stack(
                    children: [
                      Positioned(
                        top:160,
                        child: Text(
                          "Stack Inside Stack#1",
                          style: TextStyle(color: Colors.white, fontSize: 20)
                        ),
                      )
                    ],
                  ),
                ),
              )
            ],
          ),
        )
      ),
    );
  }
}
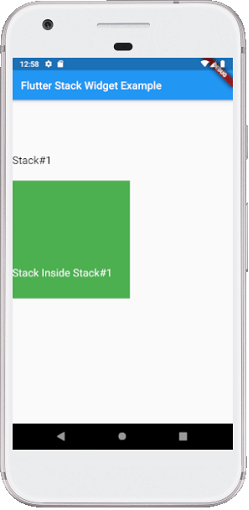
当我们运行该应用程序时,我们应该获得与以下屏幕截图类似的屏幕UI:
