- 云计算提供商
- 云计算提供商(1)
- 电子邮件提供商(1)
- 电子邮件提供商
- 最佳 MBaaS 提供商 (1)
- 最佳 MBaaS 提供商 - 无论代码示例
- android如何复制内容 (1)
- android如何复制内容 - 任何代码示例
- Android 5(1)
- android (1)
- Android 5
- 内容营销-内容创建
- 内容营销-内容创建(1)
- jQuery |内容()与示例(1)
- jQuery |内容()与示例(1)
- jQuery |内容()与示例
- jQuery |内容()与示例
- Android中的内容提供者(带有示例)
- Android中的内容提供者(带有示例)(1)
- 内容 uri 到文件路径 android (1)
- Android 1.0 和 Android 3.2.2 的区别
- Android 1.1 和 Android 1.6 的区别(1)
- Android 1.0 和 Android 3.2.2 的区别(1)
- Android 1.0 和 Android 3.0 的区别(1)
- Android 1.0 和 Android 2.3.7 的区别(1)
- Android 1.0 和 Android 2.3 的区别
- Android 1.0 和 Android 2.2 的区别(1)
- Android 1.0 和 Android 2.2 的区别
- Android 1.0 和 Android 9 的区别
📅 最后修改于: 2021-01-05 04:53:50 🧑 作者: Mango
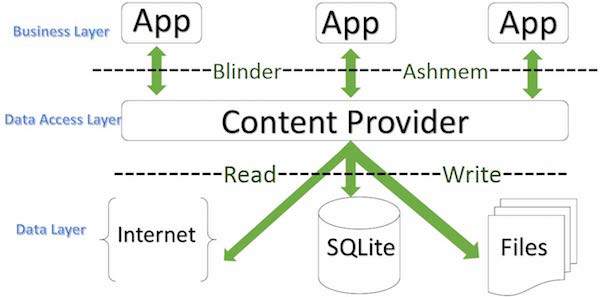
内容提供商组件应要求将数据从一个应用程序提供给其他应用程序。此类请求由ContentResolver类的方法处理。内容提供商可以使用不同的方式来存储其数据,并且数据可以存储在数据库,文件中,甚至可以通过网络存储。

内容提供商
有时需要跨应用程序共享数据。这是内容提供商变得非常有用的地方。
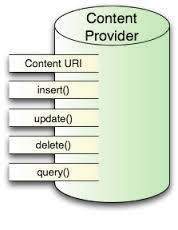
内容提供商可让您将内容集中在一个地方,并有许多不同的应用程序根据需要对其进行访问。内容提供者的行为与数据库非常相似,您可以在其中查询,编辑其内容以及使用insert(),update(),delete()和query()方法添加或删除内容。在大多数情况下,此数据存储在SQlite数据库中。
内容提供程序作为ContentProvider类的子类实现,并且必须实现一组标准的API,这些API可使其他应用程序执行事务。
public class My Application extends  ContentProvider {
}
内容URI
要查询内容提供者,您可以以URI的形式指定查询字符串,其格式如下:
:////
这是URI各个部分的详细信息-
| Sr.No | Part & Description |
|---|---|
| 1 |
prefix This is always set to content:// |
| 2 |
authority This specifies the name of the content provider, for example contacts, browser etc. For third-party content providers, this could be the fully qualified name, such as com.tutorialspoint.statusprovider |
| 3 |
data_type This indicates the type of data that this particular provider provides. For example, if you are getting all the contacts from the Contacts content provider, then the data path would be people and URI would look like thiscontent://contacts/people |
| 4 |
id This specifies the specific record requested. For example, if you are looking for contact number 5 in the Contacts content provider then URI would look like this content://contacts/people/5. |
创建内容提供者
这涉及创建您自己的内容提供程序的许多简单步骤。
-
首先,您需要创建扩展ContentProviderbaseclass的Content Provider类。
-
其次,您需要定义将用于访问内容的内容提供商URI地址。
-
接下来,您将需要创建自己的数据库以保留内容。通常,Android使用SQLite数据库,并且框架需要覆盖onCreate()方法,该方法将使用SQLite Open Helper方法创建或打开提供程序的数据库。启动应用程序时,将在主应用程序线程上调用其每个内容提供程序的onCreate()处理程序。
-
接下来,您将必须实施Content Provider查询以执行不同的数据库特定操作。
-
最后,使用
标签将您的内容提供者注册到您的活动文件中。
这是您需要在Content Provider类中重写的方法列表,以使Content Provider工作-

内容提供商
-
onCreate()在提供程序启动时调用此方法。
-
query()此方法从客户端接收请求。结果作为Cursor对象返回。
-
insert()此方法将新记录插入到内容提供程序中。
-
delete()此方法从内容提供者删除现有记录。
-
update()此方法更新内容提供者提供的现有记录。
-
getType()此方法返回给定URI处数据的MIME类型。
例
本示例将向您说明如何创建自己的ContentProvider 。因此,让我们按照以下步骤进行操作,类似于创建Hello World Example时所遵循的步骤:
| Step | Description |
|---|---|
| 1 | You will use Android StudioIDE to create an Android application and name it as My Application under a package com.example.MyApplication, with blank Activity. |
| 2 | Modify main activity file MainActivity.java to add two new methods onClickAddName() and onClickRetrieveStudents(). |
| 3 | Create a new java file called StudentsProvider.java under the package com.example.MyApplication to define your actual provider and associated methods. |
| 4 | Register your content provider in your AndroidManifest.xml file using |
| 5 | Modify the default content of res/layout/activity_main.xml file to include a small GUI to add students records. |
| 6 | No need to change string.xml.Android studio take care of string.xml file. |
| 7 | Run the application to launch Android emulator and verify the result of the changes done in the application. |
以下是修改后的主要活动文件src / com.example.MyApplication / MainActivity.java的内容。该文件可以包括每个基本生命周期方法。我们添加了两个新方法onClickAddName()和onClickRetrieveStudents()来处理用户与应用程序的交互。
package com.example.MyApplication;

import android.net.Uri;
import android.os.Bundle;
import android.app.Activity;

import android.content.ContentValues;
import android.content.CursorLoader;

import android.database.Cursor;

import android.view.Menu;
import android.view.View;

import android.widget.EditText;
import android.widget.Toast;

public class MainActivity extends Activity {

   @Override
   protected void onCreate(Bundle savedInstanceState) {
      super.onCreate(savedInstanceState);
      setContentView(R.layout.activity_main);
   }
   public void onClickAddName(View view) {
      // Add a new student record
      ContentValues values = new ContentValues();
      values.put(StudentsProvider.NAME,
         ((EditText)findViewById(R.id.editText2)).getText().toString());

      values.put(StudentsProvider.GRADE,
         ((EditText)findViewById(R.id.editText3)).getText().toString());

      Uri uri = getContentResolver().insert(
         StudentsProvider.CONTENT_URI, values);

      Toast.makeText(getBaseContext(),
         uri.toString(), Toast.LENGTH_LONG).show();
   }
   public void onClickRetrieveStudents(View view) {
      // Retrieve student records
      String URL = "content://com.example.MyApplication.StudentsProvider";

      Uri students = Uri.parse(URL);
      Cursor c = managedQuery(students, null, null, null, "name");

      if (c.moveToFirst()) {
         do{
            Toast.makeText(this,
               c.getString(c.getColumnIndex(StudentsProvider._ID)) +
                  ", " +  c.getString(c.getColumnIndex( StudentsProvider.NAME)) +
                     ", " + c.getString(c.getColumnIndex( StudentsProvider.GRADE)),
            Toast.LENGTH_SHORT).show();
         } while (c.moveToNext());
      }
   }
}
在com.example.MyApplication包下创建新文件StudentsProvider.java,以下是src / com.example.MyApplication / StudentsProvider.java的内容–
package com.example.MyApplication;

import java.util.HashMap;

import android.content.ContentProvider;
import android.content.ContentUris;
import android.content.ContentValues;
import android.content.Context;
import android.content.UriMatcher;

import android.database.Cursor;
import android.database.SQLException;

import android.database.sqlite.SQLiteDatabase;
import android.database.sqlite.SQLiteOpenHelper;
import android.database.sqlite.SQLiteQueryBuilder;

import android.net.Uri;
import android.text.TextUtils;

public class StudentsProvider extends ContentProvider {
   static final String PROVIDER_NAME = "com.example.MyApplication.StudentsProvider";
   static final String URL = "content://" + PROVIDER_NAME + "/students";
   static final Uri CONTENT_URI = Uri.parse(URL);

   static final String _ID = "_id";
   static final String NAME = "name";
   static final String GRADE = "grade";

   private static HashMap STUDENTS_PROJECTION_MAP;

   static final int STUDENTS = 1;
   static final int STUDENT_ID = 2;

   static final UriMatcher uriMatcher;
   static{
      uriMatcher = new UriMatcher(UriMatcher.NO_MATCH);
      uriMatcher.addURI(PROVIDER_NAME, "students", STUDENTS);
      uriMatcher.addURI(PROVIDER_NAME, "students/#", STUDENT_ID);
   }

   /**
      * Database specific constant declarations
   */

   private SQLiteDatabase db;
   static final String DATABASE_NAME = "College";
   static final String STUDENTS_TABLE_NAME = "students";
   static final int DATABASE_VERSION = 1;
   static final String CREATE_DB_TABLE =
      " CREATE TABLE " + STUDENTS_TABLE_NAME +
         " (_id INTEGER PRIMARY KEY AUTOINCREMENT, " +
         " name TEXT NOT NULL, " +
         " grade TEXT NOT NULL);";

   /**
      * Helper class that actually creates and manages
      * the provider's underlying data repository.
   */

   private static class DatabaseHelper extends SQLiteOpenHelper {
      DatabaseHelper(Context context){
         super(context, DATABASE_NAME, null, DATABASE_VERSION);
      }

      @Override
      public void onCreate(SQLiteDatabase db) {
         db.execSQL(CREATE_DB_TABLE);
      }

      @Override
      public void onUpgrade(SQLiteDatabase db, int oldVersion, int newVersion) {
         db.execSQL("DROP TABLE IF EXISTS " +  STUDENTS_TABLE_NAME);
         onCreate(db);
      }
   }

   @Override
   public boolean onCreate() {
      Context context = getContext();
      DatabaseHelper dbHelper = new DatabaseHelper(context);

      /**
         * Create a write able database which will trigger its
         * creation if it doesn't already exist.
      */

      db = dbHelper.getWritableDatabase();
      return (db == null)? false:true;
   }

   @Override
   public Uri insert(Uri uri, ContentValues values) {
      /**
         * Add a new student record
      */
      long rowID = db.insert(    STUDENTS_TABLE_NAME, "", values);

      /**
         * If record is added successfully
      */
      if (rowID > 0) {
         Uri _uri = ContentUris.withAppendedId(CONTENT_URI, rowID);
         getContext().getContentResolver().notifyChange(_uri, null);
         return _uri;
      }

      throw new SQLException("Failed to add a record into " + uri);
   }

   @Override
   public Cursor query(Uri uri, String[] projection,
      String selection,String[] selectionArgs, String sortOrder) {
      SQLiteQueryBuilder qb = new SQLiteQueryBuilder();
      qb.setTables(STUDENTS_TABLE_NAME);

      switch (uriMatcher.match(uri)) {
         case STUDENTS:
            qb.setProjectionMap(STUDENTS_PROJECTION_MAP);
         break;

         case STUDENT_ID:
            qb.appendWhere( _ID + "=" + uri.getPathSegments().get(1));
         break;

         default:
      }

      if (sortOrder == null || sortOrder == ""){
         /**
            * By default sort on student names
         */
         sortOrder = NAME;
      }

      Cursor c = qb.query(db,    projection,    selection,
         selectionArgs,null, null, sortOrder);
      /**
         * register to watch a content URI for changes
      */
      c.setNotificationUri(getContext().getContentResolver(), uri);
      return c;
   }

   @Override
   public int delete(Uri uri, String selection, String[] selectionArgs) {
      int count = 0;
      switch (uriMatcher.match(uri)){
         case STUDENTS:
            count = db.delete(STUDENTS_TABLE_NAME, selection, selectionArgs);
         break;

         case STUDENT_ID:
            String id = uri.getPathSegments().get(1);
            count = db.delete( STUDENTS_TABLE_NAME, _ID +  " = " + id +
               (!TextUtils.isEmpty(selection) ? "
               AND (" + selection + ')' : ""), selectionArgs);
            break;
         default:
            throw new IllegalArgumentException("Unknown URI " + uri);
      }

      getContext().getContentResolver().notifyChange(uri, null);
      return count;
   }

   @Override
   public int update(Uri uri, ContentValues values,
      String selection, String[] selectionArgs) {
      int count = 0;
      switch (uriMatcher.match(uri)) {
         case STUDENTS:
            count = db.update(STUDENTS_TABLE_NAME, values, selection, selectionArgs);
         break;

         case STUDENT_ID:
            count = db.update(STUDENTS_TABLE_NAME, values,
               _ID + " = " + uri.getPathSegments().get(1) +
               (!TextUtils.isEmpty(selection) ? "
               AND (" +selection + ')' : ""), selectionArgs);
            break;
         default:
            throw new IllegalArgumentException("Unknown URI " + uri );
      }

      getContext().getContentResolver().notifyChange(uri, null);
      return count;
   }

   @Override
   public String getType(Uri uri) {
      switch (uriMatcher.match(uri)){
         /**
            * Get all student records
         */
         case STUDENTS:
            return "vnd.android.cursor.dir/vnd.example.students";
         /**
            * Get a particular student
         */
         case STUDENT_ID:
            return "vnd.android.cursor.item/vnd.example.students";
         default:
            throw new IllegalArgumentException("Unsupported URI: " + uri);
      }
   }
}
以下将修改AndroidManifest.xml文件的内容。在这里,我们添加了
以下是res / layout / activity_main.xml文件的内容-
确保您具有以下res / values /字符串.xml文件的内容:
    My Application
;
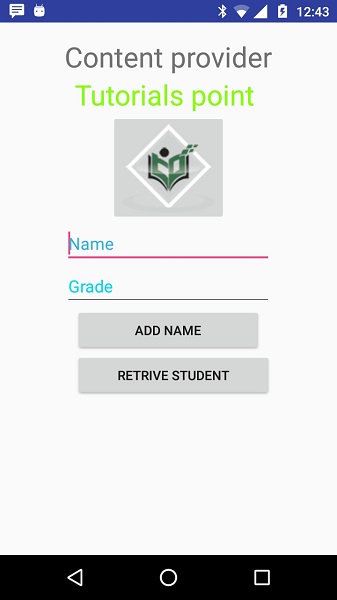
让我们尝试运行刚刚创建的修改后的“我的应用程序”应用程序。我假设您在进行环境设置时已创建了AVD 。要从Android Studio IDE运行该应用,请打开您项目的活动文件之一,然后点击运行 工具栏中的图标。 Android Studio将应用程序安装在您的AVD上并启动它,如果设置和应用程序一切正常,它将显示在“模拟器”窗口之后,请耐心等待,因为这可能需要花费一些时间,具体取决于您的计算机速度-

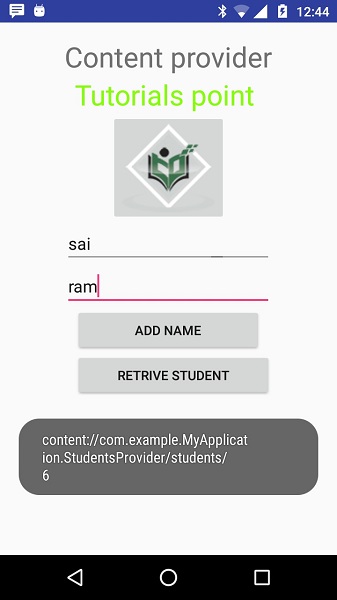
现在让我们输入学生姓名和年级,最后单击“添加姓名”按钮,这将在数据库中添加学生记录,并在底部闪烁一条消息,显示ContentProvider URI以及在数据库中添加的记录号。此操作利用了我们的insert()方法。让我们重复此过程,以在内容提供商的数据库中添加几个学生。

完成在数据库中添加记录的操作后,现在是时候让ContentProvider向我们提供这些记录了,所以让我们单击“检索学生”按钮,它将按我们的实现一一读取并显示所有记录。 query()方法。
您可以通过在MainActivity.java文件中提供回调函数来编写针对更新和删除操作的活动,然后修改用户界面以具有用于更新和删除操作的按钮,其方式与添加和读取操作相同。
这样,您可以使用现有的Content Provider(例如通讯簿),也可以在开发面向数据库的漂亮应用程序时使用Content Provider概念,在其中您可以执行各种数据库操作,如示例中所述,如读取,写入,更新和删除。