📌 相关文章
- Python的叶序模式 |算法植物学的一个单元(1)
- Python的叶序模式 |算法植物学的一个单元
- 单位圆(1)
- 单位圆
- python中的模式(1)
- * python 的模式(1)
- 如何以秒为单位转换帧数 python (1)
- CSS-单位(1)
- CSS |单位
- CSS |单位(1)
- CSS |单位
- CSS-单位
- Python图算法(1)
- Python算法类(1)
- Python图算法
- Python算法类
- 单位转换 (1)
- 模式代码 python (1)
- python 模式 - Python (1)
- python 模式 - Python (1)
- F#单位类型(1)
- F#单位类型
- 模式 - Python 代码示例
- python代码示例中的模式
- 模式 - Python 代码示例
- * python 代码示例的模式
- 如何以秒为单位转换帧数 python - 任何代码示例
- C++ 中的模式(1)
- python 模式 - Python 代码示例
📜 Python中的Phyllotaxis模式| 算法植物学的单位
📅 最后修改于: 2020-04-30 04:43:37 🧑 作者: Mango
简介| 叶序
叶序是植物茎上的叶子排列,叶序螺旋形成了自然界中独特的一类模式。这个词本身来自希腊的phullon,意为“叶子”,而出租车则意为“排列”。
基本的叶序排列包括:
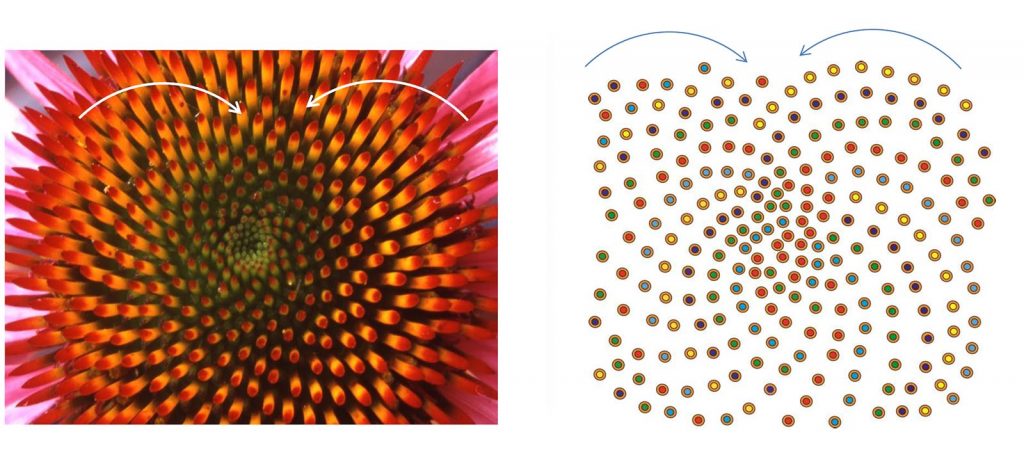
1.螺旋叶序–在螺旋的叶序中,各个花器官在固定的时间间隔内形成,相同的发散角。具有螺旋叶序的花的发散角大约为137.5度,表示遵循斐波那契数列的图案。下图显示了具有顺时针和逆时针螺旋图案的螺旋叶序。


注意事项:
- 斐波那契数列通常描述自然界中发现的螺旋形。它被计算为一个序列,其中前一对数字与该序列中的下一个数字相加。该序列是1、1、2、3、5、8、13、21、34、55、89…。
- 实际上,在顺时针方向上有一组螺旋,而在逆时针方向上有一组螺旋。
- 花器官螺旋遵循偏移的斐波那契数(1 / 2、1 / 3、2 / 5、3 / 8、5 / 13、8 / 21、13 / 34…)的分子和分母集。分子是绕轴返回初始点的次数或转数。分母表示转弯期间启动的器官数。因此,2/5表示绕轴2转和5个器官返回原点。
- 例如在松树中,我们有(2,3),(5,3)和(5,8)叶状,在头盖耳中发现的对是(21,34),(55,34),(55,89)和(89,144)。以及六边形刻度的菠萝,根据样品的大小,可以找到三胞胎(8,13,21)或(13,21,34)。
- 斐波那契序列在叶序中的普遍性通常被称为“叶序之谜”。
其他类型的花卉叶序排列方式是:
2.轮状的叶状轴,3.单轮状的叶状轴,4.复轮状的叶状轴,5.不规则的千轴状。
模式的形成摘要
在某些植物中,美丽的叶子排列被称为叶序轴,遵循许多微妙的数学关系。例如,向日葵头上的小花形成两个相反方向的螺旋:顺时针为55个,逆时针为34个:
- 这些数字是连续的斐波那契数字。
- 交替的斐波那契数的比值由收敛子与φ^(-2)给出,其中φ是黄金比率,据说可以测量植物茎上连续叶片之间的匝数比例;
- 例如:榆木和菩提树1/2,山毛榉和榛树1/3,橡木和苹果2/5,白杨木和玫瑰3/8,柳树和杏仁5/13,等等。
- 植物茎上的每片新叶子都与前一个叶子成一定角度,并且该角度在叶子之间是恒定的:通常约为137.5度。
也就是说,如果您从上方俯视植物,并测量从茎到叶子的直线与下一个叶子的对应直线之间形成的角度,您会发现通常存在一个固定的角度,称为发散角角度。
在这里,我们对螺旋叶序感兴趣,我们将使用乌龟图形编写代码以在Python中形成螺旋叶序模式。
设计代码
- 我们将编写两个函数的代码,一个函数绘制叶序图案,另一个函数绘制花瓣。
- 仅在完成叶序轴图案后才需要绘制花瓣,因此,我们将在drawPhyllPattern()函数内部调用drawPetal()函数,并在绘制Phyllotaxis图案后访问最后的x和y坐标。
- drawPetal()函数将使用乌龟函数和特征绘制花瓣。
要编码后轴图案,我们需要遵循以下方程式:
x = r * cos(θ)
y = r * sin(θ)
#r,θ也可以变化-因此形成叶序模式我们用笛卡尔形式代替
#极性形式:
r = c * sqrt(n)
θ= n * 137.508°
Reduces the problem to optimal packing on a disc, so
    r = c*sqrt(n) is from the area of the circle
        Area = πr² and n fills the Area in some units
        c1 * n/π = r²,    c is 1/sqrt(c1/π)
So, r = some constant c * sqrt(n)
伪代码:Phyllotaxis模式
IMPORT MODULES ( MATH, TURTLE )
FUNCTION - DrawPhyllotaxisPattern( turtle, t length, petalstart, angle = 137.508, size, cspread)
    turtleColor("Black")
    FillColor('"Orange")
    Convert angle to radians (Φ)
    initialize ( xcenter,ycenter ) = ( 0,0 )
    Drawing the Pattern Starts:
    For n in Range ( 0,t ):
        r = cspread * sqrt(n)
        θ = n * Φ
        x = r * cos(θ) + xcenter
            y = r * sin(θ) + ycenter
        TURTLE POSITION(x,y)
        START DRAWING():
        if Drawing pattern ends:
            DrawFlowerPetals()
FUNCTION - DrawFlowerPetals(Turtle, x coordinate, y coordinate)
    DRAW using Turtle methods
Create Turtle  =  gfg
Call DrawPhyllotaxisPattern( gfg, t length, petalstart, angle = 137.508, size, cspread)
END
Python实现1:
import math
import turtle
def drawPhyllPattern(turtle, t, petalstart, angle = 137.508, size = 2, cspread = 4 ):
    """使用螺旋叶序数据打印圆形图案"""
    # 初始化位置
    # turtle.pen(outline=1, pencolor="black", fillcolor="orange")
    turtle.color('black')
    turtle.fillcolor("orange")
    phi = angle * ( math.pi / 180.0 ) #we convert to radian
    xcenter = 0.0
    ycenter = 0.0
    # 在这种情况下,for循环从第一个值迭代直到<4
    for n in range (0, t):
        r = cspread * math.sqrt(n)
        theta = n * phi
        x = r * math.cos(theta) + xcenter
        y = r * math.sin(theta) + ycenter
        # 将乌龟移到该位置并绘制
        turtle.up()
        turtle.setpos(x, y)
        turtle.down()
        # 正确定位乌龟
        turtle.setheading(n * angle)
        if n > petalstart-1:
            turtle.color("yellow")
            drawPetal(turtle, x, y)
        else: turtle.stamp()
def drawPetal(turtle, x, y ):
    turtle.penup()
    turtle.goto(x, y)
    turtle.pendown()
    turtle.color('black')
    turtle.fillcolor('yellow')
    turtle.begin_fill()
    turtle.right(20)
    turtle.forward(70)
    turtle.left(40)
    turtle.forward(70)
    turtle.left(140)
    turtle.forward(70)
    turtle.left(40)
    turtle.forward(70)
    turtle.penup()
    turtle.end_fill() # 这是完成最后一张花瓣所需的
gfg = turtle.Turtle()
gfg.shape("turtle")
gfg.speed(0) # 使乌龟尽可能快地走
drawPhyllPattern(gfg, 200, 160, 137.508 )
gfg.penup()
gfg.forward(1000)
Pyhton实现2:
import math
import turtle
def drawPhyllotacticPattern( t, petalstart, angle = 137.508, size = 2, cspread = 4 ):
        """使用螺旋叶序数据打印圆形图案"""
        # 初始化位置
        turtle.pen(outline=1, pencolor="black", fillcolor="orange")
        # turtle.color("orange")
        phi = angle * ( math.pi / 180.0 )
        xcenter = 0.0
        ycenter = 0.0
        # 在这种情况下,for循环从第一个值迭代直到<4, 所以
        for n in range (0, t):
                r = cspread * math.sqrt(n)
                theta = n * phi
                x = r * math.cos(theta) + xcenter
                y = r * math.sin(theta) + ycenter
                # 将乌龟移到该位置并绘制
                turtle.up()
                turtle.setpos(x, y)
                turtle.down()
                # 正确定位乌龟
                turtle.setheading(n * angle)
                if n > petalstart-1:
                        #turtle.color("yellow")
                        drawPetal(x, y)
                else: turtle.stamp()
def drawPetal( x, y ):
        turtle.up()
        turtle.setpos(x, y)
        turtle.down()
        turtle.begin_fill()
        #turtle.fill(True)
        turtle.pen(outline=1, pencolor="black", fillcolor="yellow")
        turtle.right(20)
        turtle.forward(100)
        turtle.left(40)
        turtle.forward(100)
        turtle.left(140)
        turtle.forward(100)
        turtle.left(40)
        turtle.forward(100)
        turtle.up()
        turtle.end_fill() # this is needed to complete the last petal
turtle.shape("turtle")
turtle.speed(0) # 使乌龟尽可能快地走
drawPhyllotacticPattern( 200, 160, 137.508, 4, 10 )
turtle.exitonclick() # 闲置时让您x离开窗口
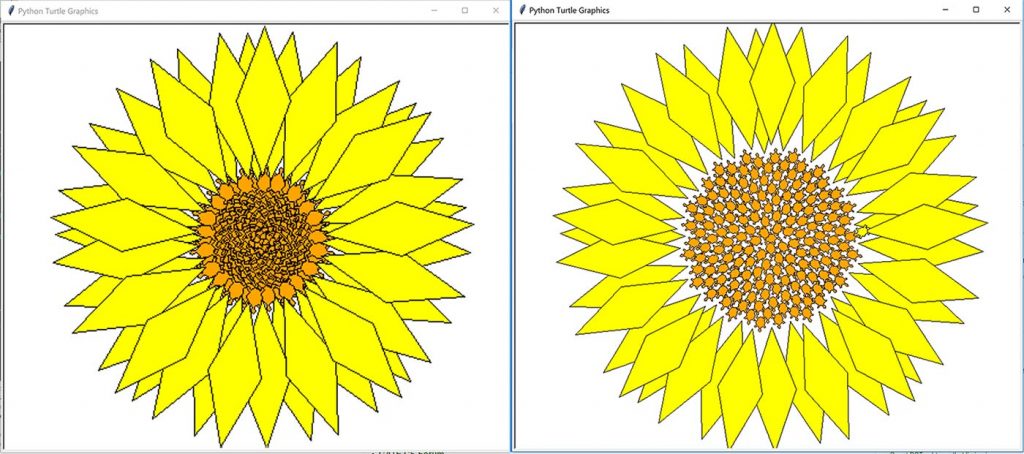
输出: Phyllotaxis模式。

