Spring Data JPA – 从 MySQL 中查找记录
Spring Boot 建立在 Spring 之上,包含了 Spring 的所有特性。并且由于其快速的生产就绪环境使开发人员能够直接专注于逻辑而不是为配置和设置而苦苦挣扎,如今它正成为开发人员的最爱。 Spring Boot 是一个基于微服务的框架,在其中制作可用于生产的应用程序只需要很少的时间。 Java持久化 API 就像一个接口,包含了 MySQL 表中用于数据操作的大部分方法,而 hibernate 是这些方法的实现,因此我们不必创建任何方法来在 MySQL 中插入数据。在本文中,我们将讨论如何使用主键从 MySQL 表中查找特定记录。
JPARepositery<>.findById() method is used for finding the records from mysql.分步实施
去 Spring Initializr 根据需求填写详细信息。单击生成将下载启动项目。解压缩 zip 文件。

Pom.xml
XML
    4.0.0

        org.springframework.boot
        spring-boot-starter-parent
        2.6.1


    com.example
    SpringBootApp
    0.0.1-SNAPSHOT
    SpringBootApp
    Demo project for Spring Boot

        11


            org.springframework.boot
            spring-boot-starter-data-jpa


            org.springframework.boot
            spring-boot-starter-web


            mysql
            mysql-connector-java
            runtime


            org.springframework.boot
            spring-boot-starter-test
            test


                org.springframework.boot
                spring-boot-maven-plugin
Java
@Entity
public class User {
    @Id
    @GeneratedValue(strategy = GenerationType.AUTO)
    int id;
    String name;
    User() {}
    User(int id, String name)
    {
        this.id = id;
        this.name = name;
    }
}
Java
import org.springframework.data.jpa.repository.JpaRepository;

interface UserRepo extends JpaRepository {

}
Java
package com.example.SpringBootApp;
import org.springframework.beans.factory.annotation.Autowired;
import org.springframework.boot.CommandLineRunner;
import org.springframework.boot.SpringApplication;
import org.springframework.boot.autoconfigure.SpringBootApplication;
import java.util.Optional;
@SpringBootApplication
public class SpringBootAppApplication implements CommandLineRunner {
@Autowired
UserRepo ob;
public static void main(String[] args) {
SpringApplication.run(SpringBootAppApplication.class, args);
}
@Override
public void run(String... args) throws Exception {
User record=new User(1,"Aayush");
ob.save(record);
Optional record=ob.findById(1);
record.stream().forEach(e->{
System.out.print(e.id+" "+e.name);
});
}
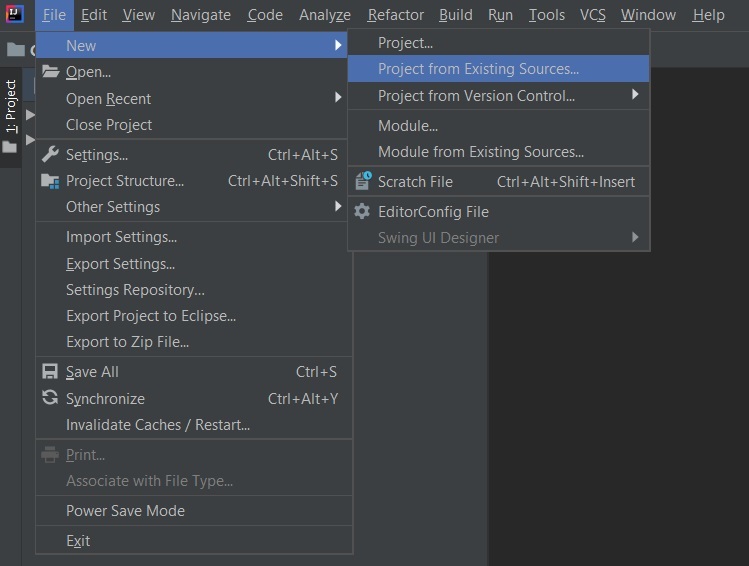
} 解压缩 zip 文件。现在打开一个合适的IDE,然后转到File->New->Project from existing sources->Springbootapp 并选择pom.xml。在提示时单击导入更改并等待项目同步
注意:在 Import Project for Maven 窗口中,确保选择与创建项目时选择的 JDK 版本相同的版本。对于数据库操作,我们必须使用数据库配置 Spring 应用程序,还需要在执行 Spring 项目之前添加数据库配置。所有配置都添加在 Spring 项目的 application.properties 文件中。
application.properties 文件:
spring.datasource.url=jdbc:mysql://localhost:3306/user
spring.datasource.username=root
spring.datasource.password=Aayush
spring.jpa.hibernate.ddl-auto=update
项目结构:

用户。 Java: (MySQL表的表结构)
Java
@Entity
public class User {
    @Id
    @GeneratedValue(strategy = GenerationType.AUTO)
    int id;
    String name;
    User() {}
    User(int id, String name)
    {
        this.id = id;
        this.name = name;
    }
}
UserRepo :(此文件用于扩展具有休眠实现的 JPA 方法)
Java
import org.springframework.data.jpa.repository.JpaRepository;

interface UserRepo extends JpaRepository {

}
SpringBootApp应用程序:
Java
package com.example.SpringBootApp;

import org.springframework.beans.factory.annotation.Autowired;
import org.springframework.boot.CommandLineRunner;
import org.springframework.boot.SpringApplication;
import org.springframework.boot.autoconfigure.SpringBootApplication;

import java.util.Optional;

@SpringBootApplication
public class SpringBootAppApplication implements  CommandLineRunner {

    @Autowired
    UserRepo ob;
    public static void main(String[] args) {
        SpringApplication.run(SpringBootAppApplication.class, args);
    }

    @Override
    public void run(String... args) throws Exception {
        User record=new User(1,"Aayush");
        ob.save(record);
        Optional record=ob.findById(1);
        record.stream().forEach(e->{
            System.out.print(e.id+" "+e.name);
        });

    }
}
运行主应用程序:
