与 HTML 一起Flutter
Flutter与它的库和社区一起成长。早些时候,我们可以结合使用机器学习和Flutter来创建强大的应用程序。现在,我们也可以将Flutter和 HTML 结合起来。如果我们想要在使用Flutter构建的应用程序中呈现静态 HTML 网页。有了这个flutter_html Flutter包,我们就可以在Flutter应用中渲染整个网页。
HTML 和Flutter是不同的,如果我们想在Flutter中用 CSS 渲染一个 HTML 页面,就显得很奇怪了。这意味着 HTML 代码如何使用Flutter在屏幕上呈现。好吧,这听起来很困难,但直到Flutter中的 flutter_html 包没有发布。在本文中,我们将通过创建一个示例应用程序来了解这个Flutter库的工作原理。
执行:
第 1 步:首先,创建一个Flutter项目。
第二步:添加依赖
在pubspec.yaml文件中,将flutter_html包添加到依赖项部分。

要安装它,请在 IDE 的终端中运行 pub get,或者只需在 Windows 中按 CTRL+S 即可添加它。
第三步:导入依赖。
在主要。 dart文件,将依赖项导入为 –
Dart
import 'package:flutter_html/flutter_html.dart';HTML
const htmlData = r"""
Header 1
Header 2
Header 3
Header 4
Header 5
Header 6
This is HTML page that we want to integrate with Flutter.
""";Dart
Html(
          data: htmlData,
          tagsList: Html.tags,
          style: {
            "table": Style(
              backgroundColor: Color.fromARGB(0x50, 0xee, 0xee, 0xee),
            ),
            "tr": Style(
              border: Border(bottom: BorderSide(color: Colors.grey)),
            ),
            "th": Style(
              padding: EdgeInsets.all(6),
              backgroundColor: Colors.grey,
            ),
            "td": Style(
              padding: EdgeInsets.all(6),
              alignment: Alignment.topLeft,
            ),
            'h5': Style(maxLines: 2, textOverflow: TextOverflow.ellipsis),
          },
        ),
Dart
import 'package:flutter/material.dart';
import 'package:flutter_html/flutter_html.dart';
void main() => runApp(new MyApp());
class MyApp extends StatelessWidget {
// This widget is the root of your application.
@override
Widget build(BuildContext context) {
return new MaterialApp(
title: 'Flutter Demo',
theme: new ThemeData(
primarySwatch: Colors.green,
),
home: MyHomePage(),
);
}
}
class MyHomePage extends StatefulWidget {
@override
_MyHomePageState createState() => new _MyHomePageState();
}
const htmlData = r"""
Header 1
Header 2
Header 3
Header 4
Header 5
Header 6
This is HTML page that we want to integrate with Flutter.
""";
class _MyHomePageState extends State {
@override
Widget build(BuildContext context) {
return new Scaffold(
appBar: AppBar(
title: Text('GeeksForGeeks'),
centerTitle: true,
),
body: SingleChildScrollView(
child: Html(
data: htmlData,
tagsList: Html.tags,
style: {
"table": Style(
backgroundColor: Color.fromARGB(0x50, 0xee, 0xee, 0xee),
),
"tr": Style(
border: Border(bottom: BorderSide(color: Colors.grey)),
),
"th": Style(
padding: EdgeInsets.all(6),
backgroundColor: Colors.grey,
),
"td": Style(
padding: EdgeInsets.all(6),
alignment: Alignment.topLeft,
),
'h5': Style(maxLines: 2, textOverflow: TextOverflow.ellipsis),
},
),
),
);
}
} Dart
void main() {
import 'package:flutter/material.dart';
import 'package:flutter_html/flutter_html.dart';
void main() => runApp(new MyApp());
class MyApp extends StatelessWidget {
// This widget is the root of your application.
@override
Widget build(BuildContext context) {
return new MaterialApp(
debugShowCheckedModeBanner: false,
title: 'Flutter Tutorial',
theme: new ThemeData(
primarySwatch: Colors.green,
),
home: MyHomePage(),
);
}
}
class MyHomePage extends StatefulWidget {
@override
_MyHomePageState createState() => new _MyHomePageState();
}
const htmlData = r"""
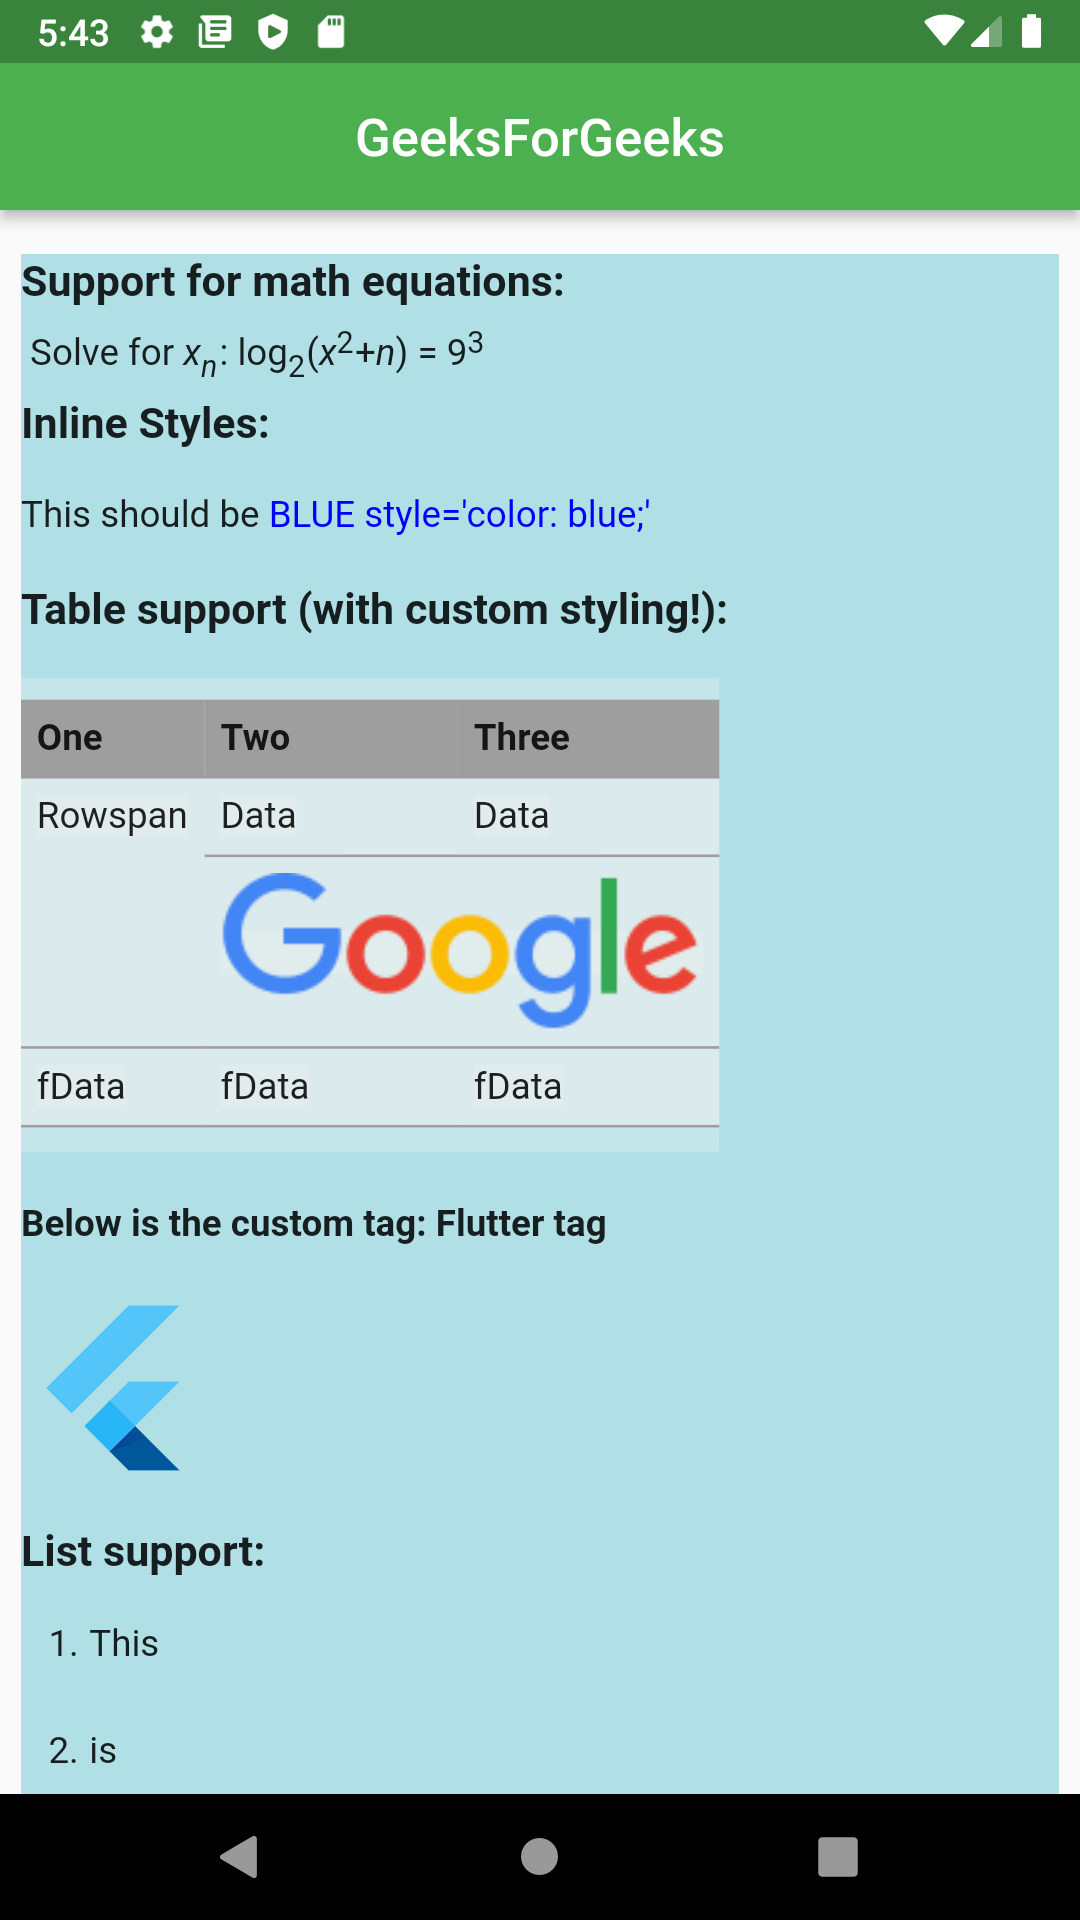
Support for math equations:
Solve for xn: log2(x2+n) = 93
Inline Styles:
This should be BLUE style='color: blue;'
Table support (with custom styling!):
One Two Three
Rowspan Data Data

fData fData fData
Below is the custom tag: Flutter tag
List support:
- This
-
is
-
ordered
- This is a
- nested
- unordered list
Images are also supported:
Network png

Network svg

Data uri (with base64 support)


 """;
class _MyHomePageState extends State
""";
class _MyHomePageState extends State {
@override
Widget build(BuildContext context) {
return new Scaffold(
appBar: AppBar(
title: Text('GeeksForGeeks'),
centerTitle: true,
),
body: SingleChildScrollView(
child: Html(
data: htmlData,
tagsList: Html.tags..add("flutter"),
style: {
// add style to the tags in HTML code
"table": Style(
backgroundColor: Color.fromARGB(0x50, 0xee, 0xee, 0xee),
),
"tr": Style(
border: Border(bottom: BorderSide(color: Colors.grey)),
),
"th": Style(
padding: EdgeInsets.all(6),
backgroundColor: Colors.grey,
),
"td": Style(
padding: EdgeInsets.all(6),
alignment: Alignment.topLeft,
),
'h5': Style(maxLines: 2, textOverflow: TextOverflow.ellipsis),
},
customRender: {
"table": (context, child) {
return SingleChildScrollView(
scrollDirection: Axis.horizontal,
child: (context.tree as TableLayoutElement).toWidget(context),
);
},
// adding customizable tag
"flutter": (RenderContext context, Widget child) {
// giving style to Flutter tag with FlutterLogo() widget
return FlutterLogo(
style: (context.tree.element!.attributes['horizontal'] != null)
? FlutterLogoStyle.horizontal
: FlutterLogoStyle.markOnly,
textColor: context.style.color!,
size: context.style.fontSize!.size! * 5,
);
},
},
customImageRenders: {
// We can give similar features to elements
// from the same domain like for flutter.dev
// We can define any number of networkSourceMatcher
networkSourceMatcher(domains: ["flutter.dev"]):
(context, attributes, element) {
return FlutterLogo(size: 36);
},
networkSourceMatcher(domains: ["mydomain.com"]): networkImageRender(
headers: {"Custom-Header": "some-value"},
altWidget: (alt) => Text(alt ?? ""),
loadingWidget: () => Text("Loading..."),
),
// If relative paths starts with /wiki,
// prefix them with a base url
(attr, _) =>
attr["src"] != null && attr["src"]!.startsWith("/wiki"):
networkImageRender(
mapUrl: (url) => "https://upload.wikimedia.org" + url!),
// If links for images are broken use Custom placeholder
// image
networkSourceMatcher():
networkImageRender(altWidget: (_) => FlutterLogo()),
},
onCssParseError: (css, messages) {
//If error occurs while applying CSS to HTML
print("css that errored: $css");
print("error messages:");
messages.forEach((element) {
print(element);
});
},
),
),
);
}
} 第 4 步:获取 HTML 页面。
现在,在Flutter中获取我们想要在屏幕上显示的 HTML 页面。例如,我们采用 HTML 示例代码:
HTML
const htmlData = r"""
Header 1
Header 2
Header 3
Header 4
Header 5
Header 6
This is HTML page that we want to integrate with Flutter.
""";
我们不能将htmlData分配给 Text 小部件,我们必须使用 flutter_html 包在应用程序上呈现这个htmlData 。
第 5 步:使用 HTML() 小部件并为其属性赋值。我们将htmlData分配给它的 data 属性,并将所有 Html 标签分配给tagsList 。
Dart
Html(
          data: htmlData,
          tagsList: Html.tags,
          style: {
            "table": Style(
              backgroundColor: Color.fromARGB(0x50, 0xee, 0xee, 0xee),
            ),
            "tr": Style(
              border: Border(bottom: BorderSide(color: Colors.grey)),
            ),
            "th": Style(
              padding: EdgeInsets.all(6),
              backgroundColor: Colors.grey,
            ),
            "td": Style(
              padding: EdgeInsets.all(6),
              alignment: Alignment.topLeft,
            ),
            'h5': Style(maxLines: 2, textOverflow: TextOverflow.ellipsis),
          },
        ),
源代码:
Dart
import 'package:flutter/material.dart';
import 'package:flutter_html/flutter_html.dart';
void main() => runApp(new MyApp());
class MyApp extends StatelessWidget {
// This widget is the root of your application.
@override
Widget build(BuildContext context) {
return new MaterialApp(
title: 'Flutter Demo',
theme: new ThemeData(
primarySwatch: Colors.green,
),
home: MyHomePage(),
);
}
}
class MyHomePage extends StatefulWidget {
@override
_MyHomePageState createState() => new _MyHomePageState();
}
const htmlData = r"""
Header 1
Header 2
Header 3
Header 4
Header 5
Header 6
This is HTML page that we want to integrate with Flutter.
""";
class _MyHomePageState extends State {
@override
Widget build(BuildContext context) {
return new Scaffold(
appBar: AppBar(
title: Text('GeeksForGeeks'),
centerTitle: true,
),
body: SingleChildScrollView(
child: Html(
data: htmlData,
tagsList: Html.tags,
style: {
"table": Style(
backgroundColor: Color.fromARGB(0x50, 0xee, 0xee, 0xee),
),
"tr": Style(
border: Border(bottom: BorderSide(color: Colors.grey)),
),
"th": Style(
padding: EdgeInsets.all(6),
backgroundColor: Colors.grey,
),
"td": Style(
padding: EdgeInsets.all(6),
alignment: Alignment.topLeft,
),
'h5': Style(maxLines: 2, textOverflow: TextOverflow.ellipsis),
},
),
),
);
}
}
输出:

第 6 步:我们可以创建自定义标签,然后使用tagList属性tagList将它们添加到 HTML 标签列表中:HTML.tags..add(' flutter')。就像这里我们正在创建一个自定义的“flutter”标签并将其添加到 HTML 标签列表中。例如:
我们需要将 HTML 数据分配给 HTML() 小部件的 data 属性。
每个 HTML 标签,无论是表格标签还是有序列表标签,都支持自定义标签功能。同样在 HTML() 小部件样式属性中,我们可以为 HTML 标签和自定义标签赋予样式。我们还可以为从网络和域渲染的图像添加样式。为了更好地理解,请参见下面的代码。
源代码:
Dart
void main() {
import 'package:flutter/material.dart';
import 'package:flutter_html/flutter_html.dart';
void main() => runApp(new MyApp());
class MyApp extends StatelessWidget {
// This widget is the root of your application.
@override
Widget build(BuildContext context) {
return new MaterialApp(
debugShowCheckedModeBanner: false,
title: 'Flutter Tutorial',
theme: new ThemeData(
primarySwatch: Colors.green,
),
home: MyHomePage(),
);
}
}
class MyHomePage extends StatefulWidget {
@override
_MyHomePageState createState() => new _MyHomePageState();
}
const htmlData = r"""
Support for math equations:
Solve for xn: log2(x2+n) = 93
Inline Styles:
This should be BLUE style='color: blue;'
Table support (with custom styling!):
One Two Three
Rowspan Data Data
fData fData fData
Below is the custom tag: Flutter tag
List support:
- This
-
is
-
ordered
- This is a
- nested
- unordered list
Images are also supported:
Network png
Network svg
Data uri (with base64 support)
""";
class _MyHomePageState extends State {
@override
Widget build(BuildContext context) {
return new Scaffold(
appBar: AppBar(
title: Text('GeeksForGeeks'),
centerTitle: true,
),
body: SingleChildScrollView(
child: Html(
data: htmlData,
tagsList: Html.tags..add("flutter"),
style: {
// add style to the tags in HTML code
"table": Style(
backgroundColor: Color.fromARGB(0x50, 0xee, 0xee, 0xee),
),
"tr": Style(
border: Border(bottom: BorderSide(color: Colors.grey)),
),
"th": Style(
padding: EdgeInsets.all(6),
backgroundColor: Colors.grey,
),
"td": Style(
padding: EdgeInsets.all(6),
alignment: Alignment.topLeft,
),
'h5': Style(maxLines: 2, textOverflow: TextOverflow.ellipsis),
},
customRender: {
"table": (context, child) {
return SingleChildScrollView(
scrollDirection: Axis.horizontal,
child: (context.tree as TableLayoutElement).toWidget(context),
);
},
// adding customizable tag
"flutter": (RenderContext context, Widget child) {
// giving style to Flutter tag with FlutterLogo() widget
return FlutterLogo(
style: (context.tree.element!.attributes['horizontal'] != null)
? FlutterLogoStyle.horizontal
: FlutterLogoStyle.markOnly,
textColor: context.style.color!,
size: context.style.fontSize!.size! * 5,
);
},
},
customImageRenders: {
// We can give similar features to elements
// from the same domain like for flutter.dev
// We can define any number of networkSourceMatcher
networkSourceMatcher(domains: ["flutter.dev"]):
(context, attributes, element) {
return FlutterLogo(size: 36);
},
networkSourceMatcher(domains: ["mydomain.com"]): networkImageRender(
headers: {"Custom-Header": "some-value"},
altWidget: (alt) => Text(alt ?? ""),
loadingWidget: () => Text("Loading..."),
),
// If relative paths starts with /wiki,
// prefix them with a base url
(attr, _) =>
attr["src"] != null && attr["src"]!.startsWith("/wiki"):
networkImageRender(
mapUrl: (url) => "https://upload.wikimedia.org" + url!),
// If links for images are broken use Custom placeholder
// image
networkSourceMatcher():
networkImageRender(altWidget: (_) => FlutterLogo()),
},
onCssParseError: (css, messages) {
//If error occurs while applying CSS to HTML
print("css that errored: $css");
print("error messages:");
messages.forEach((element) {
print(element);
});
},
),
),
);
}
}
输出: