Flutter – RFlutter 警报
在Flutter中, rflutter_alert有助于在应用程序中轻松创建警报。这是在Flutter中创建警报的可定制且最佳的方式。在本文中,我们将看到我们可以使用这个很棒的Flutter库创建不同样式的警报。按照文章了解它。
添加依赖:
要安装rflutter_alert ,请将其添加到pubspec.yaml文件的依赖项部分下。然后使用 pub get 对其进行配置。

导入依赖:
要使用这个包,请在 main.xml 中导入它。 dart文件或我们要在其中使用警报功能的任何文件。
Dart
import 'package:rflutter_alert/rflutter_alert.dart';Dart
ElevatedButton(
       child: Text("Click Me"),
       onPressed: () {
          Alert(
               context: context,
               title: "RFlutter Alert",
               desc: "GeeksForGeeks is awesome.").show();
            },
 ),
Dart
Alert(
                context: context,
                type: AlertType.info,
                title: "GeeksForGeeks",
                desc: "Create more awesome alerts with RFlutter Alert.",
                buttons: [
                  DialogButton(
                    child: Text(
                      "Done",
                      style: TextStyle(color: Colors.white, fontSize: 20),
                    ),
                    onPressed: () => Navigator.pop(context),
                    width: 120,
                  ),
                  DialogButton(
                    child: Text(
                      "Cancel",
                      style: TextStyle(color: Colors.white, fontSize: 20),
                    ),
                    onPressed: () => Navigator.pop(context),
                    width: 120,
                  )
                ],
              ).show();
Dart
Alert(
       context: context,
       title: "GeeksForGeeks",
       desc: "Create Awesome alerts with RFlutter Alert.",
       image: Image.network("https://i.stack.imgur.com/xLOYo.png"),
 ).show();
Dart
Alert(
                  context: context,
                  title: "Sign Up",
                  content: Column(
                    children: [
                      TextField(
                        decoration: InputDecoration(
                          icon: Icon(Icons.email),
                          labelText: 'Email',
                        ),
                      ),
                      TextField(
                        obscureText: true,
                        decoration: InputDecoration(
                          icon: Icon(Icons.lock),
                          labelText: 'Password',
                        ),
                      ),
                    ],
                  ),
                  buttons: [
                    DialogButton(
                      onPressed: () => Navigator.pop(context),
                      child: Text(
                        "SIGN UP",
                        style: TextStyle(color: Colors.white, fontSize: 20),
                      ),
                    )
                  ]).show();
Dart
Alert(
                       title: "GeeksForGeeks",
                       context: context,
                       style: AlertStyle(
                         alertAlignment: Alignment.center,
                         animationType: AnimationType.fromBottom,
                         isCloseButton: false,
                         isOverlayTapDismiss: false,
                         descStyle: TextStyle(fontWeight: FontWeight.bold),
                         descTextAlign: TextAlign.start,
                         animationDuration: Duration(milliseconds: 300),
                         alertBorder: RoundedRectangleBorder(
                           borderRadius: BorderRadius.circular(0.0),
                           side: BorderSide(
                             color: Colors.red,
                           ),
                         ),
                         titleStyle: TextStyle(
                           color: Colors.green,
                         ),
                       )).show();
Dart
import 'package:flutter/material.dart';
import 'package:rflutter_alert/rflutter_alert.dart';

void main() {
  runApp(const MyApp());
}

class MyApp extends StatelessWidget {
  const MyApp({Key? key}) : super(key: key);

  @override
  Widget build(BuildContext context) {
    return MaterialApp(
      debugShowCheckedModeBanner: false,
      title: 'RFlutter Alert Tutorial',
      theme: ThemeData(
        primarySwatch: Colors.green,
      ),
      home: MyHomePage(),
    );
  }
}

class MyHomePage extends StatefulWidget {
  @override
  State createState() => _MyHomePageState();
}

class _MyHomePageState extends State {
  @override
  Widget build(BuildContext context) {
    return Scaffold(
      appBar: AppBar(
        title: Text("GeeksForGeeks"),
        centerTitle: true,
      ),
      body: Container(
        child: Center(
          child: Column(
            children: [
              SizedBox(height: 100),
              ElevatedButton(
                child: Text("Click One"),
                onPressed: () {
                  Alert(
                          context: context,
                          title: "RFlutter Alert",
                          desc: "GeeksForGeeks is awesome.")
                      .show();
                },
              ),
              ElevatedButton(
                  onPressed: () {
                    Alert(
                      context: context,
                      type: AlertType.info,
                      title: "GeeksForGeeks",
                      desc: "Create more awesome alerts with RFlutter Alert.",
                      buttons: [
                        DialogButton(
                          child: Text(
                            "Done",
                            style: TextStyle(color: Colors.white, fontSize: 20),
                          ),
                          onPressed: () => Navigator.pop(context),
                          width: 120,
                        ),
                        DialogButton(
                          child: Text(
                            "Cancel",
                            style: TextStyle(color: Colors.white, fontSize: 20),
                          ),
                          onPressed: () => Navigator.pop(context),
                          width: 120,
                        )
                      ],
                    ).show();
                  },
                  child: Text("Click Two")),
              ElevatedButton(
                  onPressed: () {
                    Alert(
                      context: context,
                      title: "GeeksForGeeks",
                      desc: "Create Awesome alerts with RFlutter Alert.",
                      image:
                          Image.network("https://i.stack.imgur.com/xLOYo.png"),
                    ).show();
                  },
                  child: Text("Click Three")),
              ElevatedButton(
                  onPressed: () {
                    Alert(
                        context: context,
                        title: "Sign Up",
                        content: Column(
                          children: [
                            TextField(
                              decoration: InputDecoration(
                                icon: Icon(Icons.email),
                                labelText: 'Email',
                              ),
                            ),
                            TextField(
                              obscureText: true,
                              decoration: InputDecoration(
                                icon: Icon(Icons.lock),
                                labelText: 'Password',
                              ),
                            ),
                          ],
                        ),
                        buttons: [
                          DialogButton(
                            onPressed: () => Navigator.pop(context),
                            child: Text(
                              "SIGN UP",
                              style:
                                  TextStyle(color: Colors.white, fontSize: 20),
                            ),
                          )
                        ]).show();
                  },
                  child: Text("Click Four")),
              ElevatedButton(
                  onPressed: () {
                    Alert(
                        title: "GeeksForGeeks",
                        context: context,
                        style: AlertStyle(
                          alertAlignment: Alignment.center,
                          animationType: AnimationType.fromBottom,
                          isCloseButton: false,
                          isOverlayTapDismiss: false,
                          descStyle: TextStyle(fontWeight: FontWeight.bold),
                          descTextAlign: TextAlign.start,
                          animationDuration: Duration(milliseconds: 300),
                          alertBorder: RoundedRectangleBorder(
                            borderRadius: BorderRadius.circular(0.0),
                            side: BorderSide(
                              color: Colors.red,
                            ),
                          ),
                          titleStyle: TextStyle(
                            color: Colors.green,
                          ),
                        )).show();
                  },
                  child: Text("Click Five"))
            ],
          ),
        ),
      ),
    );
  }
}
执行:
要创建警报对话框,我们需要使用 Alert() 小部件。它需要一个上下文参数,并且 show() 方法用于在屏幕上呈现警报。此小部件提供的功能是:
- 上下文(必需)
- 细绳? ID
- 警报类型?类型
- AlertStyle 样式 = 常量 AlertStyle()
- 边缘插入?填充
- 小部件?图片
- 细绳?标题
- 细绳?描述
- 小部件内容 = const SizedBox()
- 列表<对话框按钮>?纽扣
- 函数?关闭函数
- 小部件?关闭图标
- bool onWillPopActive = false
- 小部件函数(BuildContext、Animation
、Animation 、Widget)?警报动画 - bool useRootNavigator = true,
简单警报:
Dart
ElevatedButton(
       child: Text("Click Me"),
       onPressed: () {
          Alert(
               context: context,
               title: "RFlutter Alert",
               desc: "GeeksForGeeks is awesome.").show();
            },
 ),
输出:

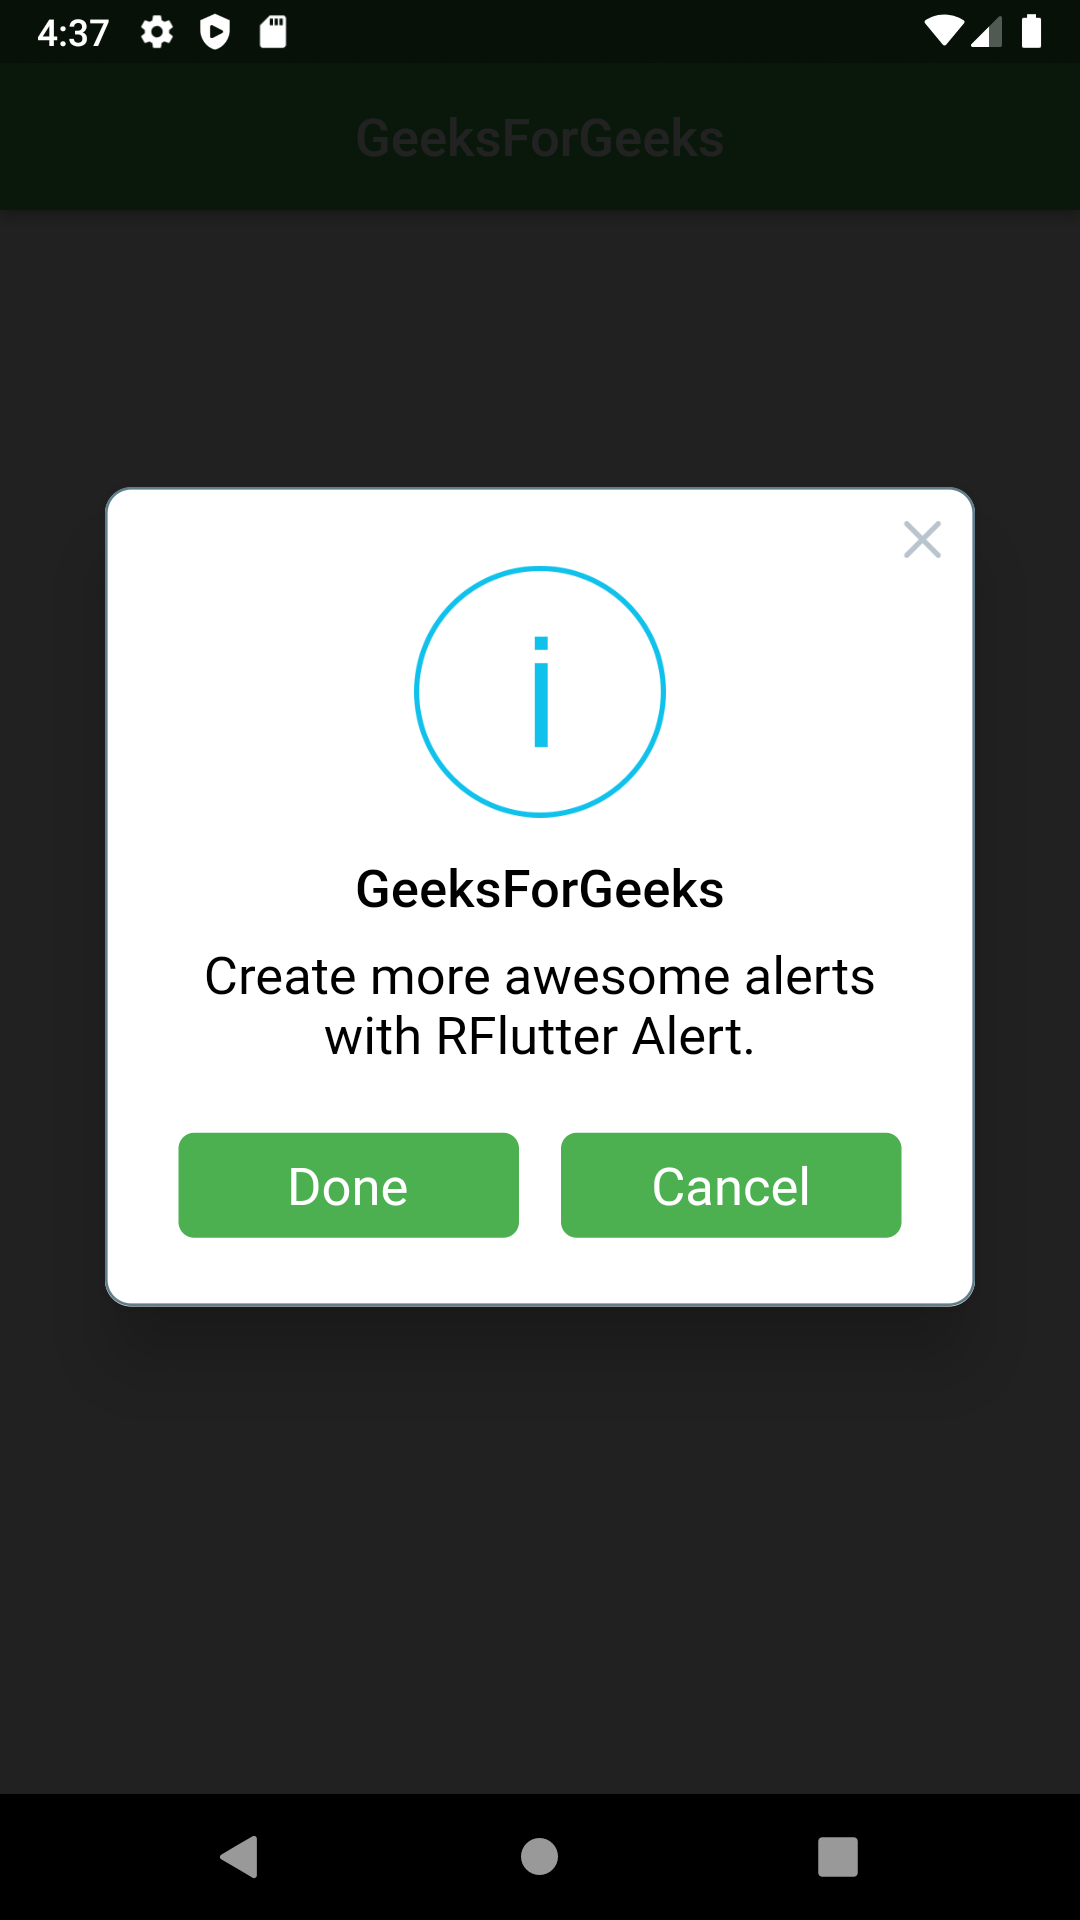
带有按钮的警报:
Dart
Alert(
                context: context,
                type: AlertType.info,
                title: "GeeksForGeeks",
                desc: "Create more awesome alerts with RFlutter Alert.",
                buttons: [
                  DialogButton(
                    child: Text(
                      "Done",
                      style: TextStyle(color: Colors.white, fontSize: 20),
                    ),
                    onPressed: () => Navigator.pop(context),
                    width: 120,
                  ),
                  DialogButton(
                    child: Text(
                      "Cancel",
                      style: TextStyle(color: Colors.white, fontSize: 20),
                    ),
                    onPressed: () => Navigator.pop(context),
                    width: 120,
                  )
                ],
              ).show();
输出:

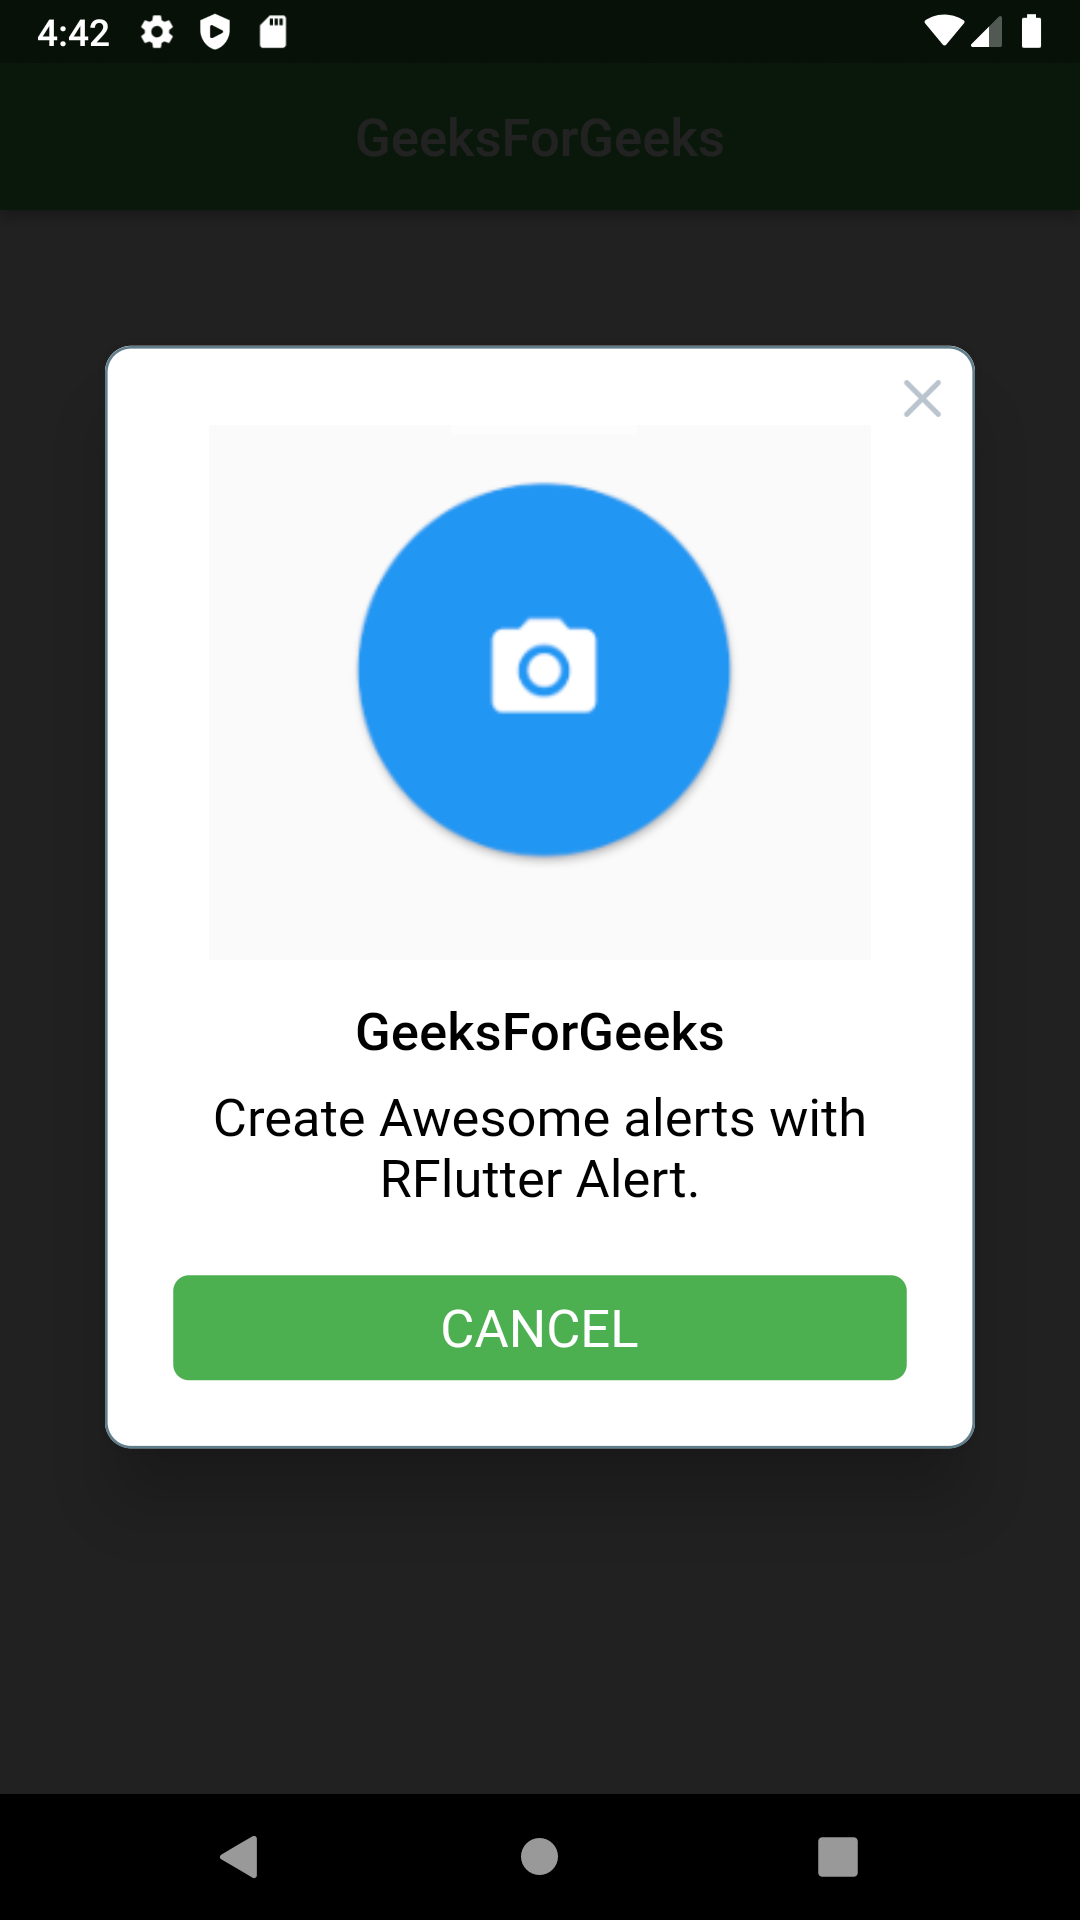
带有图像的警报:
Dart
Alert(
       context: context,
       title: "GeeksForGeeks",
       desc: "Create Awesome alerts with RFlutter Alert.",
       image: Image.network("https://i.stack.imgur.com/xLOYo.png"),
 ).show();
输出:

定制警报:
Dart
Alert(
                  context: context,
                  title: "Sign Up",
                  content: Column(
                    children: [
                      TextField(
                        decoration: InputDecoration(
                          icon: Icon(Icons.email),
                          labelText: 'Email',
                        ),
                      ),
                      TextField(
                        obscureText: true,
                        decoration: InputDecoration(
                          icon: Icon(Icons.lock),
                          labelText: 'Password',
                        ),
                      ),
                    ],
                  ),
                  buttons: [
                    DialogButton(
                      onPressed: () => Navigator.pop(context),
                      child: Text(
                        "SIGN UP",
                        style: TextStyle(color: Colors.white, fontSize: 20),
                      ),
                    )
                  ]).show();
输出:

动画警报:
我们还可以使用animationType属性将动画添加到Alert()小部件。如果我们希望警报从顶部弹出,我们可以使用AnimationType.fromTop ,如果从底部弹出,我们可以使用AnimationType.fromBottom。我们还可以使用AlertStyle() 为其赋予动画持续时间和自定义样式。
Dart
Alert(
                       title: "GeeksForGeeks",
                       context: context,
                       style: AlertStyle(
                         alertAlignment: Alignment.center,
                         animationType: AnimationType.fromBottom,
                         isCloseButton: false,
                         isOverlayTapDismiss: false,
                         descStyle: TextStyle(fontWeight: FontWeight.bold),
                         descTextAlign: TextAlign.start,
                         animationDuration: Duration(milliseconds: 300),
                         alertBorder: RoundedRectangleBorder(
                           borderRadius: BorderRadius.circular(0.0),
                           side: BorderSide(
                             color: Colors.red,
                           ),
                         ),
                         titleStyle: TextStyle(
                           color: Colors.green,
                         ),
                       )).show();
完整源代码:
Dart
import 'package:flutter/material.dart';
import 'package:rflutter_alert/rflutter_alert.dart';

void main() {
  runApp(const MyApp());
}

class MyApp extends StatelessWidget {
  const MyApp({Key? key}) : super(key: key);

  @override
  Widget build(BuildContext context) {
    return MaterialApp(
      debugShowCheckedModeBanner: false,
      title: 'RFlutter Alert Tutorial',
      theme: ThemeData(
        primarySwatch: Colors.green,
      ),
      home: MyHomePage(),
    );
  }
}

class MyHomePage extends StatefulWidget {
  @override
  State createState() => _MyHomePageState();
}

class _MyHomePageState extends State {
  @override
  Widget build(BuildContext context) {
    return Scaffold(
      appBar: AppBar(
        title: Text("GeeksForGeeks"),
        centerTitle: true,
      ),
      body: Container(
        child: Center(
          child: Column(
            children: [
              SizedBox(height: 100),
              ElevatedButton(
                child: Text("Click One"),
                onPressed: () {
                  Alert(
                          context: context,
                          title: "RFlutter Alert",
                          desc: "GeeksForGeeks is awesome.")
                      .show();
                },
              ),
              ElevatedButton(
                  onPressed: () {
                    Alert(
                      context: context,
                      type: AlertType.info,
                      title: "GeeksForGeeks",
                      desc: "Create more awesome alerts with RFlutter Alert.",
                      buttons: [
                        DialogButton(
                          child: Text(
                            "Done",
                            style: TextStyle(color: Colors.white, fontSize: 20),
                          ),
                          onPressed: () => Navigator.pop(context),
                          width: 120,
                        ),
                        DialogButton(
                          child: Text(
                            "Cancel",
                            style: TextStyle(color: Colors.white, fontSize: 20),
                          ),
                          onPressed: () => Navigator.pop(context),
                          width: 120,
                        )
                      ],
                    ).show();
                  },
                  child: Text("Click Two")),
              ElevatedButton(
                  onPressed: () {
                    Alert(
                      context: context,
                      title: "GeeksForGeeks",
                      desc: "Create Awesome alerts with RFlutter Alert.",
                      image:
                          Image.network("https://i.stack.imgur.com/xLOYo.png"),
                    ).show();
                  },
                  child: Text("Click Three")),
              ElevatedButton(
                  onPressed: () {
                    Alert(
                        context: context,
                        title: "Sign Up",
                        content: Column(
                          children: [
                            TextField(
                              decoration: InputDecoration(
                                icon: Icon(Icons.email),
                                labelText: 'Email',
                              ),
                            ),
                            TextField(
                              obscureText: true,
                              decoration: InputDecoration(
                                icon: Icon(Icons.lock),
                                labelText: 'Password',
                              ),
                            ),
                          ],
                        ),
                        buttons: [
                          DialogButton(
                            onPressed: () => Navigator.pop(context),
                            child: Text(
                              "SIGN UP",
                              style:
                                  TextStyle(color: Colors.white, fontSize: 20),
                            ),
                          )
                        ]).show();
                  },
                  child: Text("Click Four")),
              ElevatedButton(
                  onPressed: () {
                    Alert(
                        title: "GeeksForGeeks",
                        context: context,
                        style: AlertStyle(
                          alertAlignment: Alignment.center,
                          animationType: AnimationType.fromBottom,
                          isCloseButton: false,
                          isOverlayTapDismiss: false,
                          descStyle: TextStyle(fontWeight: FontWeight.bold),
                          descTextAlign: TextAlign.start,
                          animationDuration: Duration(milliseconds: 300),
                          alertBorder: RoundedRectangleBorder(
                            borderRadius: BorderRadius.circular(0.0),
                            side: BorderSide(
                              color: Colors.red,
                            ),
                          ),
                          titleStyle: TextStyle(
                            color: Colors.green,
                          ),
                        )).show();
                  },
                  child: Text("Click Five"))
            ],
          ),
        ),
      ),
    );
  }
}
输出: