Flutter - 使用 Flash 的 Flashbar、Toast 和 Dialog
flutter社区通过其库使Flutter变得强大和流行,使开发更快、更简单。 Flash 是一个有多种用途的Flutter库。可以使用它创建 Snackbars、toast 和对话框。 Flutter默认没有 Toast。因此,可以使用 Flash 库创建它。使用 Flash 包,您只需使用一个包即可简化一切。最好的部分是它可以根据要求进行定制。您不需要为小吃店、吐司或对话使用不同的包。使用 Flash 可以轻松完成。在本文中,我们将学习如何使用一个包 – Flash 创建所有这些。
- 添加依赖
在进入编码部分之前,让我们在pubspec.yaml文件中添加依赖项。
Dart
dependencies:
  flash: ^2.0.3+1
Dart
import 'package:flash/flash.dart';Dart
void _showDialogFlash() {
    context.showFlashDialog(
      title: Text('Flash Dialog'),
      content: Text('This is the simplest dialog you can create with Flash.'),
      negativeActionBuilder: (context, controller, _) {
        return TextButton(
          onPressed: () {
            controller.dismiss();
          },
          child: Text("CLOSE"),
        );
      },
    );
  }
}
Dart
ElevatedButton(
      onPressed: () => _showDialogFlash(),
      child: Text('Simple Dialog'),
 ),
Dart
import 'package:flash/flash.dart';
import 'package:flutter/material.dart';

void main() => runApp(App());

class App extends StatelessWidget {
  @override
  Widget build(BuildContext context) {
    return MaterialApp(
      debugShowCheckedModeBanner: false,
      builder: (context, _) {
        var child = _!;
        final navigatorKey = child.key as GlobalKey;
        child = Toast(child: child, navigatorKey: navigatorKey);
        child = FlashTheme(
          child: child,
          flashDialogTheme: const FlashDialogThemeData(),
        );
        return child;
      },
      theme: ThemeData(
        primarySwatch: Colors.green,
      ),
      home: FlashDemo(),
    );
  }
}

class FlashDemo extends StatefulWidget {
  @override
  _FlashDemoState createState() => _FlashDemoState();
}

class _FlashDemoState extends State {
  GlobalKey _key = GlobalKey();

  @override
  Widget build(BuildContext context) {
    return Scaffold(
      appBar: AppBar(
        title: const Text("GeeksForGeeks"),
        centerTitle: true,
      ),
      key: _key,
      body: Container(
          child: Center(
        child: ElevatedButton(
          onPressed: () =>
              context.showToast('You have 10 minutes left in the meeting.'),
          child: Text('Toast'),
        ),
      )),
    );
  }
}
Dart
void _showBasicFlash({
    Duration? duration,
    flashStyle = FlashBehavior.floating,
  }) {
    showFlash(
      context: context,
      duration: duration,
      builder: (context, controller) {
        return Flash(
          controller: controller,
          behavior: flashStyle,
          position: FlashPosition.bottom,
          horizontalDismissDirection: HorizontalDismissDirection.horizontal,
          child: FlashBar(
            content: Text('This is a basic flashbar'),
          ),
        );
      },
    );
  }
Dart
void _showTopFlash({FlashBehavior style = FlashBehavior.fixed}) {
    showFlash(
      context: context,
      duration: const Duration(seconds: 2),
      persistent: true,
      builder: (_, controller) {
        return Flash(
          controller: controller,
          backgroundColor: Colors.white,
          brightness: Brightness.light,
          barrierColor: Colors.black38,
          barrierDismissible: true,
          behavior: style,
          position: FlashPosition.top,
          child: FlashBar(
            title: Text('Hey User!'),
            content: Text('This is the top Flashbar!'),
            primaryAction: TextButton(
              onPressed: () {},
              child: Text('DISMISS',
                          style: TextStyle(color: Colors.blue)),
            ),
          ),
        );
      },
    );
  }
Dart
void _showCustomFlash() {
    showFlash(
      context: context,
      builder: (_, controller) {
        return Flash(
          controller: controller,
          behavior: FlashBehavior.floating,
          position: FlashPosition.bottom,
          borderRadius: BorderRadius.circular(8.0),
          borderColor: Colors.blue,
          backgroundGradient: LinearGradient(
            colors: [Colors.pink, Colors.red],
          ),
          forwardAnimationCurve: Curves.easeInCirc,
          reverseAnimationCurve: Curves.bounceIn,
          child: DefaultTextStyle(
            style: TextStyle(color: Colors.white),
            child: FlashBar(
              title: Text('Hello Flash'),
              content: Text('You can put any message of any length here.'),
              indicatorColor: Colors.blue,
              icon: Icon(
                Icons.info_outline_rounded,
                color: Colors.white,
              ),
              primaryAction: TextButton(
                onPressed: () => controller.dismiss(),
                child: Text('DISMISS', style: TextStyle(color: Colors.white)),
              ),
            ),
          ),
        );
      },
    );
  }
Dart
void _flashWithInput() {
    TextEditingController editingController = TextEditingController();
    context.showFlashBar(
      barrierColor: Colors.blue,
      borderWidth: 3,
      behavior: FlashBehavior.fixed,
      forwardAnimationCurve: Curves.fastLinearToSlowEaseIn,
      title: Text('Hello from Flash'),
      content: Column(
        children: [
          Text('You can put any message of any length here.'),
          TextFormField(
            controller: editingController,
            autofocus: true,
          )
        ],
      ),
      primaryActionBuilder: (context, controller, _) {
        return IconButton(
          onPressed: () {
            print(editingController.text);
            editingController.clear();
          },
          icon: Icon(Icons.send, color: Colors.blue),
        );
      },
    );
  }
Dart
import 'package:flash/flash.dart';
import 'package:flutter/material.dart';

void main() => runApp(App());

class App extends StatelessWidget {
  @override
  Widget build(BuildContext context) {
    return MaterialApp(
      debugShowCheckedModeBanner: false,
      builder: (context, _) {
        var child = _!;
        final navigatorKey = child.key as GlobalKey;

        // initializing a Toast and passing it in the FlashTheme
        child = Toast(child: child, navigatorKey: navigatorKey);
        child = FlashTheme(
          child: child,
          flashDialogTheme: const FlashDialogThemeData(),
        );
        return child;
      },
      title: 'Flash Tutorial',
      theme: ThemeData(
        primarySwatch: Colors.green,
      ),
      home: HomePage(),
    );
  }
}

class HomePage extends StatefulWidget {
  @override
  _HomePageState createState() => _HomePageState();
}

class _HomePageState extends State {
  @override
  Widget build(BuildContext context) {
    return Scaffold(
      appBar: AppBar(title: const Text("GeeksForGeeks"),
                     centerTitle: true),
      body: Container(
          padding: const EdgeInsets.all(20.0),
          child: Overlay(

            // with the help of overlay the background
            // will not go blur and the toast can lay
            // on the other widgets.
            initialEntries: [
              OverlayEntry(builder: (context) {
                return FlashDemo();
              }),
            ],
          )),
    );
  }
}

class FlashDemo extends StatefulWidget {
  @override
  _FlashDemoState createState() => _FlashDemoState();
}

class _FlashDemoState extends State {

  // creating a global Scaffold key
  GlobalKey _key = GlobalKey();

  @override
  Widget build(BuildContext context) {
    return Scaffold(
      key: _key,
      body: Container(
        child: Column(
          mainAxisAlignment: MainAxisAlignment.start,
          crossAxisAlignment: CrossAxisAlignment.stretch,
          children: [
            Text('Flash Examples',
                style: TextStyle(fontSize: 18, fontWeight: FontWeight.w500)),
            SizedBox(
              height: 20,
            ),
            ElevatedButton(

              // calling function to show the basic flashbar
              onPressed: () => _showBasicFlash(),
              child: Text('Basic Flashbar'),
            ),
            SizedBox(
              height: 10,
            ),
            ElevatedButton(

              // show snackbar from top of the screen
              onPressed: () => _showTopFlash(),
              child: Text('Top Flashbar'),
            ),
            SizedBox(
              height: 10,
            ),
            ElevatedButton(

              // customize the flashbar
              onPressed: () => _showCustomFlash(),
              child: Text('Bottom Flashbar'),
            ),
            SizedBox(
              height: 10,
            ),
            ElevatedButton(

              // take input inside flashbar
              onPressed: () => _flashWithInput(),
              child: Text('Input Flashbar'),
            ),
            ElevatedButton(
              onPressed: () =>

              // show toast simply calling showToast in the context
                  context.showToast('You have 10 minutes left in the meeting.'),
              child: Text('Toast'),
            ),
          ],
        ),
      ),
    );
  }

  void _showBasicFlash({
    flashStyle = FlashBehavior.floating,
  }) {
    showFlash(
      context: context,
      duration: Duration(seconds: 3),
      builder: (context, controller) {
        return Flash(
          controller: controller,
          behavior: flashStyle,
          position: FlashPosition.bottom,
          horizontalDismissDirection: HorizontalDismissDirection.horizontal,
          child: FlashBar(
            content: Text('This is a basic flashbar'),
          ),
        );
      },
    );
  }

  void _showTopFlash() {
    showFlash(
      context: context,
      duration: const Duration(seconds: 2),
      builder: (_, controller) {
        return Flash(
          controller: controller,
          backgroundColor: Colors.white,
          brightness: Brightness.light,
          barrierColor: Colors.black38,
          barrierDismissible: true,
          behavior: FlashBehavior.fixed,
          position: FlashPosition.top,
          child: FlashBar(
            title: Text('Hey User!'),
            content: Text('This is the top Flashbar!'),
            primaryAction: TextButton(
              onPressed: () {},
              child: Text('DISMISS', style: TextStyle(color: Colors.blue)),
            ),
          ),
        );
      },
    );
  }

  void _showCustomFlash() {
    showFlash(
      context: context,
      builder: (_, controller) {
        return Flash(
          controller: controller,
          behavior: FlashBehavior.floating,
          position: FlashPosition.bottom,
          borderRadius: BorderRadius.circular(8.0),
          borderColor: Colors.blue,
          backgroundGradient: LinearGradient(
            colors: [Colors.pink, Colors.red],
          ),
          forwardAnimationCurve: Curves.easeInCirc,
          reverseAnimationCurve: Curves.bounceIn,
          child: DefaultTextStyle(
            style: TextStyle(color: Colors.white),
            child: FlashBar(
              title: Text('Hello Flash'),
              content: Text('You can put any message of any length here.'),
              indicatorColor: Colors.blue,
              icon: Icon(
                Icons.info_outline_rounded,
                color: Colors.white,
              ),
              primaryAction: TextButton(
                onPressed: () => controller.dismiss(),
                child: Text('DISMISS', style: TextStyle(color: Colors.white)),
              ),
            ),
          ),
        );
      },
    );
  }

  void _flashWithInput() {
    TextEditingController editingController = TextEditingController();
    context.showFlashBar(
      barrierColor: Colors.blue,
      borderWidth: 3,
      behavior: FlashBehavior.fixed,
      forwardAnimationCurve: Curves.fastLinearToSlowEaseIn,
      title: Text('Hello from Flash'),
      content: Column(
        children: [
          Text('You can put any message of any length here.'),
          TextFormField(
            controller: editingController,
            autofocus: true,
          )
        ],
      ),
      primaryActionBuilder: (context, controller, _) {
        return IconButton(
          onPressed: () {
            print(editingController.text);
            editingController.clear();
          },
          icon: Icon(Icons.send, color: Colors.blue),
        );
      },
    );
  }
}
不要忘记通过在工作 IDE 的终端中运行 pub get 来配置它。
- 导入库
当然,要使用该库,我们需要在main 中导入它。 dart或您要使用的任何文件。
Dart
import 'package:flash/flash.dart';
对话框:
使用默认的 showDialog 创建弹出窗口总是一项无聊的任务。但是,显示对话框是一项简单的任务。在下面显示的代码中定义了_showDialogFlash() ,它通过调用showFlashDialog() 来显示对话框。我们可以向这个函数传递一堆参数,比如 title、negativeActionBuilder 等。
Dart
void _showDialogFlash() {
    context.showFlashDialog(
      title: Text('Flash Dialog'),
      content: Text('This is the simplest dialog you can create with Flash.'),
      negativeActionBuilder: (context, controller, _) {
        return TextButton(
          onPressed: () {
            controller.dismiss();
          },
          child: Text("CLOSE"),
        );
      },
    );
  }
}
然后,可以随时调用此函数。例如,创建一个在按下时将调用_showDialogFlash()的按钮。
Dart
ElevatedButton(
      onPressed: () => _showDialogFlash(),
      child: Text('Simple Dialog'),
 ),

祝酒词:
Toasts 只是短消息弹出窗口,即使应用程序不在前台也仍然可见。现在,我们可以使用 Flash 库在Flutter中轻松创建 toast。要创建 Toast,请创建一个子项并定义一个全局键。用 Toast 包裹孩子,然后传递给将作为孩子返回的 FlashTheme。然后,只需在上下文中调用showToast() ,并使用其属性,如消息、持续时间等。我们创建了一个名为“Toast”的ElevatedButton ,按下它时会在当前屏幕的上下文中显示 toast。
Dart
import 'package:flash/flash.dart';
import 'package:flutter/material.dart';

void main() => runApp(App());

class App extends StatelessWidget {
  @override
  Widget build(BuildContext context) {
    return MaterialApp(
      debugShowCheckedModeBanner: false,
      builder: (context, _) {
        var child = _!;
        final navigatorKey = child.key as GlobalKey;
        child = Toast(child: child, navigatorKey: navigatorKey);
        child = FlashTheme(
          child: child,
          flashDialogTheme: const FlashDialogThemeData(),
        );
        return child;
      },
      theme: ThemeData(
        primarySwatch: Colors.green,
      ),
      home: FlashDemo(),
    );
  }
}

class FlashDemo extends StatefulWidget {
  @override
  _FlashDemoState createState() => _FlashDemoState();
}

class _FlashDemoState extends State {
  GlobalKey _key = GlobalKey();

  @override
  Widget build(BuildContext context) {
    return Scaffold(
      appBar: AppBar(
        title: const Text("GeeksForGeeks"),
        centerTitle: true,
      ),
      key: _key,
      body: Container(
          child: Center(
        child: ElevatedButton(
          onPressed: () =>
              context.showToast('You have 10 minutes left in the meeting.'),
          child: Text('Toast'),
        ),
      )),
    );
  }
}
输出:

闪光条:
Flash 库的美妙之处在于,只需一个函数,您就可以创建不同类型的小吃店。 Flashbar 现在不限于地面,您可以将其显示在屏幕顶部或底部,甚至可以自定义它,为其设置边距、背景颜色等。使用 Flash 创建快餐栏的独特之处在于,您甚至可以给在我们称为 flashbar 的小吃栏中输入,带有接受它的按钮或图标。在进一步的文章中,我们将研究可以使用 Flash 创建的不同类型的 flashbar。
基本 Flashbar:
只需使用_showBasicFlash ()函数即可创建使用 Flash 的简单快餐栏。它将构建器作为返回 Flash 的属性,该 Flash 将 Flashbar 包装为子项。然后我们可以在 flashbar 中提供我们想要的任何内容。 _showBasicFlash()有两个参数,一个不能为空,即持续时间,但可以跳过行为,因为它已经定义为浮动。如果我们不将持续时间传递给函数或在showFlash()函数中修复持续时间,则 flashbar 将一直保留在屏幕上,直到应用程序关闭。
Dart
void _showBasicFlash({
    Duration? duration,
    flashStyle = FlashBehavior.floating,
  }) {
    showFlash(
      context: context,
      duration: duration,
      builder: (context, controller) {
        return Flash(
          controller: controller,
          behavior: flashStyle,
          position: FlashPosition.bottom,
          horizontalDismissDirection: HorizontalDismissDirection.horizontal,
          child: FlashBar(
            content: Text('This is a basic flashbar'),
          ),
        );
      },
    );
  }
输出:

顶部快闪条:
好吧,如果我们希望快餐栏从顶部获取条目,或者我们可以说弹出式通知,这在当今的许多应用程序中都很重要。这可以使用 Flash 以简单的方式完成。再次使用showFlash()函数。但是我们需要告诉我们想要什么位置——底部或顶部或者可以传递值来定位它的位置。我们创建了一个调用showFlash()函数的函数_showTopFlash ()。我们通过FlashBehavior传递了 flash 的行为,使用FlashBehavior.fixed我们也可以让它浮动。我们给了它一定的样式,还创建了一个TextButton “DISMISS”来关闭flashbar,我们可以根据要求或创意做任何我们想做的事情。
Dart
void _showTopFlash({FlashBehavior style = FlashBehavior.fixed}) {
    showFlash(
      context: context,
      duration: const Duration(seconds: 2),
      persistent: true,
      builder: (_, controller) {
        return Flash(
          controller: controller,
          backgroundColor: Colors.white,
          brightness: Brightness.light,
          barrierColor: Colors.black38,
          barrierDismissible: true,
          behavior: style,
          position: FlashPosition.top,
          child: FlashBar(
            title: Text('Hey User!'),
            content: Text('This is the top Flashbar!'),
            primaryAction: TextButton(
              onPressed: () {},
              child: Text('DISMISS',
                          style: TextStyle(color: Colors.blue)),
            ),
          ),
        );
      },
    );
  }
输出:

自定义底部 Flashbar:
Flashbar 的属性并不止于此。在这里,在给定的示例代码中,我们通过给它提供渐变颜色以及信息图标和 TextButton“DISMISS”作为 Flash 的primaryAction属性来自定义 flashbar,它在按下时关闭 flashbar。向 flashbar 添加动画,对其进行样式设置,它包含许多可以满足所有要求的属性。
Dart
void _showCustomFlash() {
    showFlash(
      context: context,
      builder: (_, controller) {
        return Flash(
          controller: controller,
          behavior: FlashBehavior.floating,
          position: FlashPosition.bottom,
          borderRadius: BorderRadius.circular(8.0),
          borderColor: Colors.blue,
          backgroundGradient: LinearGradient(
            colors: [Colors.pink, Colors.red],
          ),
          forwardAnimationCurve: Curves.easeInCirc,
          reverseAnimationCurve: Curves.bounceIn,
          child: DefaultTextStyle(
            style: TextStyle(color: Colors.white),
            child: FlashBar(
              title: Text('Hello Flash'),
              content: Text('You can put any message of any length here.'),
              indicatorColor: Colors.blue,
              icon: Icon(
                Icons.info_outline_rounded,
                color: Colors.white,
              ),
              primaryAction: TextButton(
                onPressed: () => controller.dismiss(),
                child: Text('DISMISS', style: TextStyle(color: Colors.white)),
              ),
            ),
          ),
        );
      },
    );
  }
输出:

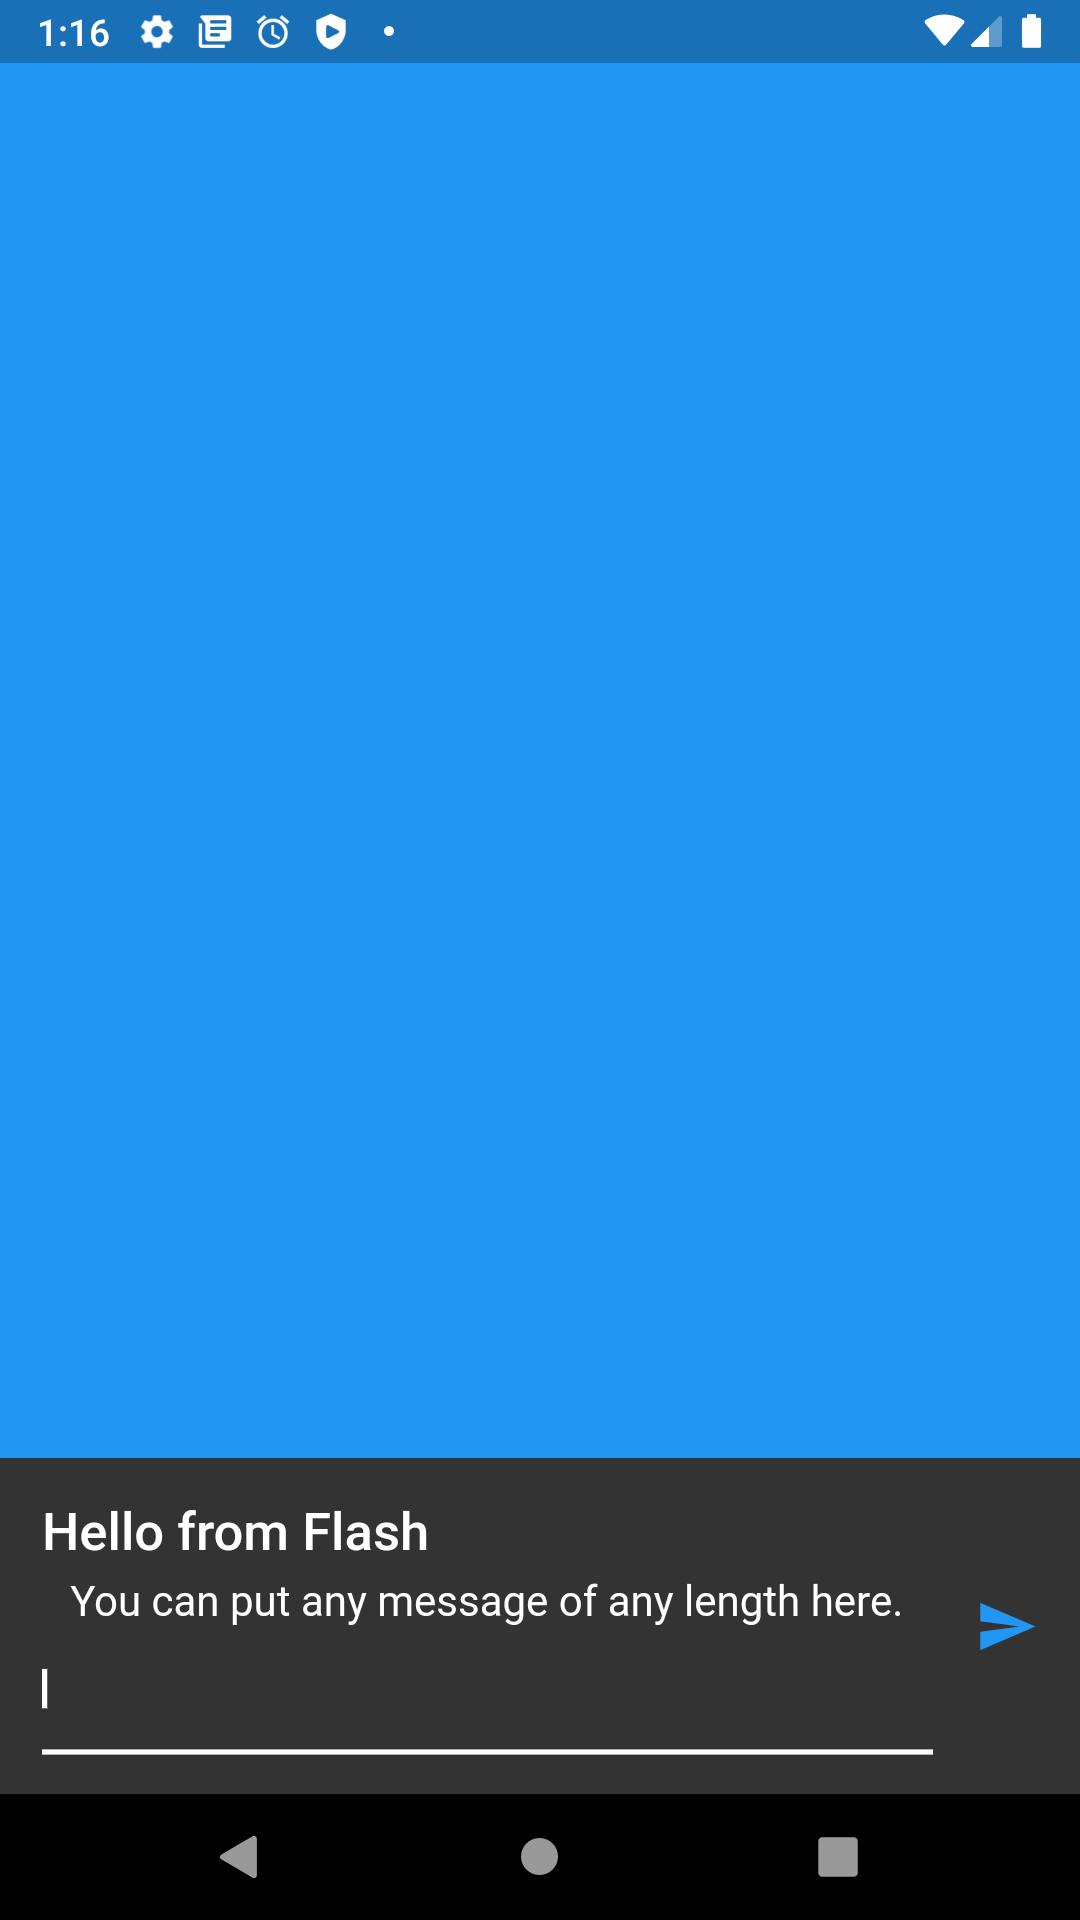
带输入的 Flashbar:
在此我们将了解 Flash 的有趣属性,我们甚至可以在 Flashbar 中进行输入。是的,它将使 UI 更具吸引力。每当出现错误以及您可能希望将用户重定向到帮助页面或其他任何内容时,都可以使用使用 Flash 创建的简单 flashbar 来完成。 _flashWithInput()函数在上下文中进一步调用showFlashBar() ,并创建了一个 TextFormField, editingController作为控制器提供给它,并使用primaryActionBuilder显示一个IconButton ,按下该按钮将执行某些函数。很容易根据需要定制它。
Dart
void _flashWithInput() {
    TextEditingController editingController = TextEditingController();
    context.showFlashBar(
      barrierColor: Colors.blue,
      borderWidth: 3,
      behavior: FlashBehavior.fixed,
      forwardAnimationCurve: Curves.fastLinearToSlowEaseIn,
      title: Text('Hello from Flash'),
      content: Column(
        children: [
          Text('You can put any message of any length here.'),
          TextFormField(
            controller: editingController,
            autofocus: true,
          )
        ],
      ),
      primaryActionBuilder: (context, controller, _) {
        return IconButton(
          onPressed: () {
            print(editingController.text);
            editingController.clear();
          },
          icon: Icon(Icons.send, color: Colors.blue),
        );
      },
    );
  }
输出:
Flashbar的完整代码:
Dart
import 'package:flash/flash.dart';
import 'package:flutter/material.dart';

void main() => runApp(App());

class App extends StatelessWidget {
  @override
  Widget build(BuildContext context) {
    return MaterialApp(
      debugShowCheckedModeBanner: false,
      builder: (context, _) {
        var child = _!;
        final navigatorKey = child.key as GlobalKey;

        // initializing a Toast and passing it in the FlashTheme
        child = Toast(child: child, navigatorKey: navigatorKey);
        child = FlashTheme(
          child: child,
          flashDialogTheme: const FlashDialogThemeData(),
        );
        return child;
      },
      title: 'Flash Tutorial',
      theme: ThemeData(
        primarySwatch: Colors.green,
      ),
      home: HomePage(),
    );
  }
}

class HomePage extends StatefulWidget {
  @override
  _HomePageState createState() => _HomePageState();
}

class _HomePageState extends State {
  @override
  Widget build(BuildContext context) {
    return Scaffold(
      appBar: AppBar(title: const Text("GeeksForGeeks"),
                     centerTitle: true),
      body: Container(
          padding: const EdgeInsets.all(20.0),
          child: Overlay(

            // with the help of overlay the background
            // will not go blur and the toast can lay
            // on the other widgets.
            initialEntries: [
              OverlayEntry(builder: (context) {
                return FlashDemo();
              }),
            ],
          )),
    );
  }
}

class FlashDemo extends StatefulWidget {
  @override
  _FlashDemoState createState() => _FlashDemoState();
}

class _FlashDemoState extends State {

  // creating a global Scaffold key
  GlobalKey _key = GlobalKey();

  @override
  Widget build(BuildContext context) {
    return Scaffold(
      key: _key,
      body: Container(
        child: Column(
          mainAxisAlignment: MainAxisAlignment.start,
          crossAxisAlignment: CrossAxisAlignment.stretch,
          children: [
            Text('Flash Examples',
                style: TextStyle(fontSize: 18, fontWeight: FontWeight.w500)),
            SizedBox(
              height: 20,
            ),
            ElevatedButton(

              // calling function to show the basic flashbar
              onPressed: () => _showBasicFlash(),
              child: Text('Basic Flashbar'),
            ),
            SizedBox(
              height: 10,
            ),
            ElevatedButton(

              // show snackbar from top of the screen
              onPressed: () => _showTopFlash(),
              child: Text('Top Flashbar'),
            ),
            SizedBox(
              height: 10,
            ),
            ElevatedButton(

              // customize the flashbar
              onPressed: () => _showCustomFlash(),
              child: Text('Bottom Flashbar'),
            ),
            SizedBox(
              height: 10,
            ),
            ElevatedButton(

              // take input inside flashbar
              onPressed: () => _flashWithInput(),
              child: Text('Input Flashbar'),
            ),
            ElevatedButton(
              onPressed: () =>

              // show toast simply calling showToast in the context
                  context.showToast('You have 10 minutes left in the meeting.'),
              child: Text('Toast'),
            ),
          ],
        ),
      ),
    );
  }

  void _showBasicFlash({
    flashStyle = FlashBehavior.floating,
  }) {
    showFlash(
      context: context,
      duration: Duration(seconds: 3),
      builder: (context, controller) {
        return Flash(
          controller: controller,
          behavior: flashStyle,
          position: FlashPosition.bottom,
          horizontalDismissDirection: HorizontalDismissDirection.horizontal,
          child: FlashBar(
            content: Text('This is a basic flashbar'),
          ),
        );
      },
    );
  }

  void _showTopFlash() {
    showFlash(
      context: context,
      duration: const Duration(seconds: 2),
      builder: (_, controller) {
        return Flash(
          controller: controller,
          backgroundColor: Colors.white,
          brightness: Brightness.light,
          barrierColor: Colors.black38,
          barrierDismissible: true,
          behavior: FlashBehavior.fixed,
          position: FlashPosition.top,
          child: FlashBar(
            title: Text('Hey User!'),
            content: Text('This is the top Flashbar!'),
            primaryAction: TextButton(
              onPressed: () {},
              child: Text('DISMISS', style: TextStyle(color: Colors.blue)),
            ),
          ),
        );
      },
    );
  }

  void _showCustomFlash() {
    showFlash(
      context: context,
      builder: (_, controller) {
        return Flash(
          controller: controller,
          behavior: FlashBehavior.floating,
          position: FlashPosition.bottom,
          borderRadius: BorderRadius.circular(8.0),
          borderColor: Colors.blue,
          backgroundGradient: LinearGradient(
            colors: [Colors.pink, Colors.red],
          ),
          forwardAnimationCurve: Curves.easeInCirc,
          reverseAnimationCurve: Curves.bounceIn,
          child: DefaultTextStyle(
            style: TextStyle(color: Colors.white),
            child: FlashBar(
              title: Text('Hello Flash'),
              content: Text('You can put any message of any length here.'),
              indicatorColor: Colors.blue,
              icon: Icon(
                Icons.info_outline_rounded,
                color: Colors.white,
              ),
              primaryAction: TextButton(
                onPressed: () => controller.dismiss(),
                child: Text('DISMISS', style: TextStyle(color: Colors.white)),
              ),
            ),
          ),
        );
      },
    );
  }

  void _flashWithInput() {
    TextEditingController editingController = TextEditingController();
    context.showFlashBar(
      barrierColor: Colors.blue,
      borderWidth: 3,
      behavior: FlashBehavior.fixed,
      forwardAnimationCurve: Curves.fastLinearToSlowEaseIn,
      title: Text('Hello from Flash'),
      content: Column(
        children: [
          Text('You can put any message of any length here.'),
          TextFormField(
            controller: editingController,
            autofocus: true,
          )
        ],
      ),
      primaryActionBuilder: (context, controller, _) {
        return IconButton(
          onPressed: () {
            print(editingController.text);
            editingController.clear();
          },
          icon: Icon(Icons.send, color: Colors.blue),
        );
      },
    );
  }
}
输出:
我们希望您今天学到了一些新东西,这篇文章对您有所帮助。