Android 架构组件中的 Room 概览
Room 是 Android 中的 Jetpack 架构组件之一。这在 SQLite 数据库上提供了一个抽象层,用于在本地保存和执行对持久数据的操作。 Google 推荐使用 SQLite 数据库,尽管 SQLite API 更强大,但它们的级别相当低,需要花费大量时间和精力来使用。但是 Room 使创建数据库和对其执行操作的一切变得简单明了。
为什么要使用房间?
- 缓存相关的数据片段,这样当用户的设备离线时,他们仍然可以离线浏览和查看内容。
- 编译时 SQLite 查询验证可防止应用程序崩溃。
- 它提供的注释最大限度地减少了样板代码。
- 这也提供了与 LiveData、LifecycleObserver 等其他架构组件的轻松集成,您可以在此处获取 Google 提供的 codelab。
Room 和 SQLite 的区别
Room | SQLite |
|---|---|
| No need of writing raw queries. | Need to write raw queries. |
| Compile Time verification of SQL queries. | No, compile-time boilerplate verification of SQL queries. |
| No need of converting the Data to Java Objects. As Room internally maps the Database objects to Java objects. | Need to write SQL queries to convert the Data to Java Objects. |
| This conveniently supports the integration with other Architecture components. | This needs a lot of boiler plate code to integrate with the other Architecture Components. |
| Room provides easier way to work with LiveData and perform the operations. | SQLite doesn’t provide a direct way to access the LiveData, it needs external code to be written to access the LiveData. |
| There is no need to change the code when the database schema gets changes. | This needs to change its queries whenever the database schema gets changes |
房间的主要组成部分
- 数据库类:它为应用程序的持久数据提供了对底层连接的主要访问点。这是用@Database 注释的。
- 数据实体:这表示现有数据库中的所有表。并用@Entity 注释。
- DAO(数据访问对象):它包含对数据库执行操作的方法。并用@Dao 注释。
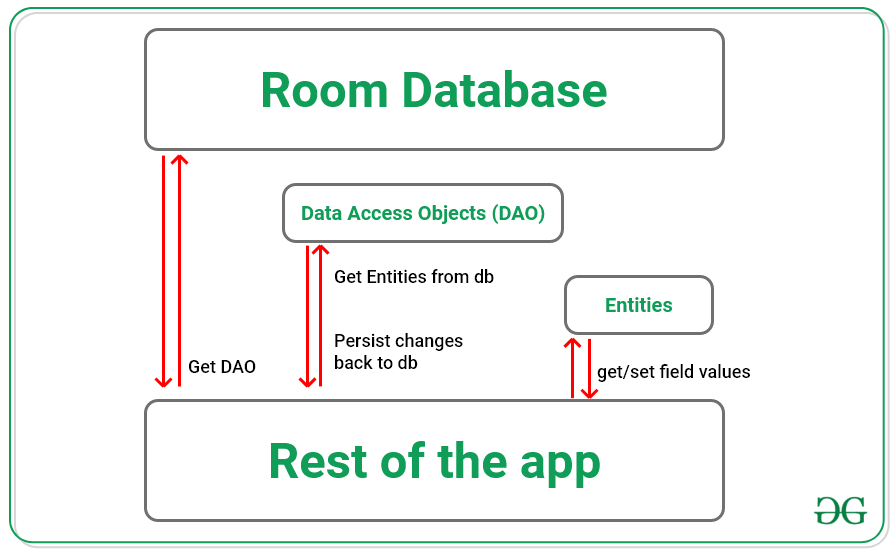
房间图书馆建筑
从下图中,我们可以总结 Room 数据库的工作情况,因为应用程序首先获取与现有Room 数据库关联的数据访问对象 (DAO)。获得DAO后,通过DAO访问数据库表中的实体。然后它可以对这些实体执行操作并将更改持久化到数据库中。

在Android应用程序中实现房间数据库的步骤
步骤 1:创建一个空的活动项目
- 创建一个空的活动 Android Studio 项目。参考安卓 |如何在 Android Studio 中创建/启动一个新项目?,到如何创建一个空的 Android Studio 活动项目。
- 并选择Kotlin作为语言。
第 2 步:添加所需的依赖项
- 将以下依赖项添加到应用程序级gradle 文件中。通过转到ProjectName -> src -> build.gradle。
// room_version may vary
def room_version = “2.3.0”
implementation “androidx.room:room-runtime:$room_version”
kapt “androidx.room:room-compiler:$room_version”
implementation “androidx.room:room-ktx:$room_version”
testImplementation “androidx.room:room-testing:$room_version”
现在一一创建 Room 的组件:
Note: Here the entities for every interface and classes created are important and to be taken care of.
第 3 步:创建数据实体
- 创建一个名为 User.kt的示例数据类。
- 并调用以下代码,其中包含实体User作为实体,它代表一行,first_name、last_name、age 代表表的列名。
Kotlin
import androidx.room.ColumnInfo
import androidx.room.Entity
import androidx.room.PrimaryKey

@Entity
data class User(
    @PrimaryKey(autoGenerate = true) val uid: Int,
    @ColumnInfo(name = "name") val firstName: String?,
    @ColumnInfo(name = "city") val lastName: String?
)
Kotlin
import androidx.room.Dao
import androidx.room.Delete
import androidx.room.Insert
import androidx.room.Query

@Dao
interface UserDao {
    @Query("SELECT * FROM user")
    fun getAll(): List

    @Query("SELECT * FROM user WHERE uid IN (:userIds)")
    fun loadAllByIds(userIds: IntArray): List

    @Insert
    fun insertAll(vararg users: User)

    @Delete
    fun delete(user: User)
}
Kotlin
import androidx.room.Database
import androidx.room.RoomDatabase

@Database(entities = arrayOf(User::class), version = 1)
abstract class UserDatabase : RoomDatabase() {
    abstract fun userDao(): UserDao
}
Kotlin
import android.os.Bundle
import androidx.appcompat.app.AppCompatActivity
import androidx.room.Room

class MainActivity : AppCompatActivity() {

    // application's Database name
    private val DATABASE_NAME: String = "USER_DATABASE"

    override fun onCreate(savedInstanceState: Bundle?) {
        super.onCreate(savedInstanceState)
        setContentView(R.layout.activity_main)

        // get the instance of the application's database
        val db = Room.databaseBuilder(
            applicationContext, UserDatabase::class.java, DATABASE_NAME
        ).build()

        // create instance of DAO to access the entities
        val userDao = db.userDao()

        // using the same DAO perform the Database operations
        val users: List = userDao.getAll()
    }
}
步骤 4:创建数据访问对象 (DAO):
- 现在创建一个名为UserDao.kt的接口。
- 并调用以下代码,这些代码提供了应用程序用来与用户交互的各种方法。
科特林
import androidx.room.Dao
import androidx.room.Delete
import androidx.room.Insert
import androidx.room.Query

@Dao
interface UserDao {
    @Query("SELECT * FROM user")
    fun getAll(): List

    @Query("SELECT * FROM user WHERE uid IN (:userIds)")
    fun loadAllByIds(userIds: IntArray): List

    @Insert
    fun insertAll(vararg users: User)

    @Delete
    fun delete(user: User)
}
步骤 5:创建数据库
- 现在创建定义实际应用程序数据库的数据库,它是应用程序持久化数据的主要访问点。这个类必须满足:
- 类必须是抽象的。
- 该类应使用@Database进行注释。
- 数据库类必须定义一个带有零参数的抽象方法并返回一个 DAO 实例。
- 现在调用 AppDatabase.kt文件中的以下代码。
科特林
import androidx.room.Database
import androidx.room.RoomDatabase

@Database(entities = arrayOf(User::class), version = 1)
abstract class UserDatabase : RoomDatabase() {
    abstract fun userDao(): UserDao
}
第 6 步:使用 Room 数据库
- 在MainActivity.kt文件中,我们可以通过为数据库提供自定义名称来创建数据库。
科特林
import android.os.Bundle
import androidx.appcompat.app.AppCompatActivity
import androidx.room.Room

class MainActivity : AppCompatActivity() {

    // application's Database name
    private val DATABASE_NAME: String = "USER_DATABASE"

    override fun onCreate(savedInstanceState: Bundle?) {
        super.onCreate(savedInstanceState)
        setContentView(R.layout.activity_main)

        // get the instance of the application's database
        val db = Room.databaseBuilder(
            applicationContext, UserDatabase::class.java, DATABASE_NAME
        ).build()

        // create instance of DAO to access the entities
        val userDao = db.userDao()

        // using the same DAO perform the Database operations
        val users: List = userDao.getAll()
    }
}
Note: By using this basic knowledge about Room Database one can build a basic CRUD application using Room Database by referring to How to Perform CRUD Operations in Room Database in Android?.