Bulma 与 Sass CLI
在本文中,我们将了解如何将 Bulma 与Sass CLI一起使用。 Bulma 元素带有 pres-styled 组件,如果您想根据需要修改或自定义它们怎么办?你可以通过使用 sass 来做到这一点。实现这一点的一种方法是使用 SASS-CLI,它是一个 sass 命令行,我们可以从中使用 sass 文件创建一个 CSS 文件来设置我们的组件的样式。以下是演示 Bulma 组件的完整修改或样式的过程。
将 Bulma 与 SASS-CLI 一起使用:以下是使用 Sass-CLI 设置 Bulma 元素样式所需的所有步骤及其所有语法。
第 1 步:安装 Sass :首先,使用您要创建 sass 文件的任何名称创建一个新文件夹。在终端中,首先,导航到文件夹目录并编写以下命令来安装sass gem :
gem install sass第 2 步:下载 Bulma:现在从这里获取最新版本的 Bulma。下载后,解压缩并将Bulma-0.9.3文件夹放入您之前在步骤 1 中创建的项目文件夹中。
第 3 步:创建 SASS 文件:创建一个 SASS 文件夹,并在其中创建一个名为mystyles.scss的文件。
@charset "utf-8";
@import "../node_modules/bulma/bulma.sass";注意:确保上述路径根据您的项目目录是正确的。
第 4 步:创建 HTML 文件:我们创建一个我们想要自定义的 HTML 文件并将其保存为: filename.html 。请注意,样式表中的 css/mystyles.css 路径是正确的,因为它将是使用 SASS 生成的 CSS 文件的位置。请参阅以下示例语法。在这里,您会注意到未设置样式的页面。请参阅后续步骤。
第 5 步:构建 CSS 文件:我们将从 SASS 文件生成 CSS 文件。在您的终端中运行以下代码并重新加载您的页面:
sass --sourcemap=none sass/mystyles.scss:css/mystyles.css现在要查看更改,请在终端中运行以下代码:
sass --watch --sourcemap=none sass/mystyles.scss:css/mystyles.css第 6 步:添加您自己的样式:
我们可以添加自己的样式,或者例如,将以下样式添加到您的mystyles.scss文件中。
@charset "utf-8";

// Set your brand colors
$success: #2dfcb7;
$warning: #f7c824;

// Update Bulma's global variables
$widescreen-enabled: false;
$fullhd-enabled: false;

// Update some of Bulma's component variables
$body-background-color: $success;
$control-border-width: 2px;

// Import only what you need from Bulma
@import "../node_modules/bulma/sass/utilities/_all.sass";
@import "../node_modules/bulma/sass/base/_all.sass";
@import "../node_modules/bulma/sass/elements/_all.sass";
@import "../node_modules/bulma/sass/form/_all.sass";
@import "../node_modules/bulma/sass/components/_all.sass";
@import "../node_modules/bulma/sass/layout/_all.sass";
示例 1:下面的示例说明了使用 SASS-CLI 的 Bulma。
HTML
GeeksforGeeks
Welcome to the Computer
science portal.
Want to tell us something?
CSS
@charset "utf-8";

// Set your brand colors
$primary: #5de246;
$success: #2dfcb7;
$warning: #f7c824;

// Update Bulma's global variables
$widescreen-enabled: false;
$fullhd-enabled: false;

// Update some of Bulma's component variables
$body-background-color: $primary;
$control-border-width: 2px;
$input-border-color: transparent;

// Import only what you need from Bulma
@import "../node_modules/bulma/sass/utilities/_all.sass";
@import "../node_modules/bulma/sass/base/_all.sass";
@import "../node_modules/bulma/sass/elements/_all.sass";
@import "../node_modules/bulma/sass/form/_all.sass";
HTML
GeeksforGeeks
Welcome to the Computer science portal.
CSS
@charset "utf-8";

// Set your brand colors
$success: #2dfcb7;
$warning: #f7c824;

// Update Bulma's global variables
$widescreen-enabled: false;
$fullhd-enabled: false;

// Update some of Bulma's component variables
$body-background-color: $success;
$control-border-width: 2px;
$input-border-color: transparent;
$input-shadow: none;

// Import only what you need from Bulma
@import "../node_modules/bulma/sass/utilities/_all.sass";
@import "../node_modules/bulma/sass/base/_all.sass";
@import "../node_modules/bulma/sass/elements/_all.sass";
@import "../node_modules/bulma/sass/form/_all.sass";
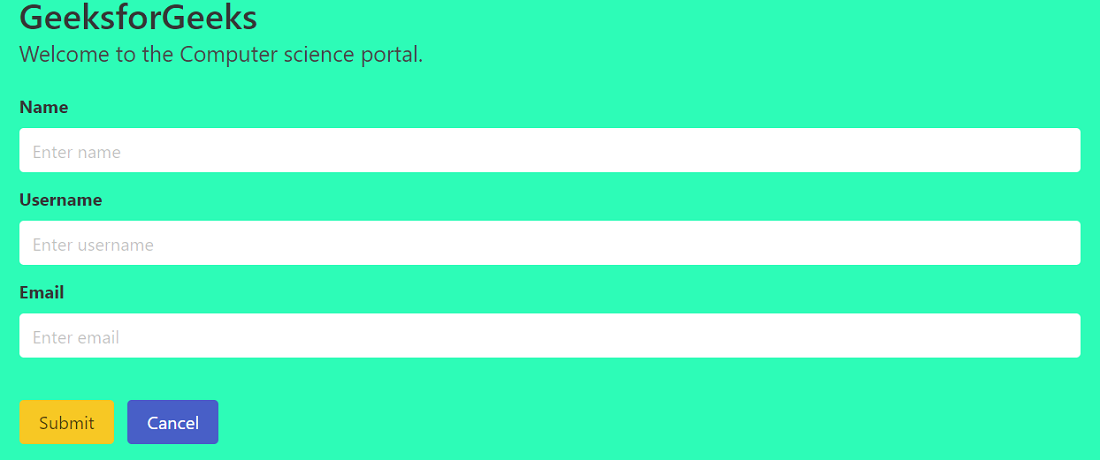
输出:

示例 2:另一个使用 SASS-CLI 说明 Bulma 的示例。
HTML
GeeksforGeeks
Welcome to the Computer science portal.
CSS
@charset "utf-8";

// Set your brand colors
$success: #2dfcb7;
$warning: #f7c824;

// Update Bulma's global variables
$widescreen-enabled: false;
$fullhd-enabled: false;

// Update some of Bulma's component variables
$body-background-color: $success;
$control-border-width: 2px;
$input-border-color: transparent;
$input-shadow: none;

// Import only what you need from Bulma
@import "../node_modules/bulma/sass/utilities/_all.sass";
@import "../node_modules/bulma/sass/base/_all.sass";
@import "../node_modules/bulma/sass/elements/_all.sass";
@import "../node_modules/bulma/sass/form/_all.sass";
输出:

参考: https://bulma.io/documentation/customize/with-sass-cli/