基于MATLAB的数字图像处理去噪技术
去噪是从图像中去除或减少噪声或伪影的过程。去噪使图像更加清晰,使我们能够清楚地看到图像中更精细的细节。它不会直接改变图像的亮度或对比度,但由于去除了伪影,最终图像可能看起来更亮。
在这个去噪过程中,我们选择一个二维框并将其滑过图像。使用框重新计算原始图像的每个像素的强度。
框平均技术:
框平均可以定义为相应像素的强度将替换为框所跨越的其相邻像素的所有强度的平均值。这是一个点运算符。
现在,让我们假设框大小为 5 x 5。它一次将跨越 25 个像素。中心像素(中心像素上的点运算符)的强度值将是 5 x 5 维度的框所覆盖的所有 25 个像素的强度的平均值。
例子:
Matlab
% MATLAB code for Box averaging
% Read the cameraman image.
k1=imread("cameraman.jpg");

% create the noise of standard deviation 25
n=25*randn(size(k1));

%add the noise to the image=noisy_image
k2=double(k1)+n;

%display the noisy image.
imtool(k2,[]);

%averagin using [5 5] sliding box.
k3=uint8(colfilt(k2,[5 5], 'sliding', @mean));

%display the denoised image.
imtool(k3,[]);

%averagin using [9 9] sliding box.
k4=uint8(colfilt(k2, [9 9], 'sliding', @mean));

%display the denoised image.
imtool(k4,[]);
Matlab
% MATLAB code for denoised imaged using
% convolution filter technique
% Read the cameraman image.
k1=imread("cameraman.jpg");

% create the noise.
n=25*randn(size(k1));

% add the noise to the image = noisy_image
k2=double(k1)+n;

% create the kernel of size [5 5]
h1=ones(5,5)*1/25;

% convule the image with the kernel.
k3=uint8(conv2(k2, h1,'same'));

% display the denoised image.
imtool(k3,[]);

% create the kernel of size [9 9]
h2=ones(9,9)*1/81;

% convule the image with the kernel.
k4=conv2(k2,h2,'same');

% display the denoised image.
imtool(k4,[]);
Matlab
% MATLAB code for denoised using
% Gaussian Filter:
k1=imread("cameraman.jpg");

% create the noise.
n=25*randn(size(k1));

% add the noise to the image = noisy_image
k2=double(k1)+n;

%create and print the kernel of size [3 3]
h1=fspecial('gaussian',3,1);
h1

% convule the image with the kernel.
k3=uint8(conv2(k2, h1,'same'));

% display the denoised image.
imtool(k3,[]);

% create and print the kernel of size [20 20]
h2=fspecial('gaussian',20,1);
h2

% convule the image with the kernel.
k4=uint8(conv2(k2,h2,'same'));

% display the denoised image.
imtool(k4,[]);
Matlab
% MATLAB code for denoising by averaging
% Read the cameraman image: original image.
I=imread("cameraman.jpg");

% Create noise-1 of std=40
n1=40*randn(size(I));

% Create first noisy_image by adding the noise to orig image.
I1=double(I)+n1;

% Create noise-2 of std=40
n2=40*randn(size(I));

% Create 2nd noisy_image by adding the noise to orig image.
I2=double(I)+n2;

% Create noise-3 of std=40
n3=40*randn(size(I));

% Create 3rd noisy_image by adding the noise to orig image.
I3=double(I)+n3;

% Create noise-4 of std=40
n4=40*randn(size(I));

% Create 4th noisy_image by adding the noise to orig image.
I4=double(I)+n4;

% Create noise-5 of std=40
n5=40*randn(size(I));

% Create 5th noisy_image by adding the noise to orig image.
I5=double(I)+n5;

% Now lets see denoising.
d1=(I1+I2)/2;
d2=(I1+I2+I3)/3;
d3=(I1+I2+I3+I4)/4;
d4=(I1+I2+I3+I4+I5)/5;

%display each denoised image with original noisy image.
imtool(I1,[]);
imtool(d1,[]);
imtool(d2,[]);
imtool(d3,[]);
imtool(d4,[]);
输出:


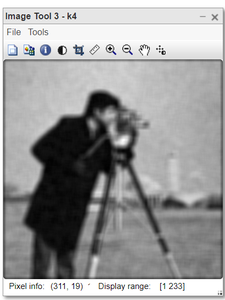
但是这种技术有一些缺点:
- 它在较小程度上减少了噪声,但会在图像中引入模糊。
- 如果我们增加框的大小,那么图像中的平滑度和模糊度会成比例地增加。
简单的高斯卷积技术:
卷积的工作与框平均相似。在卷积技术中,我们定义框并用值对其进行初始化。出于去噪目的,我们初始化框,使其表现得像平均框。卷积框称为内核。内核在图像上滑动。中心像素的值由内核跨越的所有相邻像素的平均值代替。
内核工作:内核和相应像素的值相乘,所有这些乘积相加得到最终结果。如果我们的内核大小为 [5 5],那么我们用 1/25 初始化内核。当所有像素乘以 1/25 并加在一起时,最终结果只是在某个时间点放置内核的所有 25 个像素的平均值。
卷积优于框平均的优点是有时卷积滤波器(内核)是可分离的,我们将较大的内核分成两个或多个部分。它减少了要执行的计算操作。
例子:
MATLAB
% MATLAB code for denoised imaged using
% convolution filter technique
% Read the cameraman image.
k1=imread("cameraman.jpg");

% create the noise.
n=25*randn(size(k1));

% add the noise to the image = noisy_image
k2=double(k1)+n;

% create the kernel of size [5 5]
h1=ones(5,5)*1/25;

% convule the image with the kernel.
k3=uint8(conv2(k2, h1,'same'));

% display the denoised image.
imtool(k3,[]);

% create the kernel of size [9 9]
h2=ones(9,9)*1/81;

% convule the image with the kernel.
k4=conv2(k2,h2,'same');

% display the denoised image.
imtool(k4,[]);
输出:


这种技术的一个缺点是:
- 除了减少噪声之外,它还引入了图像中的模糊性。
- 由于错误的平均结果,图像边缘变得模糊。
高斯滤波器:
此内核或过滤器对中心像素具有更大的权重。在边缘平均的同时,更多的权重被赋予边缘像素,因此它为我们提供了接近实际像素值的像素值,因此,减少了边缘的模糊度。
请记住,如果我们增加过滤器的大小,去噪程度会增加,并且模糊度也会增加。但与其他平均技术相比,模糊性要小得多。
例子:
MATLAB
% MATLAB code for denoised using
% Gaussian Filter:
k1=imread("cameraman.jpg");

% create the noise.
n=25*randn(size(k1));

% add the noise to the image = noisy_image
k2=double(k1)+n;

%create and print the kernel of size [3 3]
h1=fspecial('gaussian',3,1);
h1

% convule the image with the kernel.
k3=uint8(conv2(k2, h1,'same'));

% display the denoised image.
imtool(k3,[]);

% create and print the kernel of size [20 20]
h2=fspecial('gaussian',20,1);
h2

% convule the image with the kernel.
k4=uint8(conv2(k2,h2,'same'));

% display the denoised image.
imtool(k4,[]);
输出:


通过平均噪声图像去噪:
这是一种非常简单而有趣的去噪技术。使用这种技术的要求是:
- 我们应该有 2 个或更多相同场景或对象的图像。
- 图像捕捉设备的噪声应该是固定的。例如,相机的噪声标准偏差为 20。
在职的:
收集由同一设备捕获的同一对象的多张图像。只需取所有图像的平均值即可得到结果图像。每个像素的强度将被所有收集到的图像中相应像素的强度的平均值代替。这种技术将减少噪声,并且最终图像不会有任何模糊。
假设我们有 n 个图像。然后噪音会降低程度: ![]()
用于平均的图像数量越多,我们在去噪后得到的图像就越清晰。
例子:
MATLAB
% MATLAB code for denoising by averaging
% Read the cameraman image: original image.
I=imread("cameraman.jpg");

% Create noise-1 of std=40
n1=40*randn(size(I));

% Create first noisy_image by adding the noise to orig image.
I1=double(I)+n1;

% Create noise-2 of std=40
n2=40*randn(size(I));

% Create 2nd noisy_image by adding the noise to orig image.
I2=double(I)+n2;

% Create noise-3 of std=40
n3=40*randn(size(I));

% Create 3rd noisy_image by adding the noise to orig image.
I3=double(I)+n3;

% Create noise-4 of std=40
n4=40*randn(size(I));

% Create 4th noisy_image by adding the noise to orig image.
I4=double(I)+n4;

% Create noise-5 of std=40
n5=40*randn(size(I));

% Create 5th noisy_image by adding the noise to orig image.
I5=double(I)+n5;

% Now lets see denoising.
d1=(I1+I2)/2;
d2=(I1+I2+I3)/3;
d3=(I1+I2+I3+I4)/4;
d4=(I1+I2+I3+I4+I5)/5;

%display each denoised image with original noisy image.
imtool(I1,[]);
imtool(d1,[]);
imtool(d2,[]);
imtool(d3,[]);
imtool(d4,[]);
输出:
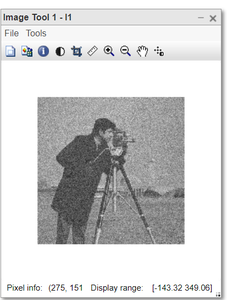
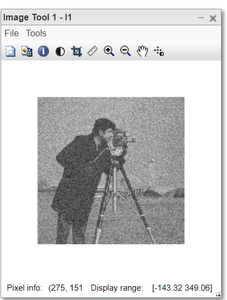
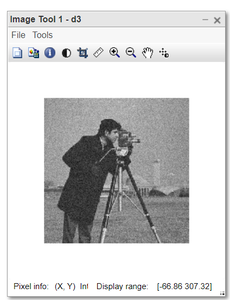
Noisy_image 和 Denoised-1


Noisy_image 和 Denoised-2


Noisy_image 和 Denoised-3


Noisy_image 和 Denoised-4


如果我们拍摄更多图像进行平均,质量会直接提高。