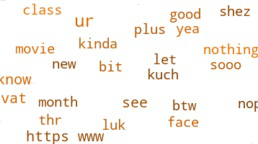
使用Python将 WhatsApp 聊天数据转换为词云
让我们看看如何使用WhatsApp聊天文件创建词云。
将 WhatsApp 聊天文件从 .txt 格式转换为 .csv 文件。这可以使用 Pandas 完成。创建一个读取 .txt 文件的 DataFrame。 .txt 文件没有像 .csv 文件中那样的列。
然后,通过分隔数据并为每列命名,将数据拆分为列。聊天文件中数据集的第一行包含此处不需要的加密详细信息。然后,将剩下的 2 个部分命名为Date和Convo ,这两个部分用逗号分隔,即“,”。
Python3
df = df.drop(0)
df.columns = ['Date', 'Convo']
Python3
Chat = df["Convo"].str.split("-", n = 1,
                             expand = True)
df['Time'] = Chat[0]
df['Content'] = Chat[1]
Python3
Chat1 = df["Content"].str.split(":", n = 1,
                                expand = True)
df['User'] = Chat1[0]
df['Message'] = Chat1[1]
Python3
df = df.drop(columns = ['Convo'])
df[['Message'] = df['Message'].str.lower()
df['Message'] = df['Message'].str.replace('',
                                          'Media Shared')
df['Message'] = df['Message'].str.replace('this message was deleted',
                                          'DeletedMsg')
Python3
df.to_csv("new_csv.csv", index = False)Python3
# importing the modules
import matplotlib.plyplot as mpl
from worcloud import WordCloud,STOPWORDS

# reading the csv file as a DataFrame
df1 = pd.read_csv("new_csv.csv")

# defining the stop words
stopwords = set(STOPWORDS)
words=''.join(df1.Message.astype(str)).lower()

# making the word cloud
wordcloud = WordCloud(stopwords = stopwords,
                      min_font_size = 10,
                      background_color = 'white',
                      width = 800,
                      height = 800,
                      color_func = random_color_func).generate(words)
Python3
def random_color_func(word = None,
                      font_size = None,
                      position = None,
                      orientation = None,
                      font_path = None,
                      random_state = None):
    h = int(360.0 * 21.0 / 255.0)
    s = int(100.0 * 255.0 / 255.0)
    l = int(100.0 * float(random_state.randint(60, 120)) / 255.0)
Python3
mpl.figure(figsize = (8, 8), facecolor = None)
mpl.imshow(wordcloud, interpolation = "bilinear")
mpl.axis("off")
mpl.tight_layout(pad = 0)
mpl.show()
Python3
import pandas as pd
import matplotlib.plyplot as mpl
from worcloud import WordCloud, STOPWORDS

df = pd.read_csv(r"WhatsAppChat.txt",
                 header = None,
                 error_bad_lines = False,
                 encoding = 'utf8')
df = df.drop(0)
df.columns = ['Date', 'Convo']
Chat = df["Convo"].str.split("-", n = 1,
                             expand = True)
df['Time'] = Chat[0]
df['Content'] = Chat[1]
Chat1 = df["Content"].str.split(": ", n = 1,
                                expand=True)
df['User'] = Chat1[0]
df['Message'] = Chat1[1]
df = df.drop(columns = ['Convo'])
df['Message'] = df['Message'].str.lower()
df['Message'] = df['Message'].str.replace('< media omitted >', 'Media Shared')
df['Message'] = df['Message'].str.replace('this message was deleted', 'DeletedMsg')
df.to_csv("new_csv.csv", index = False)

def random_color_func(word = None,
                      font_size = None,
                      position = None,
                      orientation = None,
                      font_path = None,
                      random_state = None):
    h = int(360.0 * 21.0 / 255.0)
    s = int(100.0 * 255.0 / 255.0)
    l = int(100.0 * float(random_state.randint(60, 120)) / 255.0)

df1 = pd.read_csv("new_csv.csv")
stopwords = set(STOPWORDS)
words = ''.join(df1.Message.astype(str)).lower()

wordcloud = WordCloud(stopwords = stopwords,
                      min_font_size = 10,
                      background_color = 'white',
                      width = 800,
                      height = 800,
                      color_func = random_color_func).generate(words)

mpl.figure(figsize = (8, 8), facecolor = None)
mpl.imshow(wordcloud, interpolation = "bilinear")
mpl.axis("off")
mpl.tight_layout(pad = 0)
mpl.show()
现在,将 Convo 数据集分成“ Time ”和“ Content ”列,两者都用连字符“-”分隔。 Convo 列中的数据被制成数据框Chat 。
Python3
Chat = df["Convo"].str.split("-", n = 1,
                             expand = True)
df['Time'] = Chat[0]
df['Content'] = Chat[1]
将 Content 列创建到另一个数据集Chat1中,将其进一步分为 2 列,“ User ”和“ Message ”,两者用冒号分隔,即“:”。
Python3
Chat1 = df["Content"].str.split(":", n = 1,
                                expand = True)
df['User'] = Chat1[0]
df['Message'] = Chat1[1]
现在,删除 Convo 列并将 Message 列转换为小写。所有列媒体省略单元格和已删除消息都替换为字符串“Media Shared”和“DeletedMsg”。
Python3
df = df.drop(columns = ['Convo'])
df[['Message'] = df['Message'].str.lower()
df['Message'] = df['Message'].str.replace('',
                                          'Media Shared')
df['Message'] = df['Message'].str.replace('this message was deleted',
                                          'DeletedMsg')
最后,将数据框转换为名为“ new_csv.csv ”的 .csv 文件。
Python3
df.to_csv("new_csv.csv", index = False)
现在我们必须从这个 CSV 文件中制作一个词云。为此,我们需要 word cloud 和 matplotlib.plyplot 包。使用 new_csv.csv 文件从中读取数据并创建数据框。创建一组停用词和一个变量来存储从 WordCloud函数生成的所有数据。从包含所有聊天文本的Message列中提取数据并将其转换为小写字符串。
Python3
# importing the modules
import matplotlib.plyplot as mpl
from worcloud import WordCloud,STOPWORDS

# reading the csv file as a DataFrame
df1 = pd.read_csv("new_csv.csv")

# defining the stop words
stopwords = set(STOPWORDS)
words=''.join(df1.Message.astype(str)).lower()

# making the word cloud
wordcloud = WordCloud(stopwords = stopwords,
                      min_font_size = 10,
                      background_color = 'white',
                      width = 800,
                      height = 800,
                      color_func = random_color_func).generate(words)
这里,函数“ random_color_func ”用于为单词呈现随机的橙色。这是通过更改 hsl(色调、饱和度、亮度)值中的值来完成的。
Python3
def random_color_func(word = None,
                      font_size = None,
                      position = None,
                      orientation = None,
                      font_path = None,
                      random_state = None):
    h = int(360.0 * 21.0 / 255.0)
    s = int(100.0 * 255.0 / 255.0)
    l = int(100.0 * float(random_state.randint(60, 120)) / 255.0)
然后使用 mpl 绘制和可视化 wordcloud 变量中的单词。
Python3
mpl.figure(figsize = (8, 8), facecolor = None)
mpl.imshow(wordcloud, interpolation = "bilinear")
mpl.axis("off")
mpl.tight_layout(pad = 0)
mpl.show()

完整代码如下:
Python3
import pandas as pd
import matplotlib.plyplot as mpl
from worcloud import WordCloud, STOPWORDS

df = pd.read_csv(r"WhatsAppChat.txt",
                 header = None,
                 error_bad_lines = False,
                 encoding = 'utf8')
df = df.drop(0)
df.columns = ['Date', 'Convo']
Chat = df["Convo"].str.split("-", n = 1,
                             expand = True)
df['Time'] = Chat[0]
df['Content'] = Chat[1]
Chat1 = df["Content"].str.split(": ", n = 1,
                                expand=True)
df['User'] = Chat1[0]
df['Message'] = Chat1[1]
df = df.drop(columns = ['Convo'])
df['Message'] = df['Message'].str.lower()
df['Message'] = df['Message'].str.replace('< media omitted >', 'Media Shared')
df['Message'] = df['Message'].str.replace('this message was deleted', 'DeletedMsg')
df.to_csv("new_csv.csv", index = False)

def random_color_func(word = None,
                      font_size = None,
                      position = None,
                      orientation = None,
                      font_path = None,
                      random_state = None):
    h = int(360.0 * 21.0 / 255.0)
    s = int(100.0 * 255.0 / 255.0)
    l = int(100.0 * float(random_state.randint(60, 120)) / 255.0)

df1 = pd.read_csv("new_csv.csv")
stopwords = set(STOPWORDS)
words = ''.join(df1.Message.astype(str)).lower()

wordcloud = WordCloud(stopwords = stopwords,
                      min_font_size = 10,
                      background_color = 'white',
                      width = 800,
                      height = 800,
                      color_func = random_color_func).generate(words)

mpl.figure(figsize = (8, 8), facecolor = None)
mpl.imshow(wordcloud, interpolation = "bilinear")
mpl.axis("off")
mpl.tight_layout(pad = 0)
mpl.show()