用Python生成任意形状的词云
在本文中,我们将讨论如何在Python创建任何形状的词云。
术语词云是指一种用于显示文本数据的数据可视化技术,其中每个单词的大小表示其频率或相关性。要创建任何形状的词云,请使用 Python 的 Matplotlib、wordcloud、NumPy 和 PIL 包。
分步实施
让我们来看看分步实施——
第 1 步:安装以下模块,如下所示-
pip install matplotlib
pip install wordcloud
第 2 步:导入以下模块,如下所示-
import matplotlib.pyplot as plt
from wordcloud import WordCloud, STOPWORDS
import numpy as np
from PIL import Image
第 3 步:按照以下步骤操作-
- 提供您要使用的文本文件的完整路径。
- 在读取模式下,打开文本文件。
- 最后,编码并读取它。
- 在本文中将使用以下文本文件 - 文本
text = open(r'C:\Users\Dell\Desktop\Wordcloud\Text.txt',
            mode='r', encoding='utf-8').read()
第 4 步:按照以下步骤操作-
- 给出我们将用来使输出具有相同形状的整个图像路径。
- 然后,使用 image.open函数,打开图像。
- 之后,使用 NumPy 创建图像的数组。
- 下图将用于本文中所需的形状

mask = np.array(Image.open(r'C:\Users\Dell|Downloads\Garbage\GFG.png'))步骤5:通过集成停用词、掩码、背景颜色、最大单词数创建词云 在 wordcloud 中,遮罩的高度和遮罩的宽度。
- 停用词-用于避免不必要的字符,例如- './-[{)*&^%~@!#%^&]。
- mask- Mask 是我们将 wordcloud 转换成的形状。
- background_color-我们可以使用任何我们喜欢的背景颜色,比如黑色、绿色等等。
- max_words - 词云可以包含的最大单词数。
- max_font-最大字体大小。
- wordcloud的宽高用Width和Height表示。
wc = WordCloud(stopwords = STOPWORDS,
               mask = mask, background_color = "white",
               max_words = 2000, max_font_size = 500,
               random_state = 42, width = mask.shape[1],
               height = mask.shape[0])
第 6 步:
- 现在,使用 generate函数,我们将从提供的文本创建一个 wordcloud。
- 要显示图像数据,请使用 imshow函数。
- 我们将尝试关闭 x 和 y 轴。
- 最后,我们将使用 matplotlib 中定义的 show函数显示生成的 wordcloud。
wc.generate(text)
plt.imshow(wc, interpolation="None")
plt.axis('off')
plt.show()
下面是完整的实现。
Python3
# Python3 program to implement
# the above approach
# Import the following modules

# pip install matplotlib
import matplotlib.pyplot as plt

# pip install wordcloud
from wordcloud import WordCloud, STOPWORDS
import numpy as np
from PIL import Image

# Give the whole path of the text file,
# open it, read it, and encode it.
text = open(r'C:\Users\Dell\Desktop\Wordcloud\Text.txt',
            mode = 'r', encoding = 'utf-8').read()

# The Image shape in which you wanna convert it to.
mask = np.array(Image.open(
                r'C:\Users\Dell\Downloads\Garbage\GFG.png'))

# Now inside the WordCloud, provide some functions:
# stopwords - For stopping the unuseful words
# like [,?/\"]
# font_path - provide the font path to which you
# wanna convert it to.
# max_words - Maximum number of words in the
# output image. Also provide height and width
# of the mask
wc = WordCloud(stopwords = STOPWORDS,
               mask = mask,
               background_color = "white",
               max_words = 2000,
               max_font_size = 500,
               random_state = 42,
               width = mask.shape[1],
               height = mask.shape[0])

# Finally generate the wordcloud of the given text
wc.generate(text)
plt.imshow(wc, interpolation = "None")

# Off the x and y axis
plt.axis('off')

# Now show the output cloud
plt.show()
Python3
# Python3 program to implement
# the above approach
# Import the following modules

# pip install matplotlib
import matplotlib.pyplot as plt

# pip install wordcloud
from wordcloud import WordCloud, STOPWORDS
import numpy as np
from PIL import Image

# Give the whole path of the text file,
# open it, read it, and encode it.
text = open(r'C:\Users\Dell\Desktop\Wordcloud\Text.txt',
            mode = 'r', encoding = 'utf-8').read()

# For changing the fonts of wordcloud fonts
path = r'C:\Users\Dell\Downloads\Garbage\Candy Beans.otf'

# The Image shape in which you wanna convert it to.
mask = np.array(Image.open(
                r'C:\Users\Dell\Downloads\Garbage\GFG.png'))

# Now inside the WordCloud, provide some functions:
# stopwords - For stopping the unuseful words
# like [,?/\"]
# font_path - provide the font path to which
# you wanna convert it to.
# max_words - Maximum number of words in
# the output image.
# Also provide height and width of the mask
wc = WordCloud(stopwords = STOPWORDS,
               font_path = path,
               mask = mask,
               background_color = "white",
               max_words = 2000,
               max_font_size = 500,
               random_state = 42,
               width = mask.shape[1],
               height = mask.shape[0])

# Finally generate the wordcloud of the given text
wc.generate(text)
plt.imshow(wc, interpolation = "None")

# Off the x and y axis
plt.axis('off')

# Now show the output cloud
plt.show()
Python3
# Python3 program to implement
# the above approach
# Import the following modules
# pip install matplotlib
import matplotlib.pyplot as plt
# pip install wordcloud
from wordcloud import WordCloud, STOPWORDS
import numpy as np
from PIL import Image
# Function for changing the color of the text
def one_color_func(word = None, font_size = None,
position = None, orientation = None,
font_path = None, random_state = None):
# This HSL is for the green color
h = 99
s = 62
l = 45
return "hsl({}, {}%, {}%)".format(h, s, l)
# Give the whole path of the text file,
# open it, read it, and encode it.
text = open(r'C:\Users\Dell\Desktop\Text.txt',
mode = 'r', encoding = 'utf-8').read()
# For changing the fonts of wordcloud fonts
path = r'C:\Users\Dell\Downloads\Garbage\Candy Beans.otf'
# The Image shape in which you wanna convert it to.
mask = np.array(Image.open(
r'C:\Users\Dell\Downloads\Garbage\GFG!.png'))
# Now inside the WordCloud, provide some functions:
# stopwords - For stopping the unuseful words
# like [,?/\"]
# font_path - provide the font path to which
# you wanna convert it to.
# max_words - Maximum number of words in
# the output image.
# Also provide height and width of the mask
wc = WordCloud(stopwords = STOPWORDS,
font_path = path,
mask = mask,
background_color = "white",
max_words = 2000,
max_font_size = 500,
random_state = 42,
width = mask.shape[1],
height = mask.shape[0],
color_func = one_color_func)
# Finally generate the wordcloud of
# the given text
wc.generate(text)
plt.imshow(wc, interpolation = "None")
# Off the x and y axis
plt.axis('off')
# Now show the output cloud
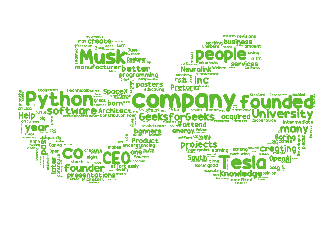
plt.show()输出:
更改字体大小
请按照以下步骤更改词云中单词的字体大小-
- 首先,从此集合中选择一种字体。
- 下载字体文件 - 您会看到它是 .zip 格式。
- 打开 zip 文件并从中提取 ttf 或 otf 文件。
- 现在只需提供 ttf 或 otf 文件的完整路径。
path = r'C:\Users\Dell\Downloads\Garbage\Candy Beans.otf'完整代码:
蟒蛇3
# Python3 program to implement
# the above approach
# Import the following modules

# pip install matplotlib
import matplotlib.pyplot as plt

# pip install wordcloud
from wordcloud import WordCloud, STOPWORDS
import numpy as np
from PIL import Image

# Give the whole path of the text file,
# open it, read it, and encode it.
text = open(r'C:\Users\Dell\Desktop\Wordcloud\Text.txt',
            mode = 'r', encoding = 'utf-8').read()

# For changing the fonts of wordcloud fonts
path = r'C:\Users\Dell\Downloads\Garbage\Candy Beans.otf'

# The Image shape in which you wanna convert it to.
mask = np.array(Image.open(
                r'C:\Users\Dell\Downloads\Garbage\GFG.png'))

# Now inside the WordCloud, provide some functions:
# stopwords - For stopping the unuseful words
# like [,?/\"]
# font_path - provide the font path to which
# you wanna convert it to.
# max_words - Maximum number of words in
# the output image.
# Also provide height and width of the mask
wc = WordCloud(stopwords = STOPWORDS,
               font_path = path,
               mask = mask,
               background_color = "white",
               max_words = 2000,
               max_font_size = 500,
               random_state = 42,
               width = mask.shape[1],
               height = mask.shape[0])

# Finally generate the wordcloud of the given text
wc.generate(text)
plt.imshow(wc, interpolation = "None")

# Off the x and y axis
plt.axis('off')

# Now show the output cloud
plt.show()
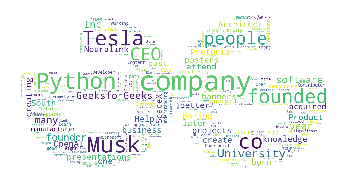
输出:
更改字体颜色
按照以下步骤更改词云中文本的字体颜色-
- 创建一个函数来更改字体颜色。
- 因为每种颜色的HSL都是唯一的,直接通过HSL返回即可。
完整代码:
蟒蛇3
# Python3 program to implement
# the above approach
# Import the following modules

# pip install matplotlib
import matplotlib.pyplot as plt

# pip install wordcloud
from wordcloud import WordCloud, STOPWORDS
import numpy as np
from PIL import Image

# Function for changing the color of the text
def one_color_func(word = None, font_size = None,
                   position = None, orientation = None,
                   font_path = None, random_state = None):

   # This HSL is for the green color
    h = 99
    s = 62
    l = 45
    return "hsl({}, {}%, {}%)".format(h, s, l)

# Give the whole path of the text file,
# open it, read it, and encode it.
text = open(r'C:\Users\Dell\Desktop\Text.txt',
            mode = 'r', encoding = 'utf-8').read()

# For changing the fonts of wordcloud fonts
path = r'C:\Users\Dell\Downloads\Garbage\Candy Beans.otf'

# The Image shape in which you wanna convert it to.
mask = np.array(Image.open(
                r'C:\Users\Dell\Downloads\Garbage\GFG!.png'))

# Now inside the WordCloud, provide some functions:
# stopwords - For stopping the unuseful words
# like [,?/\"]
# font_path - provide the font path to which
# you wanna convert it to.
# max_words - Maximum number of words in
# the output image.
# Also provide height and width of the mask
wc = WordCloud(stopwords = STOPWORDS,
               font_path = path,
               mask = mask,
               background_color = "white",
               max_words = 2000,
               max_font_size = 500,
               random_state = 42,
               width = mask.shape[1],
               height = mask.shape[0],
               color_func = one_color_func)

# Finally generate the wordcloud of
# the given text
wc.generate(text)
plt.imshow(wc, interpolation = "None")

# Off the x and y axis
plt.axis('off')

# Now show the output cloud
plt.show()
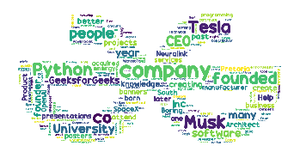
输出: