Python| Kivy 中的 BoxLayout 小部件
Kivy 是Python中一个独立于平台的 GUI 工具。因为它可以在Android、IOS、Linux和Windows等平台上运行。它基本上是用来开发Android应用程序的,但这并不意味着它不能在Desktops应用程序上使用。
???????? Kivy Tutorial – Learn Kivy with Examples.
现在在本文中,我们将了解如何在 kivy 中使用 BoxLayout 小部件,以及如何为其添加颜色、大小等功能。
盒子布局:
BoxLayout 以一个在另一个之上的垂直方式或以一个接一个的水平方式排列小部件。当您不提供任何大小提示时,子小部件会平均或相应地划分其父小部件的大小。
Basic Approach to follow while creating button :
1) import kivy
2) import kivyApp
3) import BoxLayout
4) set minimum version(optional)
5) Add widgets
6) Extend the class
7) Return layout
8) Run an instance of the class
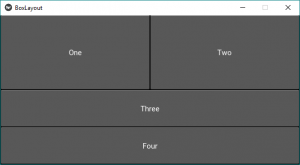
下面是使用 BoxLayout 的代码:
Python3
# code to show how to use nested boxlayouts.

# import kivy module
import kivy

# this restricts the kivy version i.e
# below this kivy version you cannot
# use the app or software
kivy.require("1.9.1")

# base Class of your App inherits from the App class.
# app:always refers to the instance of your application
from kivy.app import App

# creates the button in kivy
# if not imported shows the error
from kivy.uix.button import Button

# BoxLayout arranges children in a vertical or horizontal box.
# or help to put the children at the desired location.
from kivy.uix.boxlayout import BoxLayout

# class in which we are creating the button by using boxlayout
# defining the App class
class BoxLayoutApp(App):

    def build(self):

        # To position oriented widgets again in the proper orientation
        # use of vertical orientation to set all widgets
        superBox = BoxLayout(orientation ='vertical')

        # To position widgets next to each other,
        # use a horizontal BoxLayout.
        HB = BoxLayout(orientation ='horizontal')

        btn1 = Button(text ="One")
        btn2 = Button(text ="Two")

        # HB represents the horizontal boxlayout orientation
        # declared above
        HB.add_widget(btn1)
        HB.add_widget(btn2)

        # To position widgets above/below each other,
        # use a vertical BoxLayout.
        VB = BoxLayout(orientation ='vertical')

        btn3 = Button(text ="Three")
        btn4 = Button(text ="Four")

        # VB represents the vertical boxlayout orientation
        # declared above
        VB.add_widget(btn3)
        VB.add_widget(btn4)

        # superbox used to again align the oriented widgets
        superBox.add_widget(HB)
        superBox.add_widget(VB)

        return superBox

# creating the object root for BoxLayoutApp() class
root = BoxLayoutApp()

# run function runs the whole program
# i.e run() method which calls the
# target function passed to the constructor.
root.run()
Python3
# code to show how to use nested boxlayouts.

# import kivy module
import kivy

# to choose the colors randomly
# every time you run it shows different color
import random

# this restricts the kivy version i.e
# below this kivy version you cannot
# use the app or software
kivy.require("1.9.1")

# base Class of your App inherits from the App class.
# app:always refers to the instance of your application
from kivy.app import App

# creates the button in kivy
# if not imported shows the error
from kivy.uix.button import Button

# BoxLayout arranges children in a vertical or horizontal box.
# or help to put the children at the desired location.
from kivy.uix.boxlayout import BoxLayout

# declaring the colours you can use directly also
red = [1, 0, 0, 1]
green = [0, 1, 0, 1]
blue =  [0, 0, 1, 1]
purple = [1, 0, 1, 1]

# class in which we are creating the button
class BoxLayoutApp(App):

    def build(self):

        # To position oriented widgets again in the proper orientation
        # use of vertical orientation to set all widgets
        superBox = BoxLayout(orientation ='vertical')

        # To position widgets next to each other,
        # use a horizontal BoxLayout.
        HB = BoxLayout(orientation ='horizontal')

        colors = [red, green, blue, purple]

        # styling the button boxlayout
        btn1 = Button(text ="One",
                      background_color = random.choice(colors),
                      font_size = 32,
                      size_hint =(0.7, 1))
        btn2 = Button(text ="Two",
                      background_color = random.choice(colors),
                      font_size = 32,
                      size_hint =(0.7, 1))

        # HB represents the horizontal boxlayout orientation
        # declared above
        HB.add_widget(btn1)
        HB.add_widget(btn2)

        # To position widgets above/below each other,
        # use a vertical BoxLayout.
        VB = BoxLayout(orientation ='vertical')

        btn3 = Button(text ="Three",
                      background_color = random.choice(colors),
                      font_size = 32,
                      size_hint =(1, 10))
        btn4 = Button(text ="Four",
                      background_color = random.choice(colors),
                      font_size = 32,
                      size_hint =(1, 15))

        # VB represents the vertical boxlayout orientation
        # declared above
        VB.add_widget(btn3)
        VB.add_widget(btn4)

        # superbox used to again align the oriented widgets
        superBox.add_widget(HB)
        superBox.add_widget(VB)

        return superBox

# creating the object root for BoxLayoutApp() class
root = BoxLayoutApp()

# run function runs the whole program
# i.e run() method which calls the
# target function passed to the constructor.
root.run()
输出:

一些修改,如在 Box 布局小部件中添加颜色、修复大小:
Python3
# code to show how to use nested boxlayouts.

# import kivy module
import kivy

# to choose the colors randomly
# every time you run it shows different color
import random

# this restricts the kivy version i.e
# below this kivy version you cannot
# use the app or software
kivy.require("1.9.1")

# base Class of your App inherits from the App class.
# app:always refers to the instance of your application
from kivy.app import App

# creates the button in kivy
# if not imported shows the error
from kivy.uix.button import Button

# BoxLayout arranges children in a vertical or horizontal box.
# or help to put the children at the desired location.
from kivy.uix.boxlayout import BoxLayout

# declaring the colours you can use directly also
red = [1, 0, 0, 1]
green = [0, 1, 0, 1]
blue =  [0, 0, 1, 1]
purple = [1, 0, 1, 1]

# class in which we are creating the button
class BoxLayoutApp(App):

    def build(self):

        # To position oriented widgets again in the proper orientation
        # use of vertical orientation to set all widgets
        superBox = BoxLayout(orientation ='vertical')

        # To position widgets next to each other,
        # use a horizontal BoxLayout.
        HB = BoxLayout(orientation ='horizontal')

        colors = [red, green, blue, purple]

        # styling the button boxlayout
        btn1 = Button(text ="One",
                      background_color = random.choice(colors),
                      font_size = 32,
                      size_hint =(0.7, 1))
        btn2 = Button(text ="Two",
                      background_color = random.choice(colors),
                      font_size = 32,
                      size_hint =(0.7, 1))

        # HB represents the horizontal boxlayout orientation
        # declared above
        HB.add_widget(btn1)
        HB.add_widget(btn2)

        # To position widgets above/below each other,
        # use a vertical BoxLayout.
        VB = BoxLayout(orientation ='vertical')

        btn3 = Button(text ="Three",
                      background_color = random.choice(colors),
                      font_size = 32,
                      size_hint =(1, 10))
        btn4 = Button(text ="Four",
                      background_color = random.choice(colors),
                      font_size = 32,
                      size_hint =(1, 15))

        # VB represents the vertical boxlayout orientation
        # declared above
        VB.add_widget(btn3)
        VB.add_widget(btn4)

        # superbox used to again align the oriented widgets
        superBox.add_widget(HB)
        superBox.add_widget(VB)

        return superBox

# creating the object root for BoxLayoutApp() class
root = BoxLayoutApp()

# run function runs the whole program
# i.e run() method which calls the
# target function passed to the constructor.
root.run()
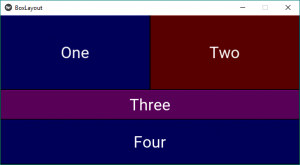
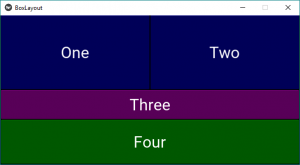
输出:
图片1:

图2:

注意:每次运行代码时,它都会为您提供图片中的不同颜色输出。