主题是任何应用程序 UI 的组成部分。主题用于设计应用程序的字体和颜色,使其更具表现力。在Flutter,Theme 小部件用于向应用程序添加主题。可以将它用于应用程序的特定部分,例如按钮和导航栏,也可以在应用程序的根目录中定义它以在整个应用程序中使用它。
Theme 类的构造函数:
const Theme(
{Key key,
@required ThemeData data,
bool isMaterialAppTheme: false,
@required Widget child}
)
主题小部件的属性:
- child: child属性将一个小部件作为对象显示在小部件树中的主题小部件下方。
- data:该属性将 ThemeData 类作为对象来指定要使用的样式、颜色和排版。
- isMarerialAppTheme:这个属性接受一个布尔值(final)作为对象。如果设置为 true,则主题使用材料设计。
在本文中,我们将通过使用主题小部件创建一个简单的应用程序来详细研究相同的小部件。为此,请执行以下步骤:
- 创建主题
- 创建一个容器来应用主题
- 在应用程序的一部分(或整个应用程序)中使用相同的主题。
现在,让我们详细研究上述步骤。
创建主题:
使用主题小部件创建主题。在主题中,可以使用的一些属性如下:
- 文字主题
- 亮度
- 原色
- 强调色
- 字体系列
一个简单的主题如下所示:
Dart
MaterialApp(
  title: title,
  theme: ThemeData(
    // UI
    brightness: Brightness.dark,
    primaryColor: Colors.lightBlue[800],
    accentColor: Colors.cyan[600],

    // font
    fontFamily: 'Georgia',
    //text style
    textTheme: TextTheme(
      headline1: TextStyle(fontSize: 72.0, fontWeight: FontWeight.bold),
      headline6: TextStyle(fontSize: 36.0, fontStyle: FontStyle.italic),
      bodyText2: TextStyle(fontSize: 14.0, fontFamily: 'Hind'),
    ),
  )
);
Dart
Container(
  color: Theme.of(context).accentColor,
  child: Text(
    'Hello Geeks!',
    style: Theme.of(context).textTheme.headline6,
  ),
);
Dart
Theme(
  data: ThemeData(
    accentColor: Colors.yellow,
  ),
  child: FloatingActionButton(
    onPressed: () {},
    child: Icon(Icons.add),
  ),
);
Dart
Theme(
  data: Theme.of(context).copyWith(accentColor: Colors.yellow),
  child: FloatingActionButton(
    onPressed: null,
    child: Icon(Icons.add),
  ),
);
Dart
import 'package:flutter/foundation.dart';
import 'package:flutter/material.dart';

void main() {
  runApp(MyApp());
}

class MyApp extends StatelessWidget {
  @override
  Widget build(BuildContext context) {
    final appName = 'GeeksForGeeks';

    return MaterialApp(
      title: appName,
      theme: ThemeData(
        brightness: Brightness.light,
        primaryColor: Colors.green,
        accentColor: Colors.deepOrangeAccent,
        fontFamily: 'Georgia',

        //text styling
        textTheme: TextTheme(
          headline1: TextStyle(fontSize: 72.0, fontWeight: FontWeight.bold),
          headline6: TextStyle(fontSize: 36.0, fontStyle: FontStyle.italic),
          bodyText2: TextStyle(fontSize: 14.0, fontFamily: 'Hind'),
        ),
      ),
      home: MyHomePage(
        title: appName,
      ),
    );
  }
}

class MyHomePage extends StatelessWidget {
  final String title;

  MyHomePage({Key key, @required this.title}) : super(key: key);

  @override
  Widget build(BuildContext context) {
    return Scaffold(
      appBar: AppBar(
        title: Text(title),
      ),
      body: Center(
        child: Container(
          color: Theme.of(context).accentColor,
          child: Text(
            'Hello Geeks!',
            style: Theme.of(context).textTheme.headline6,
          ),
        ),
      ),
      floatingActionButton: Theme(
        data: Theme.of(context).copyWith(
          colorScheme:
          Theme.of(context).colorScheme.copyWith(secondary: Colors.red),
        ),
        child: FloatingActionButton(
          onPressed: null,
          child: Icon(Icons.arrow_circle_up),
        ),
      ),
    );
  }
}
创建容器:
在Flutter,一个简单的容器可以定义如下:
Dart
Container(
  color: Theme.of(context).accentColor,
  child: Text(
    'Hello Geeks!',
    style: Theme.of(context).textTheme.headline6,
  ),
);
应用主题:
要在Flutter覆盖小部件的默认主题,可以将相同的小部件包装在 Theme 小部件中。可以创建一个Themedata()实例并将其传递给相应的小部件,如下所示:
Dart
Theme(
  data: ThemeData(
    accentColor: Colors.yellow,
  ),
  child: FloatingActionButton(
    onPressed: () {},
    child: Icon(Icons.add),
  ),
);
您可以使用copyWith()方法在应用程序范围内扩展相同的主题,如下所示:
Dart
Theme(
  data: Theme.of(context).copyWith(accentColor: Colors.yellow),
  child: FloatingActionButton(
    onPressed: null,
    child: Icon(Icons.add),
  ),
);
完整的源代码:
Dart
import 'package:flutter/foundation.dart';
import 'package:flutter/material.dart';

void main() {
  runApp(MyApp());
}

class MyApp extends StatelessWidget {
  @override
  Widget build(BuildContext context) {
    final appName = 'GeeksForGeeks';

    return MaterialApp(
      title: appName,
      theme: ThemeData(
        brightness: Brightness.light,
        primaryColor: Colors.green,
        accentColor: Colors.deepOrangeAccent,
        fontFamily: 'Georgia',

        //text styling
        textTheme: TextTheme(
          headline1: TextStyle(fontSize: 72.0, fontWeight: FontWeight.bold),
          headline6: TextStyle(fontSize: 36.0, fontStyle: FontStyle.italic),
          bodyText2: TextStyle(fontSize: 14.0, fontFamily: 'Hind'),
        ),
      ),
      home: MyHomePage(
        title: appName,
      ),
    );
  }
}

class MyHomePage extends StatelessWidget {
  final String title;

  MyHomePage({Key key, @required this.title}) : super(key: key);

  @override
  Widget build(BuildContext context) {
    return Scaffold(
      appBar: AppBar(
        title: Text(title),
      ),
      body: Center(
        child: Container(
          color: Theme.of(context).accentColor,
          child: Text(
            'Hello Geeks!',
            style: Theme.of(context).textTheme.headline6,
          ),
        ),
      ),
      floatingActionButton: Theme(
        data: Theme.of(context).copyWith(
          colorScheme:
          Theme.of(context).colorScheme.copyWith(secondary: Colors.red),
        ),
        child: FloatingActionButton(
          onPressed: null,
          child: Icon(Icons.arrow_circle_up),
        ),
      ),
    );
  }
}
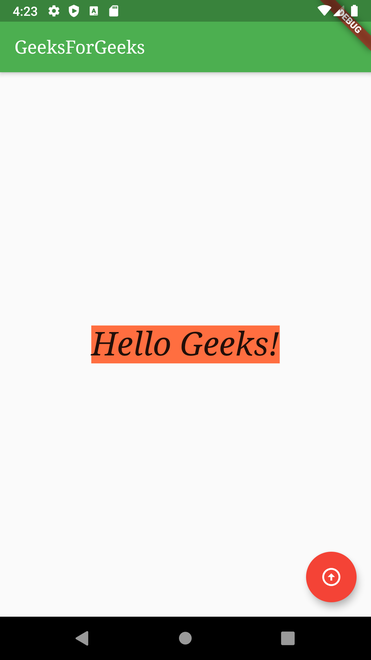
输出:

想要一个更快节奏和更具竞争力的环境来学习 Android 的基础知识吗?
单击此处前往由我们的专家精心策划的指南,旨在让您立即做好行业准备!