本地状态(有时称为UI 状态或临时状态):它是一种可以在单个小部件中管理的状态。这种状态不需要状态管理技术(Bloc、redux 等),Stateful Widget 就足够了。
例子:
页面视图中的当前页面,导航栏中的当前选项卡。
Dart
import 'package:flutter/material.dart';

void main() {
  runApp(MyApp());
}

class MyApp extends StatefulWidget {
  @override
  _MyAppState createState() => _MyAppState();
}

class _MyAppState extends State {
  List _spaces = [
    Text('Home Page',
        style: TextStyle(fontSize: 25, fontWeight: FontWeight.bold)),
    Text('Search Page',
        style: TextStyle(fontSize: 25, fontWeight: FontWeight.bold)),
    Text('Account Page',
        style: TextStyle(fontSize: 25, fontWeight: FontWeight.bold)),
  ];

  // local variable
  int _index = 0;
  @override
  Widget build(BuildContext context) {
    return MaterialApp(
      debugShowCheckedModeBanner: false,
      title: 'Geeks For Geeks',
      theme: ThemeData(
        primarySwatch: Colors.green,
      ),
      darkTheme: ThemeData.dark(),
      home: Scaffold(
        appBar: AppBar(
          leading: Icon(Icons.backspace),
          title: Text("Geeks for Geeks"),
          centerTitle: true,
        ),
        bottomNavigationBar: BottomNavigationBar(
          currentIndex: _index,
          onTap: (newIndex) {
            setState(() {

               // changing in widget
              _index = newIndex;
              print('$_index');
            });
          },
          items: [
            BottomNavigationBarItem(
              label: "Home",
              icon: Icon(Icons.home),
            ),
            BottomNavigationBarItem(
              label: "Search",
              icon: Icon(Icons.search),
            ),
            BottomNavigationBarItem(
              label: "Account",
              icon: Icon(Icons.person),
            ),
          ],
        ),
        body: Center(child: _spaces.elementAt(_index)),
      ),
    );
  }
}
Dart
dev_dependencies:
    provider: ^4.3.2
Dart
import 'package:flutter/material.dart';
import 'package:provider/provider.dart';

void main() {
  runApp(
    ChangeNotifierProvider(
      create: (context) => Counter(),
      child: MyApp(),
    ),
  );
}

class Counter with ChangeNotifier {
  int value = 0;

  void increment() {
    value += 1;
    notifyListeners();
  }
}

class MyApp extends StatelessWidget {
  @override
  Widget build(BuildContext context) {
    return MaterialApp(
      debugShowCheckedModeBanner: false,
      title: 'Geeks For Geeks',
      theme: ThemeData(
        primarySwatch: Colors.green,
      ),
      darkTheme: ThemeData.dark(),
      home: MyHomePage(),
    );
  }
}

class MyHomePage extends StatelessWidget {
  @override
  Widget build(BuildContext context) {
    return Scaffold(
      appBar: AppBar(
        leading: Icon(Icons.backspace),
        title: Text("Geeks for Geeks"),
        centerTitle: true,
      ),
      body: Center(
        child: Column(
          mainAxisAlignment: MainAxisAlignment.center,
          children: [
            Text('You have pushed the button this many times:'),
            Consumer(
              builder: (context, counter, child) => Text(
                '${counter.value}',
                style: TextStyle(fontSize: 26),
              ),
            ),
          ],
        ),
      ),
      floatingActionButton: FloatingActionButton(
        onPressed: () {
          var counter = context.read();
          counter.increment();
          // calling increment on tap
        },
        tooltip: 'Increment',
        child: Icon(Icons.add),
      ),
    );
  }
}
输出:
App-wide State :不是本地的并且可以通过我们的应用程序访问的状态,就是所谓的应用程序范围状态或共享状态。
示例:社交网络应用程序中的通知。
电子商务应用程序中的购物车状态。
第一步:首先在lib文件夹下的pubspec.yaml文件中添加Provider依赖。
Dart
dev_dependencies:
    provider: ^4.3.2
我们在pubspec 中添加了对 Provider 的依赖。 yaml文件位于依赖项中的 lib 文件夹中,如上所示:
现在单击 pub get 或保存文件,以便获取包。
第 2 步:使用 provider 我们通知更改并更新 counter 的状态:
Dart
import 'package:flutter/material.dart';
import 'package:provider/provider.dart';

void main() {
  runApp(
    ChangeNotifierProvider(
      create: (context) => Counter(),
      child: MyApp(),
    ),
  );
}

class Counter with ChangeNotifier {
  int value = 0;

  void increment() {
    value += 1;
    notifyListeners();
  }
}

class MyApp extends StatelessWidget {
  @override
  Widget build(BuildContext context) {
    return MaterialApp(
      debugShowCheckedModeBanner: false,
      title: 'Geeks For Geeks',
      theme: ThemeData(
        primarySwatch: Colors.green,
      ),
      darkTheme: ThemeData.dark(),
      home: MyHomePage(),
    );
  }
}

class MyHomePage extends StatelessWidget {
  @override
  Widget build(BuildContext context) {
    return Scaffold(
      appBar: AppBar(
        leading: Icon(Icons.backspace),
        title: Text("Geeks for Geeks"),
        centerTitle: true,
      ),
      body: Center(
        child: Column(
          mainAxisAlignment: MainAxisAlignment.center,
          children: [
            Text('You have pushed the button this many times:'),
            Consumer(
              builder: (context, counter, child) => Text(
                '${counter.value}',
                style: TextStyle(fontSize: 26),
              ),
            ),
          ],
        ),
      ),
      floatingActionButton: FloatingActionButton(
        onPressed: () {
          var counter = context.read();
          counter.increment();
          // calling increment on tap
        },
        tooltip: 'Increment',
        child: Icon(Icons.add),
      ),
    );
  }
}
输出:
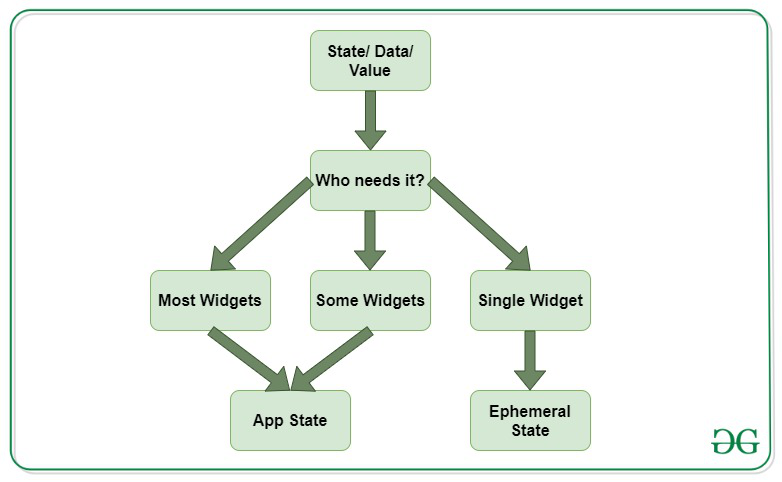
为了更好地理解 App state 和 Ephemeral State 之间的区别,请查看下图:
想要一个更快节奏和更具竞争力的环境来学习 Android 的基础知识吗?
单击此处前往由我们的专家精心策划的指南,旨在让您立即做好行业准备!