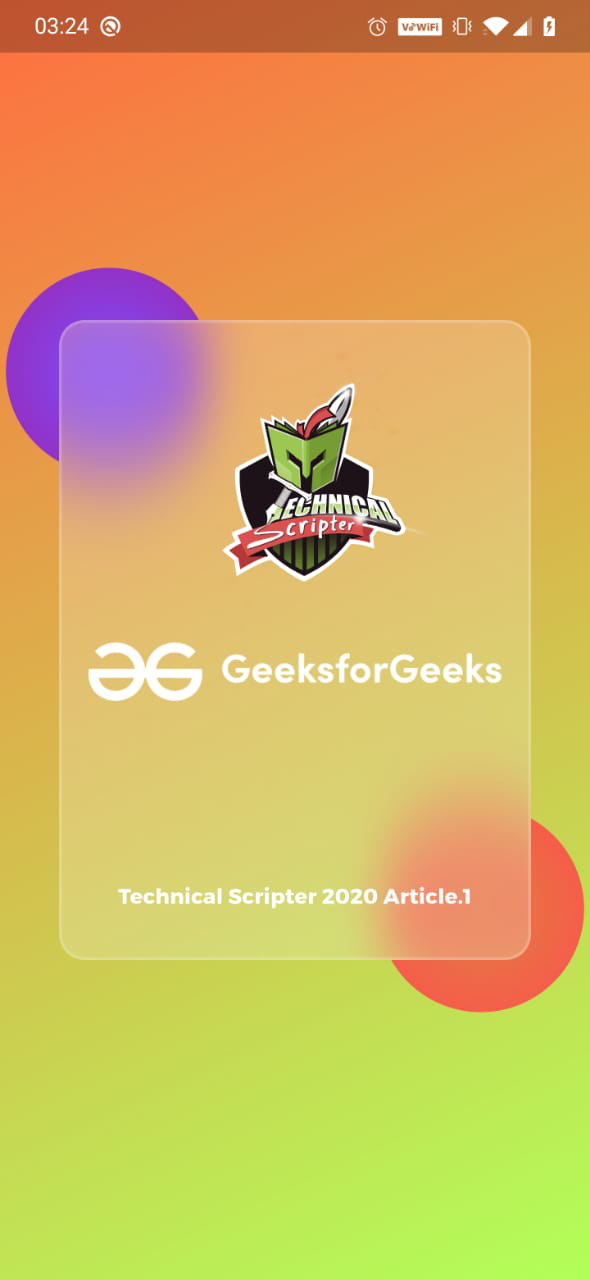
用户界面 (UI) 是应用程序和网站的成就和令人愉悦的关键组成部分。此外,由于 UI 是关于外观和计划方言的,因此它很容易受到获胜模式和风格的改变。从长远来看,不同的开发风格影响了 UI 环境。拟物化最终提供了一种水平、适度的计划方法。那时出现了 Neumorphism,它是由现实世界中的对象推动的。最近席卷UI 世界的模式是Glassmorphism。
Glassmorphism是 UI 中最新的模式,并且正在迅速流行起来。该计划的更标准用途之一出现在 2020 年的 Apple macOS Big Sur 中。但是,什么是Glassmorphism ?顾名思义,它具有简单、流畅的外观。客户看穿层是可行的。这些层可以帮助在设计中呈现渐进式系统。这种新的 UI 风格的亮点是:
- 如上所述,这种技术直接接管了具有背景模糊的虚拟玻璃。
- 一种多层方法,看起来好像物品在空间中掠过。
- 模糊的影响以充满活力的色调突出。
- 清晰物品上不显眼的边界
由于Flutter是使用单一代码库在不同平台上创建应用程序的最佳开源 UI 软件开发工具包,因此我们将使用它来演示这种流行的 UI 设计。
第 1 步:创建一个新的flutter应用程序项目并添加必要的依赖项。
- 打开 Vs Code,按“Ctrl+Shift+P”并选择“Flutter: New Application Project”
- 选择要添加此flutter项目的文件夹或新建一个
- 然后在选择文件夹后,为您的项目命名并点击“Enter”
- Flutter会为你创建一个新项目,然后在左下角点击“pubspec.yaml”文件
- 添加以下依赖项,其中包括 glassmorphism 包(检查:https://pub.dev/documentation/glassmorphism/latest/)和 google fonts 包(检查:https://pub.dev/packages/google_fonts)以使用玻璃容器和谷歌字体
dependencies:
  flutter:
    sdk: flutter
  glassmorphism ^1.0.4
  google_fonts ^1.1.2
第 2 步:创建资产文件夹并添加所需资产
- 在左侧寻找“新建文件夹”选项,添加一个新文件夹并将其命名为“资产”
- 右键单击文件夹并单击“在文件资源管理器中显示”,在资产文件夹中再创建一个文件夹并将其命名为“图像”。
- 转到此链接并下载资产文件,或者您可以自己选择图像
- 将这些文件复制到assets文件夹,再次打开“ pubspec.yaml ”文件,在“flutter”部分添加以下内容
flutter:
  uses-material-design: true
  assets:
      - assets/images/gfg_1.png
      - assets/images/technical_scripter.png
第 3 步:这是“main.js”的代码。 dart”文件在“lib”文件夹中:
Dart
import 'package:flutter/material.dart';

import 'HomePage.dart';

void main() {
  runApp(MyApp());
}

class MyApp extends StatelessWidget {

  // This widget is the root of your application.
  @override
  Widget build(BuildContext context) {
    return MaterialApp(
      title: 'Flutter Demo',
      debugShowCheckedModeBanner: false,
      theme: ThemeData(
        primarySwatch: Colors.blue,
      ),
      home: MyHomePage(),
    );
  }
}
Dart
// Dart Program to create a Glassmorphism UI for app

// importing material.dart
import 'package:flutter/material.dart';

// importing glassmorphism package
import 'package:glassmorphism/glassmorphism.dart';

// importing google fonts
import 'package:google_fonts/google_fonts.dart';

// creating class of stateful widget
class MyHomePage extends StatefulWidget {
  @override
  _MyHomePageState createState() => _MyHomePageState();
}

class _MyHomePageState extends State {
  @override
  Widget build(BuildContext context) {
    return Scaffold(
        body: Container(

            // for responsiveness of the ui we get the height
            // of current media using media queries
            height: MediaQuery.of(context).size.height,
            width: MediaQuery.of(context).size.width,

            // for creating a linear gradient in
            // the background using two colors
            decoration: BoxDecoration(
                gradient: LinearGradient(colors: [
              Colors.deepOrangeAccent,
              Colors.lightGreenAccent,
            ], begin: Alignment.topLeft, end: Alignment.bottomRight)),

            // building the layout
            child: LayoutBuilder(
              builder: (context, constraints) {
                return Stack(
                  children: [

                    // for creating the purple ball
                    Positioned(
                        top: constraints.maxHeight * 0.19,
                        left: constraints.maxWidth * 0.01,
                        child: Container(
                          height: constraints.maxHeight * 0.20,
                          width: constraints.maxWidth * 0.35,
                          decoration: BoxDecoration(
                              gradient: RadialGradient(
                                colors: [
                                  Colors.deepPurpleAccent,
                                  Colors.purple
                                ],
                                radius: 0.7,
                              ),
                              shape: BoxShape.circle),
                        )),

                    // for creating the red ball
                    Positioned(
                        top: constraints.maxHeight * 0.61,
                        right: constraints.maxWidth * 0.01,
                        child: Container(
                          height: constraints.maxHeight * 0.20,
                          width: constraints.maxWidth * 0.35,
                          decoration: BoxDecoration(
                              gradient: RadialGradient(
                                colors: [
                                  Colors.red.withOpacity(0.6),
                                  Colors.redAccent
                                ],
                                radius: 0.7,
                              ),

                              shape: BoxShape.circle),
                        )),

                    // for creating the glassmorphic
                    // container in the center
                    Center(
                      child: GlassmorphicContainer(
                        height: constraints.maxHeight * 0.5,
                        width: constraints.maxWidth * 0.8,
                        borderRadius: constraints.maxHeight * 0.02,
                        blur: 15,
                        alignment: Alignment.center,
                        border: 2,
                        linearGradient: LinearGradient(
                            colors: [
                              Colors.white.withOpacity(0.2),
                              Colors.white38.withOpacity(0.2)
                            ],
                            begin: Alignment.topLeft,
                            end: Alignment.bottomRight),
                        borderGradient: LinearGradient(colors: [
                          Colors.white24.withOpacity(0.2),
                          Colors.white70.withOpacity(0.2)
                        ]),
                        child: Stack(
                          children: [

                            // providing gfg logo to the container
                            Positioned(
                              top: constraints.maxHeight * 0.025,
                              right: constraints.maxWidth * 0.05,
                              child: Container(
                                height: constraints.maxHeight * 0.5,
                                width: constraints.maxWidth * 0.70,
                                child: Image.asset('assets/images/gfg_1.png'),
                              ),
                            ),

                            // providing text to the container
                            Positioned(
                              top: constraints.maxHeight * 0.010,
                              right: constraints.maxWidth * 0.05,
                              child: Container(
                                height: constraints.maxHeight * 0.23,
                                width: constraints.maxWidth * 0.60,
                                child: Image.asset(
                                    'assets/images/technical_scripter.png'),
                              ),
                            ),

                            // providing technical scripter
                            // logo to the container
                            Positioned(
                              top: constraints.maxHeight * 0.35,
                              right: constraints.maxWidth * 0.10,
                              child: Container(
                                height: constraints.maxHeight * 0.2,
                                width: constraints.maxWidth * 0.60,
                                child: FittedBox(
                                  fit: BoxFit.scaleDown,
                                  alignment: Alignment.centerLeft,
                                  child: Text(
                                    "Technical Scripter 2020 Article.1",
                                    style: GoogleFonts.montserrat(
                                        textStyle: TextStyle(
                                            color: Colors.white,
                                            letterSpacing: 1,
                                            fontSize: 80,
                                            fontWeight: FontWeight.w700)),
                                  ),
                                ),
                              ),
                            ),
                          ],
                        ),
                      ),
                    ),
                  ],
                );
              },
            )));
  }
}
第 4 步:将主页代码添加到我们的项目中
- 右键单击“lib”文件夹,添加新文件并将其命名为“HomePage.lib”。dart”
- 以下是“主页”的代码。 dart”文件
Dart
// Dart Program to create a Glassmorphism UI for app

// importing material.dart
import 'package:flutter/material.dart';

// importing glassmorphism package
import 'package:glassmorphism/glassmorphism.dart';

// importing google fonts
import 'package:google_fonts/google_fonts.dart';

// creating class of stateful widget
class MyHomePage extends StatefulWidget {
  @override
  _MyHomePageState createState() => _MyHomePageState();
}

class _MyHomePageState extends State {
  @override
  Widget build(BuildContext context) {
    return Scaffold(
        body: Container(

            // for responsiveness of the ui we get the height
            // of current media using media queries
            height: MediaQuery.of(context).size.height,
            width: MediaQuery.of(context).size.width,

            // for creating a linear gradient in
            // the background using two colors
            decoration: BoxDecoration(
                gradient: LinearGradient(colors: [
              Colors.deepOrangeAccent,
              Colors.lightGreenAccent,
            ], begin: Alignment.topLeft, end: Alignment.bottomRight)),

            // building the layout
            child: LayoutBuilder(
              builder: (context, constraints) {
                return Stack(
                  children: [

                    // for creating the purple ball
                    Positioned(
                        top: constraints.maxHeight * 0.19,
                        left: constraints.maxWidth * 0.01,
                        child: Container(
                          height: constraints.maxHeight * 0.20,
                          width: constraints.maxWidth * 0.35,
                          decoration: BoxDecoration(
                              gradient: RadialGradient(
                                colors: [
                                  Colors.deepPurpleAccent,
                                  Colors.purple
                                ],
                                radius: 0.7,
                              ),
                              shape: BoxShape.circle),
                        )),

                    // for creating the red ball
                    Positioned(
                        top: constraints.maxHeight * 0.61,
                        right: constraints.maxWidth * 0.01,
                        child: Container(
                          height: constraints.maxHeight * 0.20,
                          width: constraints.maxWidth * 0.35,
                          decoration: BoxDecoration(
                              gradient: RadialGradient(
                                colors: [
                                  Colors.red.withOpacity(0.6),
                                  Colors.redAccent
                                ],
                                radius: 0.7,
                              ),

                              shape: BoxShape.circle),
                        )),

                    // for creating the glassmorphic
                    // container in the center
                    Center(
                      child: GlassmorphicContainer(
                        height: constraints.maxHeight * 0.5,
                        width: constraints.maxWidth * 0.8,
                        borderRadius: constraints.maxHeight * 0.02,
                        blur: 15,
                        alignment: Alignment.center,
                        border: 2,
                        linearGradient: LinearGradient(
                            colors: [
                              Colors.white.withOpacity(0.2),
                              Colors.white38.withOpacity(0.2)
                            ],
                            begin: Alignment.topLeft,
                            end: Alignment.bottomRight),
                        borderGradient: LinearGradient(colors: [
                          Colors.white24.withOpacity(0.2),
                          Colors.white70.withOpacity(0.2)
                        ]),
                        child: Stack(
                          children: [

                            // providing gfg logo to the container
                            Positioned(
                              top: constraints.maxHeight * 0.025,
                              right: constraints.maxWidth * 0.05,
                              child: Container(
                                height: constraints.maxHeight * 0.5,
                                width: constraints.maxWidth * 0.70,
                                child: Image.asset('assets/images/gfg_1.png'),
                              ),
                            ),

                            // providing text to the container
                            Positioned(
                              top: constraints.maxHeight * 0.010,
                              right: constraints.maxWidth * 0.05,
                              child: Container(
                                height: constraints.maxHeight * 0.23,
                                width: constraints.maxWidth * 0.60,
                                child: Image.asset(
                                    'assets/images/technical_scripter.png'),
                              ),
                            ),

                            // providing technical scripter
                            // logo to the container
                            Positioned(
                              top: constraints.maxHeight * 0.35,
                              right: constraints.maxWidth * 0.10,
                              child: Container(
                                height: constraints.maxHeight * 0.2,
                                width: constraints.maxWidth * 0.60,
                                child: FittedBox(
                                  fit: BoxFit.scaleDown,
                                  alignment: Alignment.centerLeft,
                                  child: Text(
                                    "Technical Scripter 2020 Article.1",
                                    style: GoogleFonts.montserrat(
                                        textStyle: TextStyle(
                                            color: Colors.white,
                                            letterSpacing: 1,
                                            fontSize: 80,
                                            fontWeight: FontWeight.w700)),
                                  ),
                                ),
                              ),
                            ),
                          ],
                        ),
                      ),
                    ),
                  ],
                );
              },
            )));
  }
}
步骤 5:添加新设备并运行项目
- 将新设备添加到您的项目中,例如任何 android 移动模拟器、真实设备或 chrome(web)
- 之后按“Ctrl + F5”或转到“运行”>“无需调试即可运行”并查看连接设备上的输出
输出:

Glassmorphism UI 动画