- php MVC框架
- php MVC框架(1)
- MVC框架教程(1)
- MVC框架教程
- MVC框架-资源(1)
- MVC框架-资源
- MVC框架-简介(1)
- MVC框架-简介
- MVC框架-视图(1)
- Spring-MVC框架(1)
- Spring – MVC 框架(1)
- MVC框架-视图
- Spring – MVC 框架
- Spring-MVC框架
- 讨论MVC框架
- 讨论MVC框架(1)
- MVC框架介绍(1)
- MVC框架介绍
- MVC框架-布局(1)
- MVC框架-布局
- CodeIgniter-MVC框架
- CodeIgniter-MVC框架(1)
- MVC框架-控制器(1)
- MVC框架-控制器
- MVC框架-体系结构(1)
- MVC框架-体系结构
- MVC框架-第一个应用程序(1)
- MVC框架-第一个应用程序
- MVC框架-异常处理(1)
📅 最后修改于: 2020-10-21 04:52:40 🧑 作者: Mango
在第一章中,我们学习了控制器和视图如何在MVC中进行交互。在本教程中,我们将前进一步,学习如何使用模型以及如何创建高级应用程序来创建,编辑,删除。并在我们的应用程序中查看用户列表。
创建一个高级MVC应用程序
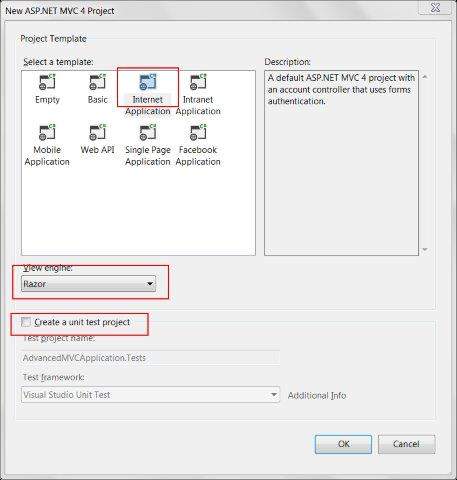
步骤1-选择文件→新建→项目→ASP.NET MVC Web应用程序。将其命名为AdvancedMVCApplication。单击确定。在下一个窗口中,选择“模板”作为“ Internet应用程序”,然后选择“ View Engine”作为Razor。观察到这次我们正在使用模板而不是Empty应用程序。
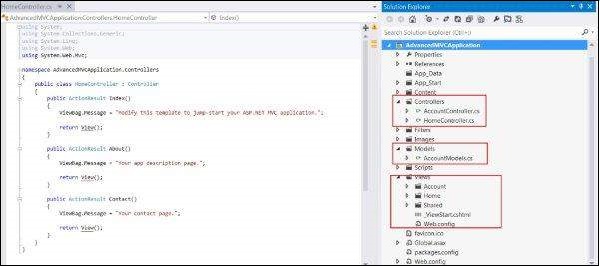
如下面的屏幕快照所示,这将创建一个新的解决方案项目。由于我们使用默认的ASP.NET主题,因此它带有示例视图,控制器,模型和其他文件。
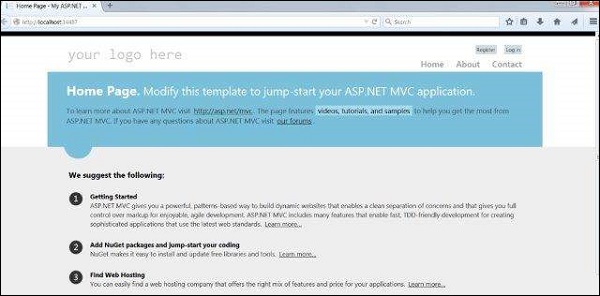
步骤2-构建解决方案并运行应用程序以查看其默认输出,如以下屏幕截图所示。
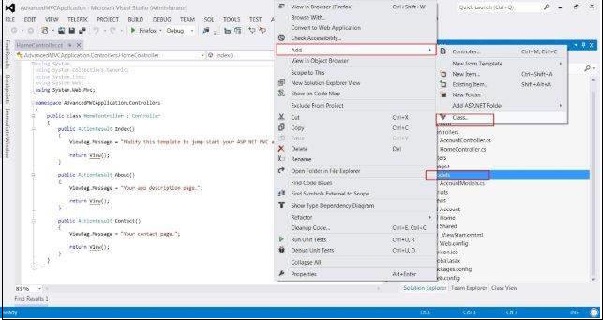
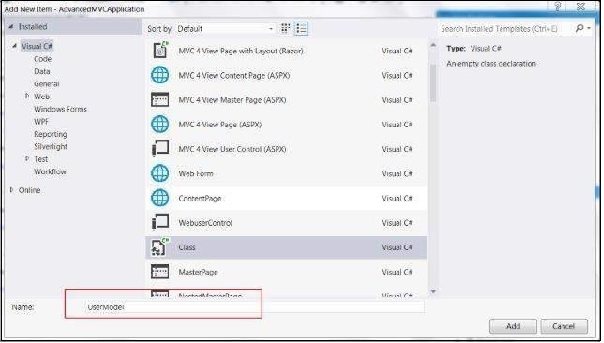
步骤3-添加一个新模型,该模型将定义用户数据的结构。右键单击Models文件夹,然后单击添加→类。将此命名为UserModel,然后单击“添加”。
步骤4-将以下代码复制到新创建的UserModel.cs中。
using System;
using System.ComponentModel;
using System.ComponentModel.DataAnnotations;
using System.Web.Mvc.Html;

namespace AdvancedMVCApplication.Models {
   public class UserModels {

      [Required]
      public int Id { get; set; }
      [DisplayName("First Name")]
      [Required(ErrorMessage = "First name is required")]
      public string FirstName { get; set; }
      [Required]
      public string LastName { get; set; }

      public string Address { get; set; }

      [Required]
      [StringLength(50)]
      public string Email { get; set; }

      [DataType(DataType.Date)]
      public DateTime DOB { get; set; }

      [Range(100,1000000)]
      public decimal Salary { get; set; }
   }
}
在上面的代码中,我们指定了User模型具有的所有参数,它们的数据类型和验证,例如必填字段和长度。
现在我们已经准备好要保存数据的用户模型,我们将创建一个类文件Users.cs,其中将包含查看用户,添加,编辑和删除用户的方法。
步骤5-右键单击模型,然后单击添加→类。将其命名为“用户”。这将在Models中创建users.cs类。将以下代码复制到users.cs类中。
using System;
using System.Collections.Generic;
using System.EnterpriseServices;

namespace AdvancedMVCApplication.Models {

   public class Users {
      public List UserList = new List();

      //action to get user details
      public UserModels GetUser(int id) {
         UserModels usrMdl = null;

         foreach (UserModels um in UserList)

            if (um.Id == id)
               usrMdl = um;
               return usrMdl;
      }

      //action to create new user
      public void CreateUser(UserModels userModel) {
         UserList.Add(userModel);
      }

      //action to udpate existing user
      public void UpdateUser(UserModels userModel) {

         foreach (UserModels usrlst in UserList) {

            if (usrlst.Id == userModel.Id) {
               usrlst.Address = userModel.Address;
               usrlst.DOB = userModel.DOB;
               usrlst.Email = userModel.Email;
               usrlst.FirstName = userModel.FirstName;
               usrlst.LastName = userModel.LastName;
               usrlst.Salary = userModel.Salary;
               break;
            }
         }
      }

      //action to delete exising user
      public void DeleteUser(UserModels userModel) {

         foreach (UserModels usrlst in UserList) {

            if (usrlst.Id == userModel.Id) {
               UserList.Remove(usrlst);
               break;
            }
         }
      }
   }
}
获得UserModel.cs和Users.cs之后,我们将在模型中添加视图以查看用户,添加,编辑和删除用户。首先让我们创建一个View以创建一个用户。
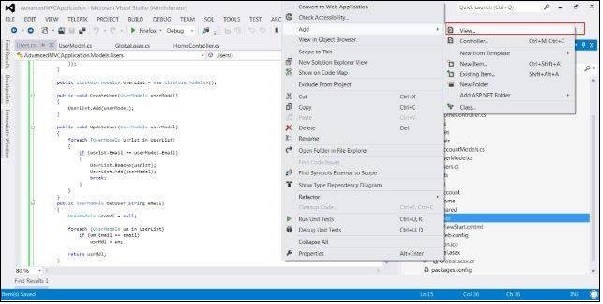
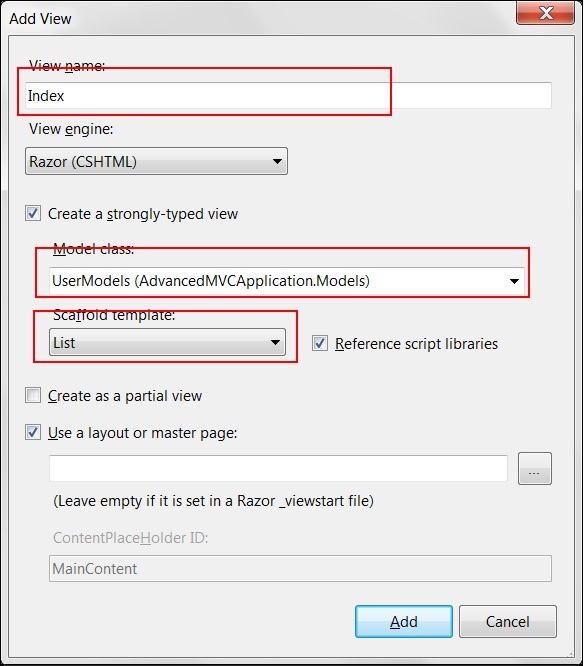
步骤6-右键单击视图文件夹,然后单击添加→视图。
步骤7-在下一个窗口中,选择“视图名称”作为UserAdd,选择“视图引擎”作为Razor,然后选择“创建强类型视图”复选框。
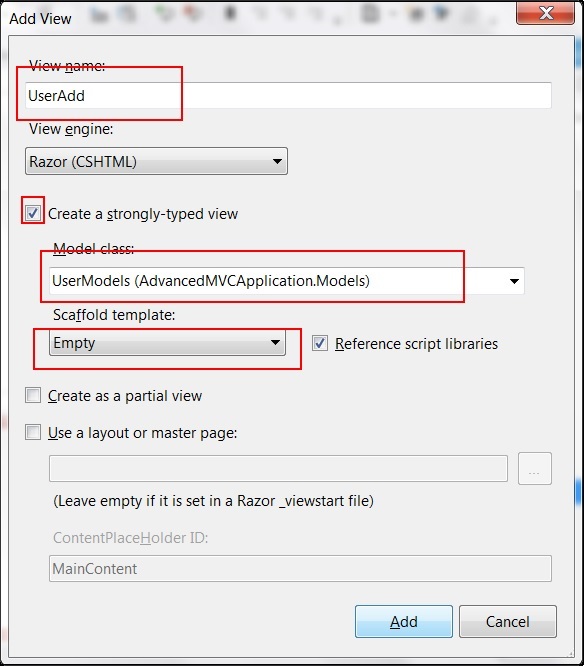
步骤8-单击添加。默认情况下,这将创建以下CSHML代码,如下所示-
@model AdvancedMVCApplication.Models.UserModels
@{
ViewBag.Title = "UserAdd";
}
UserAdd
@using (Html.BeginForm()) {
@Html.ValidationSummary(true)
}
@Html.ActionLink("Back to List", "Index")
@section Scripts {
@Scripts.Render("~/bundles/jqueryval")
}
如您所见,该视图包含字段的所有属性的视图详细信息,包括其验证消息,标签等。此视图在最终应用程序中将类似于以下内容。
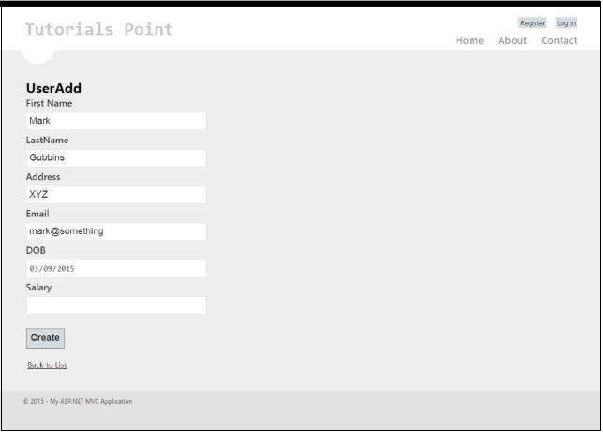
类似于UserAdd,现在我们将使用给定的代码添加下面给出的四个视图-
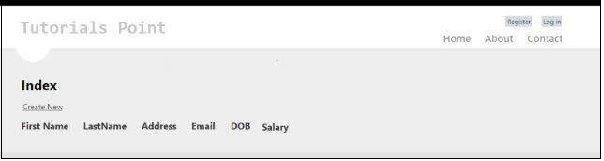
Index.cshtml
该视图将在“索引”页面上显示我们系统中存在的所有用户。
@model IEnumerable

@{
   ViewBag.Title = "Index";
}

Index


   @Html.ActionLink("Create New", "UserAdd")


         @Html.DisplayNameFor(model => model.FirstName)


         @Html.DisplayNameFor(model => model.LastName)


         @Html.DisplayNameFor(model => model.Address)


         @Html.DisplayNameFor(model => model.Email)


         @Html.DisplayNameFor(model => model.DOB)


         @Html.DisplayNameFor(model => model.Salary)


   @foreach (var item in Model) {


            @Html.DisplayFor(modelItem => item.FirstName)


            @Html.DisplayFor(modelItem => item.LastName)


            @Html.DisplayFor(modelItem => item.Address)


            @Html.DisplayFor(modelItem => item.Email)


            @Html.DisplayFor(modelItem => item.DOB)


            @Html.DisplayFor(modelItem => item.Salary)


            @Html.ActionLink("Edit", "Edit", new { id = item.Id }) |
            @Html.ActionLink("Details", "Details", new { id = item.Id }) |
            @Html.ActionLink("Delete", "Delete", new { id = item.Id })


   }
在我们的最终应用程序中,该视图将如下所示。

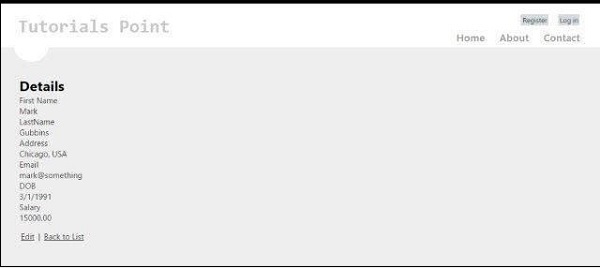
Details.cshtml
当我们单击用户记录时,此视图将显示特定用户的详细信息。
@model AdvancedMVCApplication.Models.UserModels
@{
ViewBag.Title = "Details";
}
Details
@Html.ActionLink("Edit", "Edit", new { id = Model.Id }) |
@Html.ActionLink("Back to List", "Index")
在我们的最终应用程序中,该视图将如下所示。
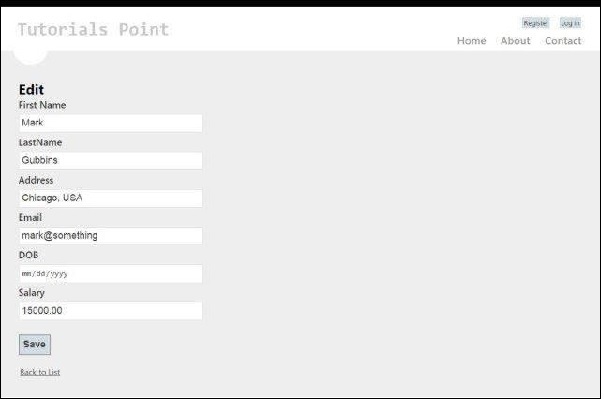
Edit.cshtml
该视图将显示编辑表单,以编辑现有用户的详细信息。
@model AdvancedMVCApplication.Models.UserModels
@{
ViewBag.Title = "Edit";
}
Edit
@using (Html.BeginForm()) {
@Html.AntiForgeryToken()
@Html.ValidationSummary(true)
}
@Html.ActionLink("Back to List", "Index")
@section Scripts {
@Scripts.Render("~/bundles/jqueryval")
}
该视图在我们的应用程序中将如下所示。
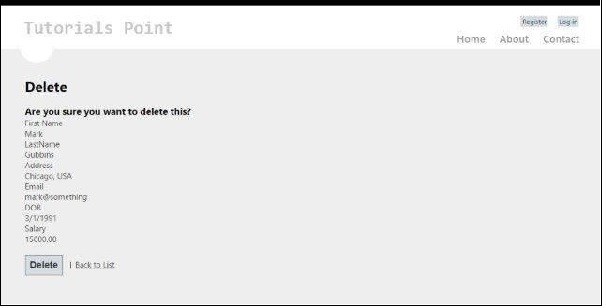
Delete.cshtml
该视图将显示删除现有用户的表单。
@model AdvancedMVCApplication.Models.UserModels
@{
ViewBag.Title = "Delete";
}
Delete
Are you sure you want to delete this?
@using (Html.BeginForm()) {
@Html.AntiForgeryToken()
|
@Html.ActionLink("Back to List", "Index")
}
在我们的最终应用程序中,该视图将如下所示。
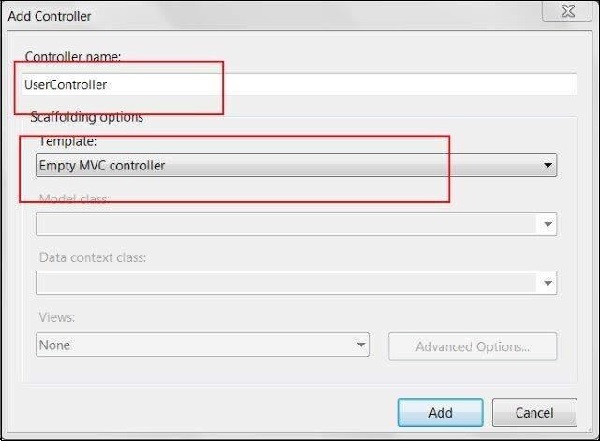
步骤9-我们已经在我们的应用程序中添加了模型和视图。现在,最后我们将为视图添加一个控制器。右键单击Controllers文件夹,然后单击添加→控制器。将其命名为UserController。
默认情况下,将使用以下代码创建Controller类-
using System;
using System.Collections.Generic;
using System.Linq;
using System.Web;
using System.Web.Mvc;
using AdvancedMVCApplication.Models;

namespace AdvancedMVCApplication.Controllers {

   public class UserController : Controller {
      private static Users _users = new Users();

      public ActionResult Index() {
         return View(_users.UserList);
      }
   }
}
在上面的代码中,在“索引”页面上呈现用户列表时将使用Index方法。
步骤10-右键单击Index方法,然后选择Create View为我们的Index页面创建一个View(将列出所有用户并提供创建新用户的选项)。
步骤11-现在在UserController.cs中添加以下代码。在此代码中,我们将为不同的用户操作创建操作方法,并返回我们之前创建的相应视图。
我们将为每个操作添加两个方法:GET和POST。 HttpGet将在获取数据并呈现时使用。 HttpPost将用于创建/更新数据。例如,当我们添加一个新用户时,我们将需要一个表单来添加用户,这是一个GET操作。填写表单并提交这些值后,我们将需要POST方法。
//Action for Index View
public ActionResult Index() {
   return View(_users.UserList);
}

//Action for UserAdd View
[HttpGet]
public ActionResult UserAdd() {
   return View();
}

[HttpPost]
public ActionResult UserAdd(UserModels userModel) {
   _users.CreateUser(userModel);
   return View("Index", _users.UserList);
}

//Action for Details View
[HttpGet]
public ActionResult Details(int id) {
   return View(_users.UserList.FirstOrDefault(x => x.Id == id));
}

[HttpPost]
public ActionResult Details() {
   return View("Index", _users.UserList);
}

//Action for Edit View
[HttpGet]
public ActionResult Edit(int id) {
   return View(_users.UserList.FirstOrDefault(x=>x.Id==id));
}

[HttpPost]
public ActionResult Edit(UserModels userModel) {
   _users.UpdateUser(userModel);
   return View("Index", _users.UserList);
}

//Action for Delete View
[HttpGet]
public ActionResult Delete(int id) {
   return View(_users.UserList.FirstOrDefault(x => x.Id == id));
}

[HttpPost]
public ActionResult Delete(UserModels userModel) {
   _users.DeleteUser(userModel);
   return View("Index", _users.UserList);
} sers.UserList);
步骤12-最后要做的是转到App_Start文件夹中的RouteConfig.cs文件,并将默认控制器更改为User。
defaults: new { controller = "User", action = "Index", id = UrlParameter.Optional }
这就是我们启动和运行高级应用程序所需要的。
步骤13-现在运行该应用程序。您将能够看到一个应用程序,如以下屏幕截图所示。您可以执行添加,查看,编辑和删除用户的所有功能,如我们在前面的屏幕快照中所见。