- cakephp (1)
- 国际化 - 任何代码示例
- 国际化测试
- 国际化测试(1)
- cakephp 3 - PHP (1)
- Flutter – 国际化(1)
- Flutter – 国际化
- Flutter – 国际化
- Flutter-国际化
- Flutter – 国际化(1)
- Flutter-国际化(1)
- cakephp - 任何代码示例
- CakePHP-安装
- CakePHP-安装(1)
- cakephp 3 - PHP 代码示例
- AngularJS-国际化(1)
- AngularJS-国际化
- Java国际化教程(1)
- Java国际化教程
- CodeIgniter-国际化(1)
- CodeIgniter-国际化
- Drupal-国际化(1)
- Drupal-国际化
- Flex-国际化(1)
- Flex-国际化
- Servlet-国际化
- Servlet-国际化(1)
- Symfony-国际化(1)
- Symfony-国际化
📅 最后修改于: 2020-10-26 05:15:32 🧑 作者: Mango
像许多其他框架一样,CakePHP也支持国际化。我们需要按照以下步骤从单一语言转换为多种语言。
第1步
创建一个单独的语言环境目录resources \ locales 。
第2步
在目录src \ Locale下,为每种语言创建子目录。子目录的名称可以是该语言的两个字母的ISO代码,也可以是完整的语言环境名称,例如en_US,fr_FR等。
第三步
在每个语言子目录下创建单独的default.po文件。该文件包含msgid和msgstr形式的条目,如以下程序所示。
msgid "msg"
msgstr "CakePHP Internationalization example."
在此, msgid是将在“视图”模板文件中使用的密钥,而msgstr是用于存储翻译的值。
第4步
在View模板文件中,我们可以使用上面的msgid ,如下所示,它将根据语言环境的设置值进行翻译。
可以通过以下行在config / app.php文件中设置默认语言环境。
'defaultLocale' => env('APP_DEFAULT_LOCALE', 'en_US')
要在运行时更改本地,我们可以使用以下几行。
use Cake\I18n\I18n;
I18n::locale('de_DE');
例
如以下程序所示,在config / routes.php文件中进行更改。
config / routes.php
setRouteClass(DashedRoute::class);
$routes->scope('/', function (RouteBuilder $builder) {
   $builder->registerMiddleware('csrf', new CsrfProtectionMiddleware([
      'httpOnly' => true,
   ]));
   $builder->applyMiddleware('csrf');
   //$builder->connect('/pages',
      ['controller'=>'Pages','action'=>'display', 'home']);
   $builder->connect('locale',
      ['controller'=>'Localizations','action'=>'index']);
   $builder->fallbacks();
});
在src / Controller / LocalizationsController.php中创建LocalizationsController.php文件。将以下代码复制到控制器文件中。
src / Controller / LocalizationsController.php
request->is('post')) {
            $locale = $this->request->getData('locale');
            I18n::setLocale($locale);
         }
      }
   }
?>
在resources \ locales中创建一个语言环境目录。在locales目录下创建3个名为en_US,fr_FR,de_DE的目录。在每个名为default.po的目录下创建一个文件。将以下代码复制到相应的文件中。
资源/语言环境/en_US/default.po
msgid "msg"
msgstr "CakePHP Internationalization example."
资源/语言环境/fr_FR/default.po
msgid "msg"
msgstr "Exemple CakePHP internationalisation."
资源/语言环境/de_DE/default.po
msgid "msg"
msgstr "CakePHP Internationalisierung Beispiel."
在src / Template上创建一个目录Localizations ,并在该目录下创建一个名为index.php的View文件。将以下代码复制到该文件中。
src / Template / Localizations / index.php
Form->create(NULL,array('url'=>'/locale'));
   echo $this->Form->radio("locale",
      [
         ['value'=>'en_US','text'=>'English'],
         ['value'=>'de_DE','text'=>'German'],
         ['value'=>'fr_FR','text'=>'French'],
      ]
   );
   echo $this->Form->button('Change Language');
   echo $this->Form->end();
?>
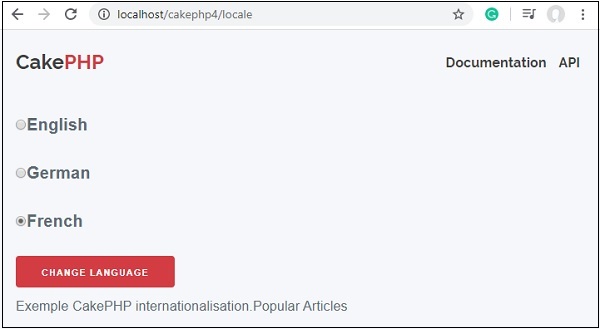
通过访问以下URL执行以上示例。 http:// localhost / cakephp4 / locale
输出
执行后,您将收到以下输出。
电子邮件
CakePHP提供了Email类来管理与电子邮件相关的功能。要在任何控制器中使用电子邮件功能,我们首先需要通过编写以下行来加载Email类。
use Cake\Mailer\Email;
Email类提供了各种有用的方法,如下所述。
| Syntax |
From(string|array|null $email null, string|null $name null ) |
|---|---|
| Parameters |
|
| Returns |
array|$this |
| Description |
It specifies from which email address; the email will be sent |
| Syntax |
To(string|array|null $emailnull, string|null $namenull) |
|---|---|
| Parameters |
|
| Returns |
array|$this |
| Description |
It specifies to whom the email will be sent |
| Syntax |
Send(string|array|null $contentnull) |
|---|---|
| Parameters |
|
| Returns | array |
| Description |
Send an email using the specified content, template and layout |
| Syntax |
Subject(string|null $subjectnull) |
|---|---|
| Parameters |
|
| Returns |
array|$this |
| Description |
Get/Set Subject |
| Syntax |
Attachments(string|array|null $attachmentsnull) |
|---|---|
| Parameters |
|
| Returns |
array|$this |
| Description |
Add attachments to the email message |
| Syntax |
Bcc(string|array|null $emailnull, string|null $namenull) |
|---|---|
| Parameters |
|
| Returns |
array|$this |
| Description |
Bcc |
| Syntax |
cc( string|array|null $emailnull , string|null $namenull ) |
|---|---|
| Parameters |
|
| Returns |
array|$this |
| Description |
Cc |
例
如以下程序所示,在config / routes.php文件中进行更改。
config / routes.php
setRouteClass(DashedRoute::class);
$routes->scope('/', function (RouteBuilder $builder) {
   $builder->registerMiddleware('csrf', new CsrfProtectionMiddleware([
      'httpOnly' => true,
   ]));
   $builder->applyMiddleware('csrf');
   //$builder->connect('/pages',['controller'=>'Pages','action'=>'display', 'home']);
   $builder->connect('/email',['controller'=>'Emails','action'=>'index']);
   $builder->fallbacks();
});
在src / Controller / EmailsController.php中创建一个EmailsController.php文件。将以下代码复制到控制器文件中。
src / Controller / EmailsController.php
to('abc@gmail.com')
            ->subject('About')
            ->send('My message');
      }
   }
?>
在src / Template上创建一个目录Email ,并在该目录下创建一个名为index.php的查看文件。将以下代码复制到该文件中。
src / Template / Emails / index.php
Email Sent.
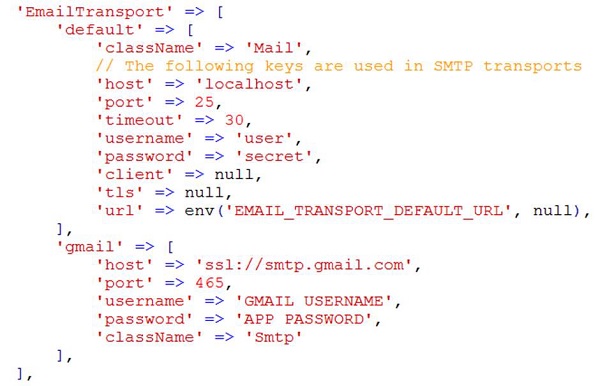
在发送任何电子邮件之前,我们需要对其进行配置。在下面的屏幕截图中,您可以看到有两种传输方式,即默认传输方式和Gmail。我们已使用Gmail传输。
您需要用Gmail用户名替换“ GMAIL USERNAME”,并用应用程序密码替换“ APP PASSWORD”。您需要在Gmail中启用两步验证并创建新的APP密码才能发送电子邮件。
config / app.php
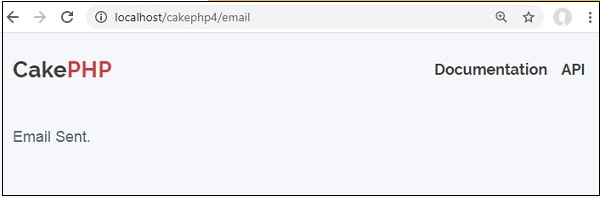
通过访问以下URL执行上述示例-http:// localhost / cakephp / email
输出
执行后,您将收到以下输出。