Python|使用 dlib 进行人脸识别
本文旨在快速构建一个Python人脸识别程序,轻松训练一个人多张图像,并开始识别图像中的已知人脸。
在本文中,代码使用了 ageitgey 的 face_recognition API for Python。该 API 是使用dlib 的人脸识别算法构建的,它允许用户在您的项目中或从命令行轻松实现人脸检测、人脸识别甚至实时人脸跟踪。
库安装:
首先,确保您的计算机上安装了所需的库。
pip install face_recognition Scikit-learn dlib docopt如果您希望 dlib 在 GPU 上使用CUDA ,请确保正确安装了CUDA和cuDNN ,然后使用 pip 安装 dlib。有关在不同平台上安装的详细说明,请查看 face_recognition 的安装指南。
现在,使用以下格式为每个人创建一个包含训练图像的目录。确保你有足够的训练图像(每个人至少 5 个),否则支持向量分类器 (SVC)(在这个程序中使用 - 在非常小的数据集上产生毫无意义的结果。
文件结构:
face_recognize.py
test_image.jpg
train_dir/
    person_1/
        person_1_face-1.jpg
        person_1_face-2.jpg
        .
        .
        person_1_face-n.jpg
    person_2/
        person_2_face-1.jpg
        person_2_face-2.jpg
        .
        .
        person_2_face-n.jpg
    .
    .
    person_n/
        person_n_face-1.jpg
        person_n_face-2.jpg
        .
        .
        person_n_face-n.jpg
人脸编码:
face_recognition API 为图像中的人脸生成人脸编码。面部编码基本上是一种使用一组128个计算机生成的测量值来表示面部的方法。同一个人的两张不同图片将具有相似的编码,而两个不同的人将具有完全不同的编码。
生成所有人脸编码后,使用 scikit-learn 对人脸编码及其标签进行训练,支持向量分类器 (SVC) 来自训练目录中的所有已知人脸。最后,API 会检测您提供的测试图像中的所有人脸,并且经过训练的 SVC 会预测测试图像中的所有已知人脸。
代码:识别多张面孔。
"""
Usage:
  face_recognize.py -d  -i

Options:
  -h, --help                     Show this help
  -d, --train_dir =   Directory with
                                 images for training
  -i, --test_image = Test image
"""

# importing libraries
import face_recognition
import docopt
from sklearn import svm
import os

def face_recognize(dir, test):
    # Training the SVC classifier
    # The training data would be all the
    # face encodings from all the known
    # images and the labels are their names
    encodings = []
    names = []

    # Training directory
    if dir[-1]!='/':
        dir += '/'
    train_dir = os.listdir(dir)

    # Loop through each person in the training directory
    for person in train_dir:
        pix = os.listdir(dir + person)

        # Loop through each training image for the current person
        for person_img in pix:
            # Get the face encodings for the face in each image file
            face = face_recognition.load_image_file(
                dir + person + "/" + person_img)
            face_bounding_boxes = face_recognition.face_locations(face)

            # If training image contains exactly one face
            if len(face_bounding_boxes) == 1:
                face_enc = face_recognition.face_encodings(face)[0]
                # Add face encoding for current image
                # with corresponding label (name) to the training data
                encodings.append(face_enc)
                names.append(person)
            else:
                print(person + "/" + person_img + " can't be used for training")

    # Create and train the SVC classifier
    clf = svm.SVC(gamma ='scale')
    clf.fit(encodings, names)

    # Load the test image with unknown faces into a numpy array
    test_image = face_recognition.load_image_file(test)

    # Find all the faces in the test image using the default HOG-based model
    face_locations = face_recognition.face_locations(test_image)
    no = len(face_locations)
    print("Number of faces detected: ", no)

    # Predict all the faces in the test image using the trained classifier
    print("Found:")
    for i in range(no):
        test_image_enc = face_recognition.face_encodings(test_image)[i]
        name = clf.predict([test_image_enc])
        print(*name)

def main():
    args = docopt.docopt(__doc__)
    train_dir = args["--train_dir"]
    test_image = args["--test_image"]
    face_recognize(train_dir, test_image)

if __name__=="__main__":
    main()
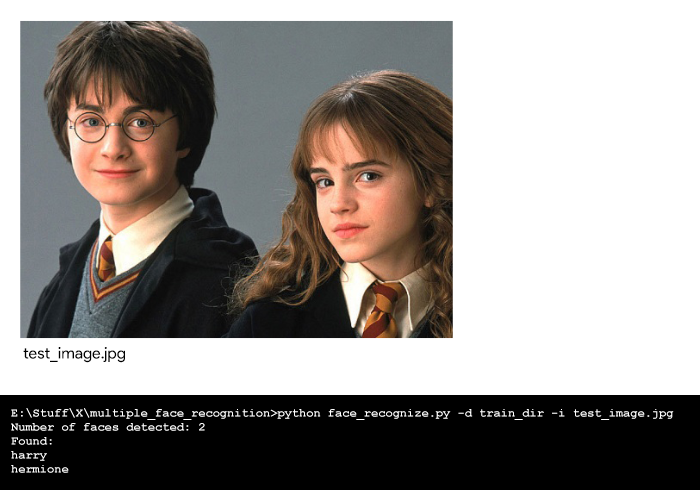
如何在终端上运行它:
python face_recognize.py -d train_dir -i test_image.jpg
输出: