使用 OpenCV、 Python和 dlib 进行眨眼检测
在本文中,我们将了解如何使用 OpenCV、 Python和 dlib 检测眨眼。这是一个相当简单的任务,它需要您对 OpenCV 以及如何使用 OpenCV 和 dlib 实现面部标志检测程序有基本的了解,因为我们将使用它作为今天项目的基础。
逐步实施
第 1 步:安装所有必需的软件包
因此,我们将在此步骤中安装所有依赖项。我们将使用 OpenCV 进行计算机视觉,使用 dlib 库进行面部识别,以及使用 imutils 包来使用一些函数来帮助我们将地标转换为 NumPy 数组并使其易于使用,所以让我们先安装这些.
pip install opencv-python numpy dlib imutils第 2 步:初始化并从网络摄像头读取
Python3
import cv2

cam = cv2.VideoCapture(0)
while True:
    _, frame = cam.read()
    cv2.imshow('Camera Feed', frame)
    if cv2.waitKey(1) & 0xFF == ord('q'):
        break
cam.release()
Python3
# Importing the required dependencies
import cv2  # for video rendering
import dlib  # for face and landmark detection
import imutils

# for calculating dist b/w the eye landmarks
from scipy.spatial import distance as dist

# to get the landmark ids of the left
# and right eyes ----you can do this
# manually too
from imutils import face_utils

cam = cv2.VideoCapture('assets/Video.mp4')


# Initializing the Models for Landmark and
# face Detection
detector = dlib.get_frontal_face_detector()
landmark_predict = dlib.shape_predictor(
    'Model/shape_predictor_68_face_landmarks.dat')

while 1:

    # If the video is finished then reset it
    # to the start
    if cam.get(cv2.CAP_PROP_POS_FRAMES) == cam.get(
      cv2.CAP_PROP_FRAME_COUNT):
        cam.set(cv2.CAP_PROP_POS_FRAMES, 0)

    else:
        _, frame = cam.read()
        frame = imutils.resize(frame, width=640)

        # converting frame to gray scale to pass
        # to detector
        img_gray = cv2.cvtColor(frame, cv2.COLOR_BGR2GRAY)

        # detecting the faces---#
        faces = detector(img_gray)
        for face in faces:
            cv2.rectangle(frame, face[0], face[1],
                          (200, 0, 0), 1)

        cv2.imshow("Video", frame)
        if cv2.waitKey(5) & 0xFF == ord('q'):
            break

cam.release()
cv2.destroyAllWindows()
Python3
def calculate_EAR(eye):

    # calculate the vertical distances
    # euclidean distance is basically
    # the same when you calculate the
    # hypotenuse in a right triangle
    y1 = dist.euclidean(eye[1], eye[5])
    y2 = dist.euclidean(eye[2], eye[4])

    # calculate the horizontal distance
    x1 = dist.euclidean(eye[0], eye[3])

    # calculate the EAR
    EAR = (y1+y2) / x1

    return EAR
Python3
# Importing the required dependencies
import cv2  # for video rendering
import dlib  # for face and landmark detection
import imutils
# for calculating dist b/w the eye landmarks
from scipy.spatial import distance as dist
# to get the landmark ids of the left and right eyes
# you can do this manually too
from imutils import face_utils

# from imutils import

cam = cv2.VideoCapture('assets/my_blink.mp4')

# defining a function to calculate the EAR
def calculate_EAR(eye):

    # calculate the vertical distances
    y1 = dist.euclidean(eye[1], eye[5])
    y2 = dist.euclidean(eye[2], eye[4])

    # calculate the horizontal distance
    x1 = dist.euclidean(eye[0], eye[3])

    # calculate the EAR
    EAR = (y1+y2) / x1
    return EAR

# Variables
blink_thresh = 0.45
succ_frame = 2
count_frame = 0

# Eye landmarks
(L_start, L_end) = face_utils.FACIAL_LANDMARKS_IDXS["left_eye"]
(R_start, R_end) = face_utils.FACIAL_LANDMARKS_IDXS['right_eye']

# Initializing the Models for Landmark and
# face Detection
detector = dlib.get_frontal_face_detector()
landmark_predict = dlib.shape_predictor(
    'Model/shape_predictor_68_face_landmarks.dat')
while 1:

    # If the video is finished then reset it
    # to the start
    if cam.get(cv2.CAP_PROP_POS_FRAMES) == cam.get(
            cv2.CAP_PROP_FRAME_COUNT):
        cam.set(cv2.CAP_PROP_POS_FRAMES, 0)

    else:
        _, frame = cam.read()
        frame = imutils.resize(frame, width=640)

        # converting frame to gray scale to
        # pass to detector
        img_gray = cv2.cvtColor(frame, cv2.COLOR_BGR2GRAY)

        # detecting the faces
        faces = detector(img_gray)
        for face in faces:

            # landmark detection
            shape = landmark_predict(img_gray, face)

            # converting the shape class directly
            # to a list of (x,y) coordinates
            shape = face_utils.shape_to_np(shape)

            # parsing the landmarks list to extract
            # lefteye and righteye landmarks--#
            lefteye = shape[L_start: L_end]
            righteye = shape[R_start:R_end]

            # Calculate the EAR
            left_EAR = calculate_EAR(lefteye)
            right_EAR = calculate_EAR(righteye)

            # Avg of left and right eye EAR
            avg = (left_EAR+right_EAR)/2
            if avg < blink_thresh:
                count_frame += 1  # incrementing the frame count
            else:
                if count_frame >= succ_frame:
                    cv2.putText(frame, 'Blink Detected', (30, 30),
                                cv2.FONT_HERSHEY_DUPLEX, 1, (0, 200, 0), 1)
                else:
                    count_frame = 0

        cv2.imshow("Video", frame)
        if cv2.waitKey(5) & 0xFF == ord('q'):
            break

cam.release()
cv2.destroyAllWindows()
第 3 步:使用 dlib 进行面部地标检测
注意: dlib 库中包含的面部标志检测器是 Kazemi 和 Sullivan (2014) 的 One Millisecond Face Alignment with an Ensemble of Regression Trees 论文的实现。
面部标志是图像中面部的关键属性,如眼睛、眉毛、鼻子、嘴巴和下巴。由于步骤1-3不是本文的主要重点,所以我们不会深入,而是在代码上写注释以便于理解。
这是面部标志检测的基本代码,我们稍后将用于眨眼检测。
Python3
# Importing the required dependencies
import cv2  # for video rendering
import dlib  # for face and landmark detection
import imutils

# for calculating dist b/w the eye landmarks
from scipy.spatial import distance as dist

# to get the landmark ids of the left
# and right eyes ----you can do this
# manually too
from imutils import face_utils

cam = cv2.VideoCapture('assets/Video.mp4')


# Initializing the Models for Landmark and
# face Detection
detector = dlib.get_frontal_face_detector()
landmark_predict = dlib.shape_predictor(
    'Model/shape_predictor_68_face_landmarks.dat')

while 1:

    # If the video is finished then reset it
    # to the start
    if cam.get(cv2.CAP_PROP_POS_FRAMES) == cam.get(
      cv2.CAP_PROP_FRAME_COUNT):
        cam.set(cv2.CAP_PROP_POS_FRAMES, 0)

    else:
        _, frame = cam.read()
        frame = imutils.resize(frame, width=640)

        # converting frame to gray scale to pass
        # to detector
        img_gray = cv2.cvtColor(frame, cv2.COLOR_BGR2GRAY)

        # detecting the faces---#
        faces = detector(img_gray)
        for face in faces:
            cv2.rectangle(frame, face[0], face[1],
                          (200, 0, 0), 1)

        cv2.imshow("Video", frame)
        if cv2.waitKey(5) & 0xFF == ord('q'):
            break

cam.release()
cv2.destroyAllWindows()
现在问题出现了,我们将如何使用这些地标进行眼睛检测。
眼睛地标
我们看到我们可以从我们检测到的 68 个面部地标中提取任何面部结构。因此,对于图像中的任何给定面部,我们将提取眼睛的地标,即每只眼睛的 6 (x,y) 坐标。然后我们将计算这些地标的 EAR。
眼睛纵横比 (EAR)
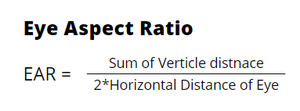
这种方法非常简单、高效,并且不需要图像处理之类的任何东西。基本上,这个比率为我们提供了眼睛的水平和垂直测量值之间的某种关系。这是使用眼睛的六个参数计算 EAR 的公式:

作者使用画布创建的图像
我们可以使用给定的函数来计算 EAR :
Python3
def calculate_EAR(eye):

    # calculate the vertical distances
    # euclidean distance is basically
    # the same when you calculate the
    # hypotenuse in a right triangle
    y1 = dist.euclidean(eye[1], eye[5])
    y2 = dist.euclidean(eye[2], eye[4])

    # calculate the horizontal distance
    x1 = dist.euclidean(eye[0], eye[3])

    # calculate the EAR
    EAR = (y1+y2) / x1

    return EAR
这个EAR有什么神奇之处?
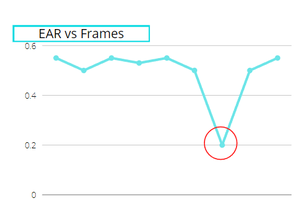
这是最重要的部分,当你计算一只眼睛的EAR时,睁眼时它保持不变,但眨眼时它突然下降。下面,我展示了一个图表来显示它的工作:

. 〜作者使用画布的图像
正如您在图像中看到的,EAR 的整体值始终保持不变,除了在某一时刻,即眨眼时,这使其成为检测眨眼的最简单和最有效的方法之一。
由于我们每只眼睛分别有两个 EAR,我们将取右眼 EAR 和左眼 EAR 的平均值,然后检查它是否低于某个阈值(我们将创建一个变量来设置它的值)并且这个阈值可能会有所不同,对我来说它适用于 0.4 或 0.5,但在某些情况下,它也适用于 0.25 或 0.3。这取决于您的视频或网络摄像头的 FPS。
下一步:当 EAR 低于阈值时,我们将保持帧计数,如果计数为 3(或 5,取决于 fps)帧,那么我们将考虑检测到眨眼。
下面是完整的实现
Python3
# Importing the required dependencies
import cv2  # for video rendering
import dlib  # for face and landmark detection
import imutils
# for calculating dist b/w the eye landmarks
from scipy.spatial import distance as dist
# to get the landmark ids of the left and right eyes
# you can do this manually too
from imutils import face_utils

# from imutils import

cam = cv2.VideoCapture('assets/my_blink.mp4')

# defining a function to calculate the EAR
def calculate_EAR(eye):

    # calculate the vertical distances
    y1 = dist.euclidean(eye[1], eye[5])
    y2 = dist.euclidean(eye[2], eye[4])

    # calculate the horizontal distance
    x1 = dist.euclidean(eye[0], eye[3])

    # calculate the EAR
    EAR = (y1+y2) / x1
    return EAR

# Variables
blink_thresh = 0.45
succ_frame = 2
count_frame = 0

# Eye landmarks
(L_start, L_end) = face_utils.FACIAL_LANDMARKS_IDXS["left_eye"]
(R_start, R_end) = face_utils.FACIAL_LANDMARKS_IDXS['right_eye']

# Initializing the Models for Landmark and
# face Detection
detector = dlib.get_frontal_face_detector()
landmark_predict = dlib.shape_predictor(
    'Model/shape_predictor_68_face_landmarks.dat')
while 1:

    # If the video is finished then reset it
    # to the start
    if cam.get(cv2.CAP_PROP_POS_FRAMES) == cam.get(
            cv2.CAP_PROP_FRAME_COUNT):
        cam.set(cv2.CAP_PROP_POS_FRAMES, 0)

    else:
        _, frame = cam.read()
        frame = imutils.resize(frame, width=640)

        # converting frame to gray scale to
        # pass to detector
        img_gray = cv2.cvtColor(frame, cv2.COLOR_BGR2GRAY)

        # detecting the faces
        faces = detector(img_gray)
        for face in faces:

            # landmark detection
            shape = landmark_predict(img_gray, face)

            # converting the shape class directly
            # to a list of (x,y) coordinates
            shape = face_utils.shape_to_np(shape)

            # parsing the landmarks list to extract
            # lefteye and righteye landmarks--#
            lefteye = shape[L_start: L_end]
            righteye = shape[R_start:R_end]

            # Calculate the EAR
            left_EAR = calculate_EAR(lefteye)
            right_EAR = calculate_EAR(righteye)

            # Avg of left and right eye EAR
            avg = (left_EAR+right_EAR)/2
            if avg < blink_thresh:
                count_frame += 1  # incrementing the frame count
            else:
                if count_frame >= succ_frame:
                    cv2.putText(frame, 'Blink Detected', (30, 30),
                                cv2.FONT_HERSHEY_DUPLEX, 1, (0, 200, 0), 1)
                else:
                    count_frame = 0

        cv2.imshow("Video", frame)
        if cv2.waitKey(5) & 0xFF == ord('q'):
            break

cam.release()
cv2.destroyAllWindows()
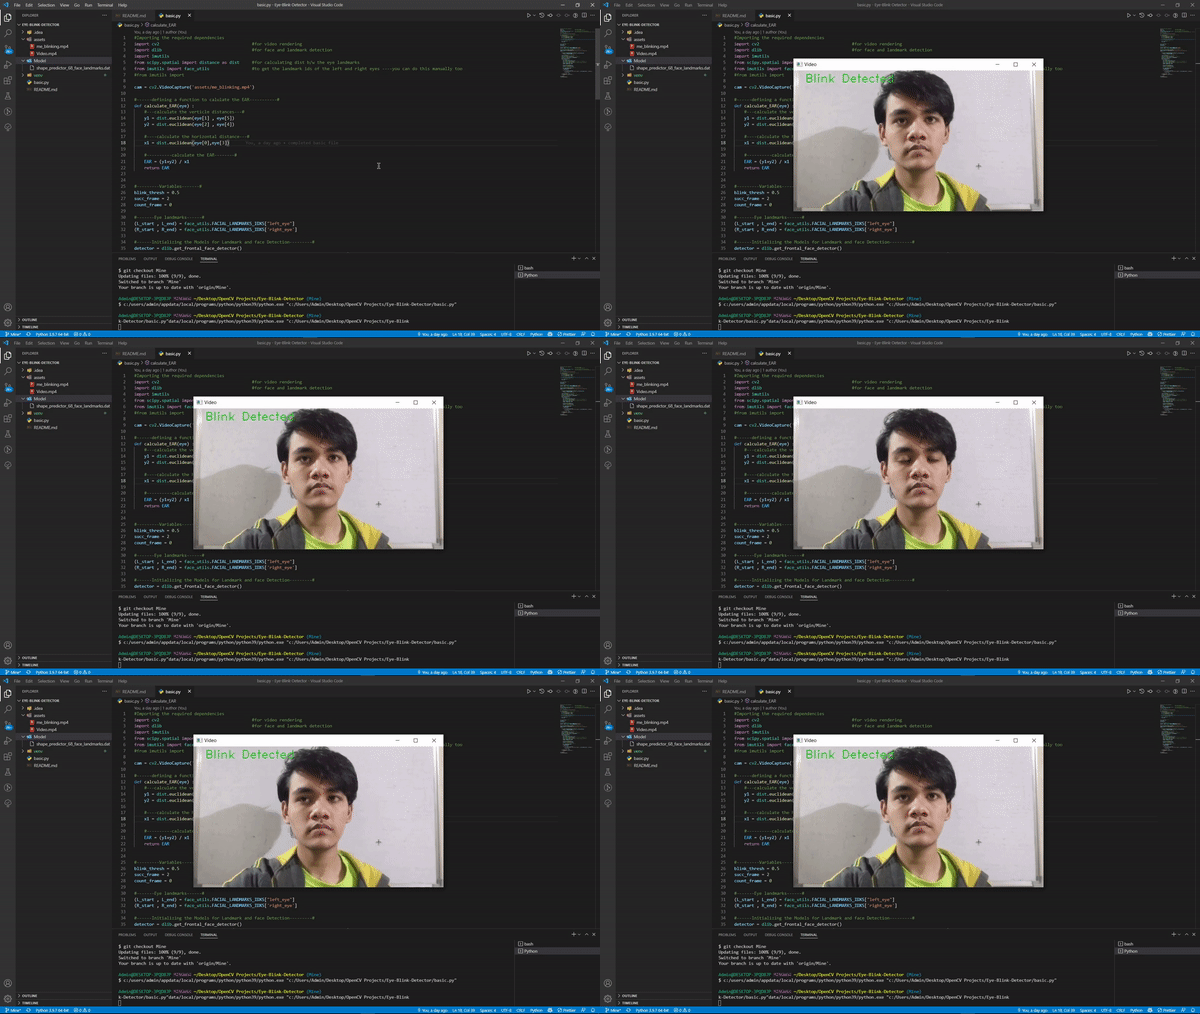
输出:

如果您使用不同的视频或使用网络摄像头,您的 FPS 会有所不同,因此可能想尝试更改我们定义的变量的值,尽管它们在大多数情况下都可以正常工作。