📌 相关文章
- arduino 键盘库 - C++ 代码示例
- Arduino串行。print()(1)
- Arduino串行。print()
- arduino 串行打印整数 - C 编程语言(1)
- arduino 串行打印整数 - C 编程语言代码示例
- Arduino-键盘消息
- Arduino-键盘消息(1)
- 启动串行监视器 arduino (1)
- 启动串行监视器 arduino - 任何代码示例
- Arduino-串行外围接口
- Arduino-串行外围接口(1)
- 安装串行 python (1)
- DBMS 中串行和非串行调度的计算
- DBMS 中串行和非串行调度的计算(1)
- DBMS 中串行和非串行调度的计算
- DBMS 中串行和非串行调度的计算(1)
- Arduino - 使用 python 通过串行通信发送命令(1)
- Arduino串行| Serial.begin()(1)
- Arduino串行| Serial.begin()
- Arduino - 使用 python 代码示例通过串行通信发送命令
- Arduino盾
- Arduino盾(1)
- arduino (1)
- Arduino库(1)
- arduino 和 (1)
- Arduino库
- PostgreSQL串行
- PostgreSQL串行(1)
- PostgreSQL – 串行(1)
📜 Arduino-键盘串行
📅 最后修改于: 2020-11-05 03:41:10 🧑 作者: Mango
本示例侦听来自串行端口的字节。收到后,开发板将击键发送回计算机。发送的击键比接收到的击键高一个,因此,如果您从串行监视器发送“ a”,则从与计算机连接的板上将收到“ b”。 “ 1”将返回“ 2”,依此类推。
警告-使用Keyboard.print()命令时,Leonardo,Micro或Due板将接管计算机的键盘。为确保在使用此函数运行草图时不会失去对计算机的控制,请在调用Keyboard.print()之前设置可靠的控制系统。该草图旨在仅在开发板通过串行端口接收到字节后发送键盘命令。
所需组件
您将需要以下组件-
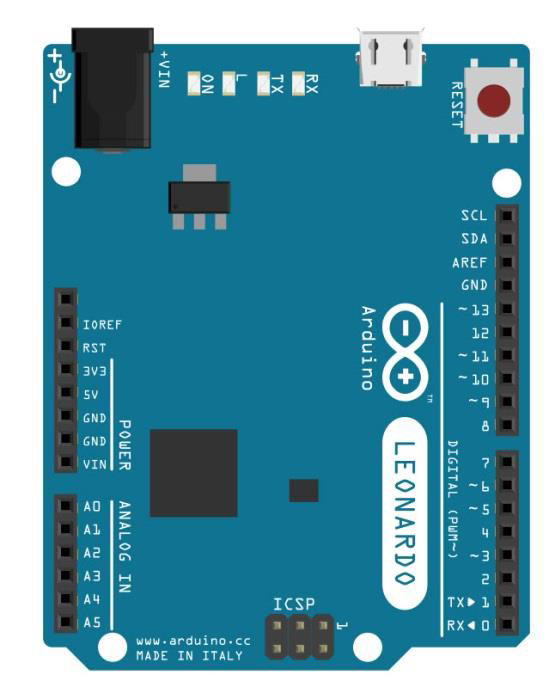
- 1个Arduino Leonardo,Micro或Due板
程序
只需使用USB电缆将开发板连接到计算机即可。
草图
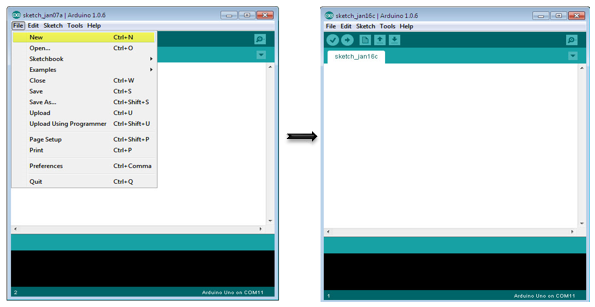
打开计算机上的Arduino IDE软件。使用Arduino语言进行编码将控制您的电路。通过单击“新建”打开一个新的草图文件。
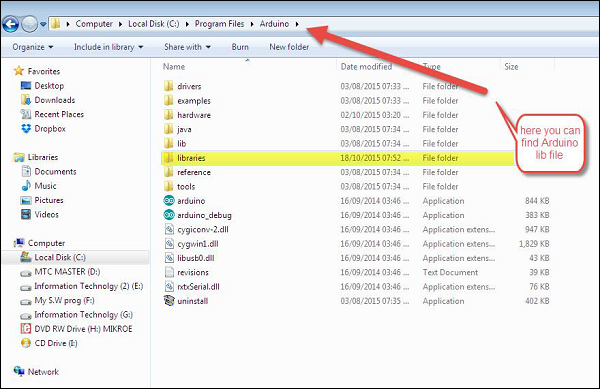
注意-您必须在您的Arduino库文件中包含键盘库。将键盘库文件复制并粘贴到文件中,文件名以黄色突出显示为“ libraries”。
Arduino代码
/*
   Keyboard test
   For the Arduino Leonardo, Micro or Due Reads
      a byte from the serial port, sends a keystroke back.
   The sent keystroke is one higher than what's received, e.g. if you send a, you get b, send
      A you get B, and so forth.
   The circuit:
   * none
*/

#include "Keyboard.h"

void setup() {
   // open the serial port:
   Serial.begin(9600);
   // initialize control over the keyboard:
   Keyboard.begin();
}

void loop() {
   // check for incoming serial data:
   if (Serial.available() > 0) {
      // read incoming serial data:
      char inChar = Serial.read();
      // Type the next ASCII value from what you received:
      Keyboard.write(inChar + 1);
   }
}
注意代码
编程后,打开串行监视器并发送一个字节。董事会将通过击键(高出一个数字)进行回复。
结果
当发送字节时,开发板将在Arduino IDE串行监视器上以高出一个数字的按键响应。