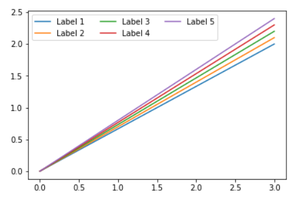
在 Matplotlib 图例中使用多列
在本文中,任务是在Python中的 Matplotlib 图例中使用多列。在开始讨论“在 Matplotlib 图例中使用多列”之前,首先我们应该简要了解 matplotlib、pyplot 和图例。
- Matplotlib: “matplotlib”库基本上用于创建很多图形化的东西,比如高质量的图形、图表、图形等等。该库是广泛的,并且能够将图形的非常小的细节更改为最小的细节。这个库是由 John Hunter 和他的团队在 2002 年引入的。
- 派图: 在Python中,“pyplot”是用于二维图形的绘图库。它用于Python脚本、shell、Web 应用程序服务器和其他 GUI 工具包。
- 图例:图例是描述图形元素的区域。在 matplotlib 中,有一个名为 legend() 的函数,用于在提到的轴上放置图例。
注意:在声明 matplotlib 和 pyplot 之前,最好也声明 numpy 库。
基本上,我们可以使用 matplotlib 导入 pyplot,因为我们通常在Python中导入其他库,例如
import matplotlib.pyplot as plt或者
from matplotlib import pyplot as plt在 Matolotlib Legend 中使用多列
在许多情况下,我们可能遇到的主要问题是,随着图例数量的增加,它可能会消耗大量垂直空间,这可能会给图形的可视化带来问题。因此,在这种情况下,我们需要将图例标签组织成多列。为此,可以轻松无中断地放置所有图例。
以下面定义的方式在 plt.legend() 中使用 ncol 参数来指定图例应具有的列数。
plt.legend(ncol=k)此处,k 是图例在图中应具有的列数。
例子:
Python3
# code
import matplotlib.pyplot as plt

plt.plot([0, 3], [0, 2.0], label='Label 1')
plt.plot([0, 3], [0, 2.1], label='Label 2')
plt.plot([0, 3], [0, 2.2], label='Label 3')
plt.plot([0, 3], [0, 2.3], label='Label 4')
plt.plot([0, 3], [0, 2.4], label='Label 5')

# Change the number of columns here
plt.legend(ncol=3)

plt.show()
输出:

输出