- Flutter中的脚手架类和示例
- Flutter中的脚手架类和示例(1)
- 脚手架 (1)
- 脚手架 - 任何代码示例
- laravel 脚手架 - PHP 代码示例
- 脚手架 db - C# (1)
- 脚手架 db - C# 代码示例
- ExpressJS-脚手架
- ExpressJS-脚手架(1)
- 脚手架 mysql 数据库 - SQL (1)
- TurboGears脚手架
- TurboGears脚手架(1)
- 脚手架 mysql 数据库 - SQL 代码示例
- 创建反应应用脚手架 - Javascript (1)
- Koa.js-脚手架
- Koa.js-脚手架(1)
- 创建反应应用脚手架 - Javascript 代码示例
- 颤振脚手架背景颜色 (1)
- flutter 表
- flutter 表(1)
- Flutter(1)
- flutter 卡
- Flutter
- flutter 卡(1)
- Flutter
- 创建 VScode 主题脚手架 (1)
- Phalcon-脚手架应用
- Phalcon-脚手架应用(1)
- 使脚手架可滚动颤动 - Dart (1)
📅 最后修改于: 2021-01-02 05:01:22 🧑 作者: Mango
颤振脚手架
Scaffold是Flutter中的一个小部件,用于实现基本的材料设计视觉布局结构。创建通用移动应用程序的速度足够快,几乎包含了创建功能性和响应式Flutter应用程序所需的所有内容。该小部件能够占据整个设备屏幕。换句话说,我们可以说它主要负责为应用程序屏幕创建基础,子控件在该基础上保留并呈现在屏幕上。它提供了许多小部件或API,用于显示Drawer,SnackBar,BottomNavigationBar,AppBar,FloatingActionButton等。
Scaffold类是设置应用程序外观和设计的快捷方式,它使我们不必手动构建单个视觉元素。它节省了我们为应用程序的外观编写更多代码的时间。以下是Scaffold小部件类的构造函数和属性。
const Scaffold({
  Key key,
  this.appBar,
  this.body,
  this.floatingActionButton,
  this.floatingActionButtonLocation,
  this.persistentFooterButtons,
  this.drawer,
  this.endDrawer,
  this.bottomNavigationBar,
  this.bottomSheet,
  this.floatingActionButtonAnimator,
  this.backgroundColor,
  this.resizeToAvoidBottomPadding = true,
  this.primary = true,
})
让我们详细了解上述所有属性。
1. appBar:它是一个水平条,主要显示在Scaffold小部件的顶部。它是Scaffold小部件的主要部分,并显示在屏幕顶部。没有此属性,“脚手架”小部件将不完整。它使用本身包含各种属性(例如高程,标题,亮度等)的appBar小部件。请参见以下示例:
Widget build(BuildContext context)
{
  return Scaffold(
    appBar: AppBar(
      title: Text('First Flutter Application'),
    ), )
}
在上面的代码中,title属性使用一个Text小部件来在屏幕上显示文本。
2. body:这是此小部件的另一个主要属性和必需属性,它将在Scaffold中显示主要内容。它表示appBar下方,floatingActionButton和抽屉后面的位置。默认情况下,主体内部的小部件位于可用空间的左上方。请参见以下代码:
Widget build(BuildContext context) {
return Scaffold(
    appBar: AppBar(
    title: Text('First Flutter Application'),
    ),
    body: Center(
    child: Text("Welcome to Javatpoint",
        style: TextStyle( color: Colors.black, fontSize: 30.0,
        ),
         ),
    ),
}
在上面的代码中,我们显示了文本“ Welcome to Javatpoint !!”。在body属性中。通过使用“中心”小部件,此文本在页面的中心对齐。在这里,我们还使用TextStyle小部件设置了文本样式,例如颜色,字体大小等。
3.抽屉:这是一个滑动面板,显示在主体的侧面。通常,它在移动设备上是隐藏的,但是用户可以从左向右或从右向左滑动以访问抽屉菜单。它使用“抽屉”窗口小部件属性从“脚手架”边缘沿水平方向滑动,以显示应用程序中的导航链接。将在appBar属性中自动设置抽屉的适当图标。手势也自动设置为打开抽屉。请参阅以下代码。
drawer: Drawer(
        child: ListView(
        children: const [
        DrawerHeader(
            decoration: BoxDecoration(
            color: Colors.red,
            ),
            child: Text(
            'Welcome to Javatpoint',
            style: TextStyle(
                color: Colors.green,
                fontSize: 30,
            ),
              ),
        ),
        ListTile(
            title: Text('1'),
        ),
        ListTile(
            title: new Text("All Mail Inboxes"),
            leading: new Icon(Icons.mail),
        ),
        Divider(
            height: 0.2,
        ),
        ListTile(
            title: new Text("Primary"),
        ),
        ListTile(
            title: new Text("Social"),
        ),
        ListTile(
            title: new Text("Promotions"),
        ),
        ],
         ),
  ),
在上面的代码中,我们使用Scaffold的抽屉属性创建抽屉。我们还使用了其他一些小部件来使其具有吸引力。在ListView小部件中,我们将面板分为两部分, Header和Menu 。 DrawerHeader属性根据应用程序修改面板标题,该面板标题还包含图标或详细信息。同样,我们使用ListTile在菜单中添加列表项。
4. floatActionButton:这是一个显示在右下角并浮在主体上方的按钮。它是一个圆形图标按钮,漂浮在屏幕内容的固定位置上,以促进应用程序中的主要动作。滚动页面时,其位置无法更改。它使用Scaffold.floatingActionButton使用FloatingActionButton小部件属性。请参见以下代码:
Widget build(BuildContext context) {
         return Scaffold(
    appBar: AppBar(title: Text('First Flutter Application')),
    body: Center(
        child: Text("Welcome to Javatpoint!!"),
    ),
    floatingActionButton: FloatingActionButton(
        elevation: 8.0,
        child: Icon(Icons.add),
        onPressed: (){
           print('I am Floating Action Button');
        }
    );
}
在上面的代码中,我们使用了height属性,该属性为按钮提供阴影效果。我们还使用“图标”小部件使用预加载的Flutter SDK图标为按钮提供图标。当用户点击按钮时,将调用onPressed()属性,并且控制台上将打印“ I is Floating Action Button”语句。
5. backgroundColor:此属性用于设置整个Scaffold小部件的背景颜色。
backgroundColor: Colors.yellow,
6. primary:用于判断是否将支架显示在屏幕顶部。它的默认值是true ,表示appBar的高度扩展了屏幕状态栏的高度。
primary: true/false,
7.persistentFooterButton:这是显示在Scaffold小部件底部的按钮列表。这些属性项始终可见;即使我们已经滚动了脚手架的主体。它始终包装在ButtonBar小部件中。它们呈现在主体下方但在bottomNavigationBar上方。
persistentFooterButtons: [
  RaisedButton(
    onPressed: () {},
    color: Colors.blue,
    child: Icon(
      Icons.add,
      color: Colors.white,
    ),
  ),
  RaisedButton(
    onPressed: () {},
    color: Colors.green,
    child: Icon(
      Icons.clear,
      color: Colors.white,
    ),
  ),
],
在上面的代码中,我们使用了显示在脚手架底部的RaisedButton。我们也可以使用FlatButton代替RaisedButton。
8. bottomNavigationBar:该属性类似于菜单,该菜单在Scaffold的底部显示导航栏。可以在大多数移动应用程序中看到。此属性允许开发人员在栏中添加多个图标或文本作为项目。它应该在body和persistentFooterButtons下面呈现。请参见以下代码:
bottomNavigationBar: BottomNavigationBar(
  currentIndex: 0,
  fixedColor: Colors.grey,
  items: [
    BottomNavigationBarItem(
      title: Text("Home"),
      icon: Icon(Icons.home),
    ),
    BottomNavigationBarItem(
      title: Text("Search"),
      icon: Icon(Icons.search),
    ),
    BottomNavigationBarItem(
      title: Text("User Profile"),
      icon: Icon(Icons.account_circle),
    ),
  ],
  onTap: (int itemIndex){
    setState(() {
      _currentIndex = itemIndex;
    });
  },
),
在上面的代码中,我们使用了BottomNavigationBar小部件来显示菜单栏。 fixedColor属性用于活动图标的颜色。 BottomNavigationBarItems小部件用于在包含文本和图标作为其子属性的栏中添加项目。当我们点击项目时,我们还使用了onTap(int itemIndex)函数来执行操作,该操作根据它们的索引位置进行。
9. endDrawer:类似于抽屉属性,但默认情况下它们显示在屏幕的右侧。可以从右向左或从左向右滑动。
10. resizeToAvoidBottomInset:如果为true ,则主体和脚手架的浮动小部件应自行调整其大小,以避免出现屏幕键盘。 bottom属性定义屏幕键盘的高度。
11. floatActionButtonLocation:默认情况下,它位于屏幕的右下角。它用于确定floatActionButton的位置。它包含许多预定义的常量,例如centerDocked,centerFloat,endDocked,endFloat等。
这就是关于脚手架的各种属性的全部内容,这些属性使我们可以大致了解脚手架小部件。其主要目的是熟悉Flutter应用程序中的不同属性及其用法。如果我们想更详细地学习它,请参考这里的flutter文档。
让我们看一下我们尝试使用大多数Scaffold属性来快速,轻松地理解此小部件的示例。
在此示例中,我们将看到一个带有AppBar,BottomAppBar,FloatingActionButton,floatingActionButtonLocation和抽屉属性的Scaffold小部件。
import 'package:flutter/material.dart';

void main() => runApp(MyApp());

/// This Widget is the main application widget.
class MyApp extends StatelessWidget {
  @override
  Widget build(BuildContext context) {
    return MaterialApp(
      home: MyStatefulWidget(),
    );
  }
}

class MyStatefulWidget extends StatefulWidget {
  MyStatefulWidget({Key key}) : super(key: key);

  @override
  _MyStatefulWidgetState createState() => _MyStatefulWidgetState();
}

class _MyStatefulWidgetState extends State {
  int _count = 0;

  Widget build(BuildContext context) {
    return Scaffold(
      appBar: AppBar(
        title: Text('Flutter Scaffold Example'),
      ),
      body: Center(
        child: Text('We have pressed the button $_count times.'),
      ),
      bottomNavigationBar: BottomAppBar(
        shape: const CircularNotchedRectangle(),
        child: Container(
          height: 50.0,
        ),
      ),
      floatingActionButton: FloatingActionButton(
        onPressed: () => setState(() {
          _count++;
        }),
        tooltip: 'Increment Counter',
        child: Icon(Icons.add),
      ),
      floatingActionButtonLocation: FloatingActionButtonLocation.endDocked,
      drawer: Drawer(
        elevation: 20.0,
        child: Column(
          children: [
            UserAccountsDrawerHeader(
              accountName: Text("javatpoint"),
              accountEmail: Text("javatpoint@gmail.com"),
              currentAccountPicture: CircleAvatar(
                backgroundColor: Colors.yellow,
                child: Text("abc"),
              ),
            ),
            ListTile(
              title: new Text("Inbox"),
              leading: new Icon(Icons.mail),
            ),
            Divider( height: 0.1,),
            ListTile(
              title: new Text("Primary"),
              leading: new Icon(Icons.inbox),
            ),
            ListTile(
              title: new Text("Social"),
              leading: new Icon(Icons.people),
            ),
            ListTile(
              title: new Text("Promotions"),
              leading: new Icon(Icons.local_offer),
            )
          ],
        ),
      ),
    );
  }
}
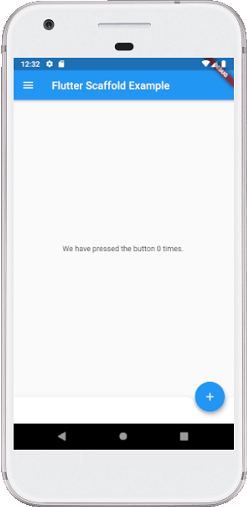
输出:
当我们在IDE中运行该项目时,我们将看到UI如下屏幕截图。
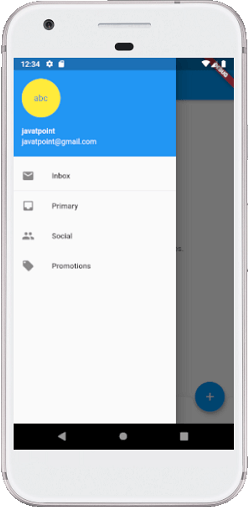
如果单击屏幕左上角可以看到的三行,我们将看到抽屉。抽屉可以从右向左或从左向右滑动。参见下图。