- Flutter的容器类(1)
- Flutter容器(1)
- Flutter – 容器样式(1)
- Flutter – 容器样式
- Flutter – 容器样式
- Flutter onclick 容器 - Dart (1)
- 容器内的容器颤动 (1)
- Flutter onclick 容器 - Dart 代码示例
- flutter 卡
- flutter 表(1)
- Flutter
- flutter 卡(1)
- Flutter(1)
- Flutter
- flutter 表
- 容器内的容器颤动 - 任何代码示例
- Flutter行列与容器的区别
- Flutter行列与容器的区别(1)
- Flutter行列与容器的区别(1)
- Flutter行列与容器的区别
- 容器与容器流体 (1)
- C++中的序列容器与关联容器(1)
- C++中的序列容器与关联容器
- 容器 js - Javascript (1)
- js 容器类 - Javascript (1)
- 容器与容器流体 - 任何代码示例
- 容器 js - Javascript 代码示例
- js 容器类 - Javascript 代码示例
- Docker-容器
📅 最后修改于: 2021-01-02 04:52:55 🧑 作者: Mango
颤振容器
Flutter中的容器是一个父窗口小部件,可以包含多个子窗口小部件,并通过宽度,高度,填充,背景颜色等有效地对其进行管理。它是一个结合了子窗口小部件的常见绘画,定位和大小的窗口小部件。这也是一类,用于存储一个或多个小部件并根据我们的需要将它们放置在屏幕上。通常,它类似于用于存储内容的盒子。它允许用户使用许多属性来装饰其子窗口小部件,例如使用margin ,它将容器与其他内容分开。
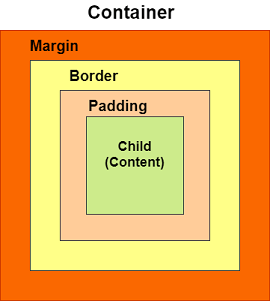
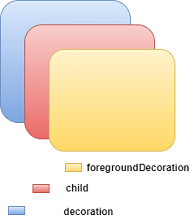
容器小部件与html中的 如果我们有一个需要某种背景样式的窗口小部件,可能是颜色,形状或大小限制,则可以尝试将其包装在容器窗口小部件中。此小部件可帮助我们组成,装饰和定位其子小部件。如果将小部件包装在容器中,则不使用任何参数,就不会发现外观上的任何差异。但是,如果我们在容器中添加任何属性,例如颜色,边距,填充等,则可以根据需要在屏幕上设置小部件的样式。 基本容器的子控件周围具有边距,边框和填充属性,如下图所示: 以下是容器类构造函数的语法: 让我们详细了解容器小部件的一些基本属性。 1. child:此属性用于存储容器的子窗口小部件。假设我们将“文本”小部件作为其子小部件,可以在以下示例中显示: 2. color:此属性用于设置文本的背景颜色。它还会更改整个容器的背景颜色。请参见以下示例: 3. height and width:此属性用于根据我们的需要设置容器的高度和宽度。默认情况下,容器始终根据其子窗口小部件占用空间。请参见以下代码: 4. margin:此属性用于包围容器周围的有效空间。我们可以通过查看容器周围的空白来观察此情况。假设我们使用了EdgeInsets.all(25) ,它在所有四个方向上设置了相等的边距,如下例所示: 5. padding:此属性用于设置容器的边框(所有四个方向)与其子控件之间的距离。我们可以通过查看容器和子窗口小部件之间的空间来观察这一点。在这里,我们使用了EdgeInsets.all(35)来设置文本和所有四个容器方向之间的间距: 6.对齐:此属性用于设置子项在容器中的位置。 Flutter允许用户以各种方式对齐其元素,例如中心,底部,底部中心,topLeft,centerRight,左侧,右侧等。在下面的示例中,我们将其子项对齐到右下角的位置。 7.装饰:此属性允许开发人员在小部件上添加装饰。它装饰或绘制孩子后面的小部件。如果要在孩子面前装饰或绘画,则需要使用forgroundDecoration参数。下图说明了两者之间的区别,其中,前台装饰覆盖子项和子项后的装饰涂料。 装饰属性支持许多参数,例如颜色,渐变,背景图像,边框,阴影等。这是确保我们可以在容器或装饰中使用color属性,但不能同时在两者中使用。请参阅下面的代码,其中我们添加了border和shadow属性来装饰盒子: 我们将在屏幕截图中看到以下输出: 8. transform: transform属性允许开发人员旋转容器。它可以沿任何方向旋转容器,即在父窗口小部件中更改容器坐标。在下面的示例中,我们将沿z轴旋转容器。 9.约束:当我们要向子级添加其他约束时,使用此属性。它包含各种构造函数,例如紧密,松散,扩展等。让我们看看如何在我们的应用程序中使用这些构造函数: 紧:如果在此使用size属性,它将为子级赋予固定值。 expand:在这里,我们可以选择子项的高度,宽度或两者。 让我们通过一个示例来了解它,在该示例中,我们将尝试覆盖大多数容器属性。打开main.dart文件,并将其替换为以下代码: 输出量 当我们运行该应用程序时,它将给出以下屏幕截图:为什么我们在Flutter中需要一个容器小部件?
容器类的构造函数
Container({Key key,
           AlignmentGeometry alignment,
           EdgeInsetsGeometry padding,
           Color color,
           double width,
           double height,
           Decoration decoration,
           Decoration foregroundDecoration,
           BoxConstraints constraints,
           Widget child,
           Clip clipBehavior: Clip.none
});
容器小部件的属性
Container(
    child: Text("Hello! I am in the container widget", style: TextStyle(fontSize: 25)),
)
Container(
    color: Colors.green,
    child: Text("Hello! I am in the container widget", style: TextStyle(fontSize: 25)),
)
Container(
    width: 200.0,
    height: 100.0,
    color: Colors.green,
    child: Text("Hello! I am in the container widget", style: TextStyle(fontSize: 25)),
)
Container(
    width: 200.0,
    height: 100.0,
    color: Colors.green,
    margin: EdgeInsets.all(20),
    child: Text("Hello! I am in the container widget", style: TextStyle(fontSize: 25)),
)
Container(
    width: 200.0,
    height: 100.0,
    color: Colors.green,
    padding: EdgeInsets.all(35),
    margin: EdgeInsets.all(20),
    child: Text("Hello! I am in the container widget", style: TextStyle(fontSize: 25)),
)
Container(
    width: 200.0,
    height: 100.0,
    color: Colors.green,
    padding: EdgeInsets.all(35),
    margin: EdgeInsets.all(20),
    alignment: Alignment.bottomRight,
    child: Text("Hello! I am in the container widget", style: TextStyle(fontSize: 25)),
)
import 'package:flutter/material.dart';
void main() => runApp(MyApp());
/// This Widget is the main application widget.
class MyApp extends StatelessWidget {
@override
Widget build(BuildContext context) {
return MaterialApp(
home: Scaffold(
appBar: AppBar(
title: Text("Flutter Container Example"),
),
body: Container(
padding: EdgeInsets.all(35),
margin: EdgeInsets.all(20),
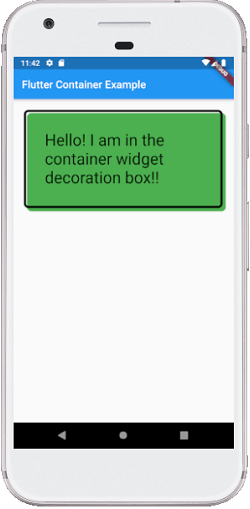
decoration: BoxDecoration(
border: Border.all(color: Colors.black, width: 4),
borderRadius: BorderRadius.circular(8),
boxShadow: [
new BoxShadow(color: Colors.green, offset: new Offset(6.0, 6.0),),
],
),
child: Text("Hello! I am in the container widget decoration box!!",
style: TextStyle(fontSize: 30)),
),
),
);
}
}
Container(
    width: 200.0,
    height: 100.0,
    color: Colors.green,
    padding: EdgeInsets.all(35),
    margin: EdgeInsets.all(20),
    alignment: Alignment.bottomRight,
    transform: Matrix4.rotationZ(0.1),
    child: Text("Hello! I am in the container widget", style: TextStyle(fontSize: 25)),
)
Container(
    color: Colors.green,
    constraints: BoxConstraints.tight(Size size)
        : minWidth = size.width, maxWidth = size.width,
          minHeight = size.height, maxHeight = size.height;
    child: Text("Hello! I am in the container widget", style: TextStyle(fontSize: 25)),
)
Container(
    color: Colors.green,
    constraints: BoxConstraints.expand(height: 60.0),
    child: Text("Hello! I am in the container widget", style: TextStyle(fontSize: 25)),
)
import 'package:flutter/material.dart';
void main() => runApp(MyApp());
/// This Widget is the main application widget.
class MyApp extends StatelessWidget {
@override
Widget build(BuildContext context) {
return MaterialApp(
home: MyContainerWidget(),
);
}
}
class MyContainerWidget extends StatelessWidget {
@override
Widget build(BuildContext context) {
return MaterialApp(
home: Scaffold(
appBar: AppBar(
title: Text("Flutter Container Example"),
),
body: Container(
width: double.infinity,
height: 150.0,
color: Colors.green,
margin: EdgeInsets.all(25),
padding: EdgeInsets.all(35),
alignment: Alignment.center,
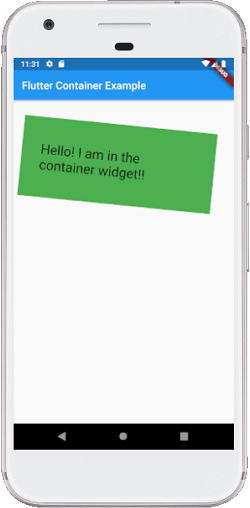
transform: Matrix4.rotationZ(0.1),
child: Text("Hello! I am in the container widget!!",
style: TextStyle(fontSize: 25)),
),
),
);
}
}