您是否知道一套计算机算法可以处理视频流,从而使它们能够检测犯罪活动,控制交通拥堵,甚至自动检测体育广播中的事件?得益于机器学习(ML)的应用,从简单的视频中获取大量数据的想法似乎并不现实。在本文中,我们将讨论如何将机器学习算法的预构建逻辑应用于视频的对象检测和分割。
特别是,我们讨论了如何配置Google Colaboratory来通过机器学习来解决视频处理任务。您将学习如何使用此Google服务和免费的NVIDIA Tesla K80 GPU,该服务可实现您在训练神经网络方面的目标。对于熟悉机器学习并考虑使用图像识别和视频处理的人员,本文将非常有用。
硬件资源有限的图像处理
这项任务是借助机器学习(ML)算法在视频录制中识别人物。我们决定从基础开始。首先,让我们考虑一下实际上是什么录像。
从技术角度来看,任何视频记录都包含一系列特定格式的静止图像,并用视频编解码器压缩。因此,视频流上的对象识别可以归结为将流分成单独的图像或帧,然后对其应用预训练的ML图像识别算法。
为此,我们决定使用Mask_R-CNN存储库中的神经网络对单个图像进行分类。该存储库包含在Python3,TensorFlow和Keras上的卷积神经网络的实现。让我们看看这个计划的结果。
Mask_RCNN示例
我们开发并实现了一个Mask_RCNN的简单示例,该示例接收图片作为输入并识别其中的对象。我们基于demo.ipynb描述创建了一个示例,描述取自Mask_R-CNN存储库。这是我们示例的代码:
import os, sys
import random
import math
import numpy as np
import skimage.io
import matplotlib
import matplotlib.pyplot as plt

os.chdir("/content/drive/My Drive/Colab Notebooks/MRCNN_pure")
sys.path.append("/content/drive/My Drive/Colab Notebooks/MRCNN_pure")

# Root directory of the project
ROOT_DIR = os.path.abspath(".")

# Import Mask RCNN
sys.path.append(ROOT_DIR)  # To find local version of the library

from mrcnn import utils
import mrcnn.model as modellib
from mrcnn import visualize

# Import COCO config
sys.path.append(os.path.join(ROOT_DIR, "samples/coco/"))  # To find local version
import coco

# Directory to save logs and trained model
MODEL_DIR = os.path.join(ROOT_DIR, "logs")

# Local path to trained weights file
COCO_MODEL_PATH = os.path.join(ROOT_DIR, "mask_rcnn_coco.h5")
# Download COCO trained weights from Releases if needed
if not os.path.exists(COCO_MODEL_PATH):
    utils.download_trained_weights(COCO_MODEL_PATH)

# Directory of images to run detection on
IMAGE_DIR = os.path.join(ROOT_DIR, "images")

class InferenceConfig(coco.CocoConfig):
    # Set batch size to 1 since we'll be running inference on
    # one image at a time. Batch size = GPU_COUNT * IMAGES_PER_GPU
    GPU_COUNT = 1
    IMAGES_PER_GPU = 1

config = InferenceConfig()
config.display()

# Create model object in inference mode.
model = modellib.MaskRCNN(mode="inference", model_dir=MODEL_DIR, config=config)

# Load weights trained on MS-COCO
model.load_weights(COCO_MODEL_PATH, by_name=True)

# COCO Class names
# Index of the class in the list is its ID. For example, to get ID of
# the teddy bear class, use: class_names.index('teddy bear')
class_names = ['BG', 'person', 'bicycle', 'car', 'motorcycle', 'airplane',
               'bus', 'train', 'truck', 'boat', 'traffic light',
               'fire hydrant', 'stop sign', 'parking meter', 'bench', 'bird',
               'cat', 'dog', 'horse', 'sheep', 'cow', 'elephant', 'bear',
               'zebra', 'giraffe', 'backpack', 'umbrella', 'handbag', 'tie',
               'suitcase', 'frisbee', 'skis', 'snowboard', 'sports ball',
               'kite', 'baseball bat', 'baseball glove', 'skateboard',
               'surfboard', 'tennis racket', 'bottle', 'wine glass', 'cup',
               'fork', 'knife', 'spoon', 'bowl', 'banana', 'apple',
               'sandwich', 'orange', 'broccoli', 'carrot', 'hot dog', 'pizza',
               'donut', 'cake', 'chair', 'couch', 'potted plant', 'bed',
               'dining table', 'toilet', 'tv', 'laptop', 'mouse', 'remote',
               'keyboard', 'cell phone', 'microwave', 'oven', 'toaster',
               'sink', 'refrigerator', 'book', 'clock', 'vase', 'scissors',
               'teddy bear', 'hair drier', 'toothbrush']

# Load a random image from the images folder
file_names = next(os.walk(IMAGE_DIR))[2]
image = skimage.io.imread(os.path.join(IMAGE_DIR, random.choice(file_names)))

# Run detection
results = model.detect([image], verbose=1)

# Visualize results
r = results[0]
visualize.display_instances(image, r['rois'], r['masks'],
                            r['class_ids'],class_names, r['scores'])
在此示例中,/ content / drive /我的驱动器/ Colab笔记本/ MRCNN_pure是使用Mask_R-CNN到我们的存储库的路径。结果,我们得到了以下内容: 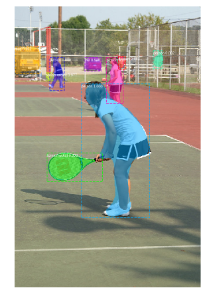
演示代码的这一部分将遍历images文件夹,随机选择一张图像,并将其加载到我们的神经网络模型中进行分类:
# Load a random image from the images folder
file_names = next(os.walk(IMAGE_DIR))[2]
image = skimage.io.imread(os.path.join(IMAGE_DIR, random.choice(file_names)))

# Run detection
results = model.detect([image], verbose = 1)
让我们修改Mask_R-CNN示例以使其识别images文件夹中的所有图像:
# Load a random image from the images folder
file_names = next(os.walk(IMAGE_DIR))[2]

for file_name in file_names:
    image = skimage.io.imread(os.path.join(IMAGE_DIR, file_name))

    # Run detection
    results = model.detect([image], verbose = 1)

    # Visualize results
    r = results[0]
    visualize.display_instances(image, r['rois'], r['masks'],
                         r['class_ids'],class_names, r['scores'])
在运行演示代码五分钟后,控制台显示以下输出:
…
Processing 1 images
image shape: (415, 640, 3) min: 0.00000 max: 255.00000 uint8
molded_images shape: (1, 1024, 1024, 3) min: -123.70000 max: 151.10000 float64
image_metas shape: (1, 93) min: 0.00000 max: 1024.00000 float64
anchors shape: (1, 261888, 4) min: -0.35390 max: 1.29134 float32
Segmentation fault (core dumped)
最初,我们在具有Intel Core i5和8GB RAM且没有独立显卡的计算机上运行演示代码。代码每次都在不同的位置崩溃,但最常见的是在内存分配期间在TensorFlow框架中崩溃。此外,在图像识别过程中尝试运行任何其他软件的任何尝试都会使计算机的速度降低到无用的程度。
因此,我们面临一个严重的问题:熟悉ML的任何实验都需要功能强大的图形卡和更多的硬件资源。没有这个,我们就无法在识别大量图像的同时执行任何其他任务。借助Google合作伙伴来增加我们的硬件资源
我们决定通过使用Google的Colaboratory服务(也称为Colab)来扩展硬件资源。 Google Colab是一项免费的云服务,可使用CPU和GPU以及预配置的虚拟机实例。具体来说,Google提供了具有12GB专用视频内存的NVIDIA Tesla K80 GPU,这使Colab成为进行神经网络实验的理想工具。
在解释如何使用此Google服务之前,我们要强调其他有益的协作功能。
通过为您的机器学习实验选择Colab,您将获得:
–支持Python 2.7和Python 3.6,以便您提高编码技能;
–具有Jupyter Notebook的功能,因此您可以创建,编辑和共享.ipynb文件;
–使用本地计算机连接到Jupyter运行时的能力;
–许多预安装的库,包括TensorFlow,Keras和OpenCV,以及与Google Colaboratory中的自定义库进行交互的可能性;
–上传功能,因此您可以添加训练有素的模型;
–与GitHub集成,因此您可以加载公共GitHub笔记本或将Colab文件的副本保存到GitHub;
–使用诸如matplotlib之类的流行库进行简单的可视化;
–可用于参数化代码的表格;
–可以在您的Google云端硬盘中存储Google Colab笔记本。
为了开始使用Google Colab GPU,您只需要提供对在Docker容器中实现的.ipynb脚本的访问。 Docker容器仅分配给您12个小时。默认情况下,您创建的所有脚本都会存储在Google云端硬盘的Colab笔记本部分中,该部分会在您连接到Colaboratory时自动创建。 12小时后,容器中的所有数据将被删除。您可以通过将Google云端硬盘安装在容器中并使用它来避免这种情况。否则,Docker映像的文件系统将仅在有限的时间内可用。
配置Google Colab
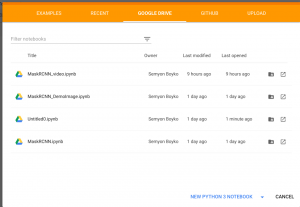
首先,让我们解释一下如何创建您的.ipynb笔记本。在此处打开Google合作实验室,选择Google云端硬盘部分,然后点击新建PYTHON 3笔记本:
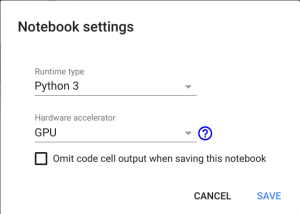
通过单击文件名,可以将笔记本重命名为任意名称。现在,您需要选择硬件。为此,只需转到“编辑”部分,找到“笔记本设置”,选择GPU作为硬件加速器,然后单击“保存”保存更改。
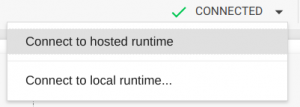
保存新设置后,将为您提供带有独立显卡的Docker容器。页面右上方将显示“已连接”消息,通知您:
![]()
如果没有看到此消息,请选择“连接到托管的运行时”。
现在,您可以将Google云端硬盘安装到此容器中,以便重新定位源代码并将工作结果保存在该容器中。为此,只需将下面的代码复制到第一个表格单元格中,然后按“播放”按钮(或Shift + Enter)。
通过运行以下代码来挂载Google云端硬盘:
# from google.colab import drive
drive.mount('/content/drive')
您将收到授权请求。单击链接,授权,复制验证码,将其粘贴到.ipynb脚本的文本框中,然后按Enter。如果授权成功,您的Google云端硬盘将安装在/ content / drive /我的云端硬盘路径下。要遵循文件树,请在左侧菜单中选择“文件”。
现在,您有了一个带有Tesla K80 GPU的Docker容器,您的Google Drive作为文件存储以及用于脚本执行的.ipynb笔记本。
使用Google Colab进行对象识别
现在,我们将描述如何在Google Colab中运行Mask_R-CNN示例进行对象识别。我们沿着/ content / drive / My Drive / Colab Notebooks /路径将Mask_RCNN存储库上传到我们的Google云端硬盘。
然后,将示例代码添加到.ipynb脚本中。执行此操作时,请不要忘记像下面这样更改Mask_RCNN文件夹的路径:
os.chdir("/content/drive/My Drive/Colab Notebooks/MRCNN_pure")
sys.path.append("/content/drive/My Drive/Colab Notebooks/MRCNN_pure")
如果一切正确,代码执行的结果将为您提供一张图像,在其中可以检测和识别所有对象。
您还可以修改示例代码以使其处理所有测试图像:
import os, sys
import random
import math
import numpy as np
import skimage.io
import matplotlib
import matplotlib.pyplot as plt

os.chdir("/content/drive/My Drive/Colab Notebooks/MRCNN_pure")
sys.path.append("/content/drive/My Drive/Colab Notebooks/MRCNN_pure")

# Root directory of the project
ROOT_DIR = os.path.abspath(".")

# Import Mask RCNN
sys.path.append(ROOT_DIR)  # To find local version of the library
from mrcnn import utils
import mrcnn.model as modellib
from mrcnn import visualize
# Import COCO config
sys.path.append(os.path.join(ROOT_DIR, "samples/coco/"))  # To find local version
import coco

# Directory to save logs and trained model
MODEL_DIR = os.path.join(ROOT_DIR, "logs")

# Local path to trained weights file
COCO_MODEL_PATH = os.path.join(ROOT_DIR, "mask_rcnn_coco.h5")
# Download COCO trained weights from Releases if needed
if not os.path.exists(COCO_MODEL_PATH):
    utils.download_trained_weights(COCO_MODEL_PATH)

# Directory of images to run detection on
IMAGE_DIR = os.path.join(ROOT_DIR, "images")

class InferenceConfig(coco.CocoConfig):
    # Set batch size to 1 since we'll be running inference on
    # one image at a time. Batch size = GPU_COUNT * IMAGES_PER_GPU
    GPU_COUNT = 1
    IMAGES_PER_GPU = 1

config = InferenceConfig()
config.display()

# Create model object in inference mode.
model = modellib.MaskRCNN(mode="inference", model_dir=MODEL_DIR, config=config)

# Load weights trained on MS-COCO
model.load_weights(COCO_MODEL_PATH, by_name=True)

# COCO Class names
# Index of the class in the list is its ID. For example, to get ID of
# the teddy bear class, use: class_names.index('teddy bear')
class_names = ['BG', 'person', 'bicycle', 'car', 'motorcycle', 'airplane',
               'bus', 'train', 'truck', 'boat', 'traffic light',
               'fire hydrant', 'stop sign', 'parking meter', 'bench', 'bird',
               'cat', 'dog', 'horse', 'sheep', 'cow', 'elephant', 'bear',
               'zebra', 'giraffe', 'backpack', 'umbrella', 'handbag', 'tie',
               'suitcase', 'frisbee', 'skis', 'snowboard', 'sports ball',
               'kite', 'baseball bat', 'baseball glove', 'skateboard',
               'surfboard', 'tennis racket', 'bottle', 'wine glass', 'cup',
               'fork', 'knife', 'spoon', 'bowl', 'banana', 'apple',
               'sandwich', 'orange', 'broccoli', 'carrot', 'hot dog', 'pizza',
               'donut', 'cake', 'chair', 'couch', 'potted plant', 'bed',
               'dining table', 'toilet', 'tv', 'laptop', 'mouse', 'remote',
               'keyboard', 'cell phone', 'microwave', 'oven', 'toaster',
               'sink', 'refrigerator', 'book', 'clock', 'vase', 'scissors',
               'teddy bear', 'hair drier', 'toothbrush']

# Load a random image from the images folder
file_names = next(os.walk(IMAGE_DIR))[2]

for file_name in file_names:
    image = skimage.io.imread(os.path.join(IMAGE_DIR, file_name))

    # Run detection
    results = model.detect([image], verbose=1)

    # Visualize results
    r = results[0]
    visualize.display_instances(image, r['rois'], r['masks'],
                      r['class_ids'],class_names, r['scores'])
使用Google Colab中的对象检测,我们可以快速接收到带有已识别对象的结果,而即使在图像识别过程中,我们的计算机仍可以像往常一样执行。
使用Google Colab进行视频处理
让我们看看我们如何应用这种方法来识别视频流中的人物。我们将测试视频文件上传到我们的Google云端硬盘。为了训练脚本来处理视频流,我们使用了OpenCV,这是一种流行的开源计算机视觉库。
我们不需要在一张图像上读取并实现识别模型的全部代码。因此,我们没有打开视频文件,而是运行视频流并将其指针移至第1个第000帧,因为在录制的简介中没有可识别的对象。
import cv2
...
VIDEO_STREAM = "/content/drive/My Drive/Colab Notebooks/Millery.avi"
VIDEO_STREAM_OUT = "/content/drive/My Drive/Colab Notebooks/Result.avi"
...

# initialize the video stream and pointer to output video file
vs = cv2.VideoCapture(VIDEO_STREAM)
writer = None
vs.set(cv2.CAP_PROP_POS_FRAMES, 1000);
然后,使用我们的神经网络模型处理20,000帧。 OpenCV对象允许我们使用read()方法从视频文件中逐帧获取图像。接收到的图像将传递到model.detect()方法,并使用visualize.display_instances()函数将结果可视化。
但是,我们遇到了一个问题:Mask_RCNN存储库中的display_instances()函数反映了图像中检测到的对象,但没有返回图像。我们决定简化display_instances()函数,并使其返回带有显示对象的图像:
def display_instances(image, boxes, masks, ids, names, scores):
    """
        take the image and results and apply the mask, box, and Label
    """
    n_instances = boxes.shape[0]
    colors = visualize.random_colors(n_instances)

    if not n_instances:
        print('NO INSTANCES TO DISPLAY')
    else:
        assert boxes.shape[0] == masks.shape[-1] == ids.shape[0]

    for i, color in enumerate(colors):
        if not np.any(boxes[i]):
            continue

        y1, x1, y2, x2 = boxes[i]
        label = names[ids[i]]
        score = scores[i] if scores is not None else None
        caption = '{} {:.2f}'.format(label, score) if score else label
        mask = masks[:, :, i]

        image = visualize.apply_mask(image, mask, color)
        image = cv2.rectangle(image, (x1, y1), (x2, y2), color, 2)
        image = cv2.putText(
            image, caption, (x1, y1), cv2.FONT_HERSHEY_COMPLEX, 0.7, color, 2
        )

    return image
处理后,应将这些帧重新绑定到一个新的视频文件中。我们也可以使用OpenCV库来做到这一点。我们需要做的就是从OpenCV库分配VideoWriter对象:
fourcc = cv2.VideoWriter_fourcc(*"XVID")
writer = cv2.VideoWriter(VIDEO_STREAM_OUT, fourcc, 30,
             (masked_frame.shape[1], masked_frame.shape[0]), True)
使用我们为输入提供的视频类型。我们借助ffprobe命令获得视频文件类型:
ffprobe Result.avi
…
Duration: N/A, start: 0.000000, bitrate: N/A
Stream #0:0: Video: mpeg4 (Simple Profile) (XVID / 0x44495658), yuv420p, 640×272 [SAR 1:1 DAR 40:17], 30 fps, 30 tbr, 30 tbn, 30 tbc
接收到的对象可用于每帧记录:writer.write(masked_frame)。
在脚本的开头,我们需要指定要处理的目标视频文件的路径:VIDEO_STREAM和VIDEO_STREAM_OUT。
这是我们为视频识别开发的完整脚本:
from google.colab import drive
drive.mount('/content/drive')

import os, sys
import random
import math
import numpy as np
import skimage.io
import matplotlib
import matplotlib.pyplot as plt
import cv2

from matplotlib.patches import Polygon

os.chdir("/content/drive/My Drive/Colab Notebooks/MRCNN_pure")
sys.path.append("/content/drive/My Drive/Colab Notebooks/MRCNN_pure")
VIDEO_STREAM = "/content/drive/My Drive/Colab Notebooks/Millery.avi"
VIDEO_STREAM_OUT = "/content/drive/My Drive/Colab Notebooks/Result.avi"

# Root directory of the project
ROOT_DIR = os.path.abspath(".")

# Import Mask RCNN
sys.path.append(ROOT_DIR)  # To find local version of the library
from mrcnn import utils
import mrcnn.model as modellib
from mrcnn import visualize
# Import COCO config
sys.path.append(os.path.join(ROOT_DIR, "samples/coco/"))  # To find local version
import coco

# Directory to save logs and trained model
MODEL_DIR = os.path.join(ROOT_DIR, "logs")

# Local path to trained weights file
COCO_MODEL_PATH = os.path.join(ROOT_DIR, "mask_rcnn_coco.h5")
# Download COCO trained weights from Releases if needed
if not os.path.exists(COCO_MODEL_PATH):
    utils.download_trained_weights(COCO_MODEL_PATH)

# Directory of images to run detection on
IMAGE_DIR = os.path.join(ROOT_DIR, "images")

class InferenceConfig(coco.CocoConfig):
    # Set batch size to 1 since we'll be running inference on
    # one image at a time. Batch size = GPU_COUNT * IMAGES_PER_GPU
    GPU_COUNT = 1
    IMAGES_PER_GPU = 1


def display_instances(image, boxes, masks, ids, names, scores):
    """
        take the image and results and apply the mask, box, and Label
    """
    n_instances = boxes.shape[0]
    colors = visualize.random_colors(n_instances)

    if not n_instances:
        print('NO INSTANCES TO DISPLAY')
    else:
        assert boxes.shape[0] == masks.shape[-1] == ids.shape[0]

    for i, color in enumerate(colors):
        if not np.any(boxes[i]):
            continue

        y1, x1, y2, x2 = boxes[i]
        label = names[ids[i]]
        score = scores[i] if scores is not None else None
        caption = '{} {:.2f}'.format(label, score) if score else label
        mask = masks[:, :, i]

        image = visualize.apply_mask(image, mask, color)
        image = cv2.rectangle(image, (x1, y1), (x2, y2), color, 2)
        image = cv2.putText(
            image, caption, (x1, y1), cv2.FONT_HERSHEY_COMPLEX, 0.7, color, 2
        )

    return image


config = InferenceConfig()
config.display()

# Create model object in inference mode.
model = modellib.MaskRCNN(mode="inference", model_dir=MODEL_DIR, config=config)

# Load weights trained on MS-COCO
model.load_weights(COCO_MODEL_PATH, by_name=True)

# COCO Class names
# Index of the class in the list is its ID. For example, to get ID of
# the teddy bear class, use: class_names.index('teddy bear')
class_names = ['BG', 'person', 'bicycle', 'car', 'motorcycle', 'airplane',
               'bus', 'train', 'truck', 'boat', 'traffic light',
               'fire hydrant', 'stop sign', 'parking meter', 'bench', 'bird',
               'cat', 'dog', 'horse', 'sheep', 'cow', 'elephant', 'bear',
               'zebra', 'giraffe', 'backpack', 'umbrella', 'handbag', 'tie',
               'suitcase', 'frisbee', 'skis', 'snowboard', 'sports ball',
               'kite', 'baseball bat', 'baseball glove', 'skateboard',
               'surfboard', 'tennis racket', 'bottle', 'wine glass', 'cup',
               'fork', 'knife', 'spoon', 'bowl', 'banana', 'apple',
               'sandwich', 'orange', 'broccoli', 'carrot', 'hot dog', 'pizza',
               'donut', 'cake', 'chair', 'couch', 'potted plant', 'bed',
               'dining table', 'toilet', 'tv', 'laptop', 'mouse', 'remote',
               'keyboard', 'cell phone', 'microwave', 'oven', 'toaster',
               'sink', 'refrigerator', 'book', 'clock', 'vase', 'scissors',
               'teddy bear', 'hair drier', 'toothbrush']

# Initialize the video stream and pointer to output video file
vs = cv2.VideoCapture(VIDEO_STREAM)
writer = None
vs.set(cv2.CAP_PROP_POS_FRAMES, 1000);

i = 0
while i < 20000:
  # read the next frame from the file
  (grabbed, frame) = vs.read()
  i += 1

  # If the frame was not grabbed, then we have reached the end
  # of the stream
  if not grabbed:
    print ("Not grabbed.")
    break;

  # Run detection
  results = model.detect([frame], verbose=1)

  # Visualize results
  r = results[0]
  masked_frame = display_instances(frame, r['rois'], r['masks'], r['class_ids'],
                            class_names, r['scores'])

  # Check if the video writer is None
  if writer is None:
    # Initialize our video writer
    fourcc = cv2.VideoWriter_fourcc(*"XVID")
    writer = cv2.VideoWriter(VIDEO_STREAM_OUT, fourcc, 30,
      (masked_frame.shape[1], masked_frame.shape[0]), True)

  # Write the output frame to disk
  writer.write(masked_frame)

# Release the file pointers
print("[INFO] cleaning up...")
writer.release()
结论:
在本文中,我们向您展示了如何利用Google Colab,并说明了如何执行以下操作:
使用Google Colab提供的免费Tesla K80 GPU
使用Mask_RCNN神经网络和Google Colab对图像进行分类
使用Mask_RCNN,Google Colab和OpenCV库对视频流中的对象进行分类