在Python使用Selenium和 Beautiful Soup 抓取 LinkedIn
在本文中,我们将使用Python的Selenium和 Beautiful Soup 库来抓取 Linkedln。
首先,我们需要安装一些库。在终端中执行以下命令。
pip install selenium
pip install beautifulsoup4
为了使用selenium,我们还需要一个网络驱动程序。您可以下载 Internet Explorer、Firefox 或 Chrome 的网络驱动程序。在本文中,我们将使用 Chrome 网络驱动程序。
注意:在按照本文进行操作时,如果出现错误,很可能有 2 个可能的原因。
- 网页加载时间过长(可能是因为互联网连接速度较慢)。在这种情况下,使用time.sleep()函数 为网页加载提供额外的时间。根据您的需要指定睡眠秒数。
- 网页的 HTML 与撰写本文时的 HTML 有所不同。如果是这样,您将必须手动选择所需的网页元素,而不是复制下面写的元素名称。下面解释了如何找到元素名称。另外,不要从默认的高度和宽度减少窗口的高度和宽度。它还会更改网页的 HTML。
登录领英
这里我们将编写登录 Linkedin 的代码,首先,我们需要使用selenium启动 web 驱动程序并向 URL 发送 get 请求并识别 HTML 文档并找到接受用户名/电子邮件、密码的输入标签和按钮标签,和登录按钮。
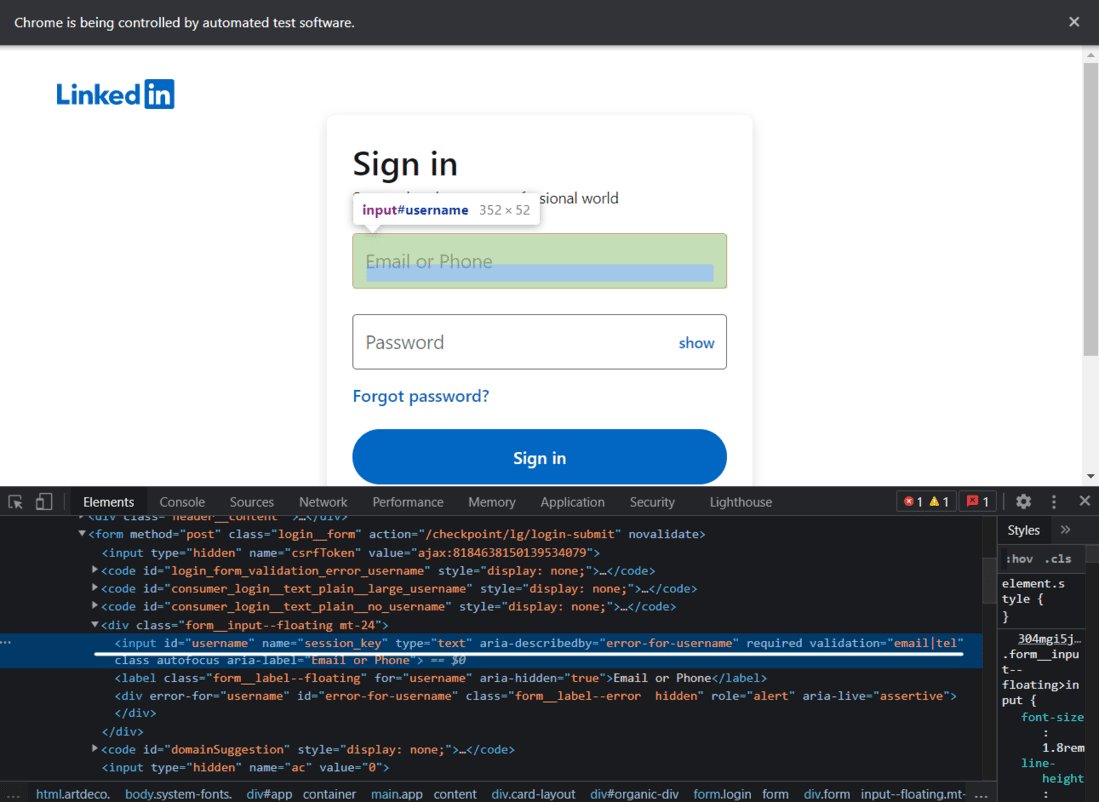
领英登录页面
代码:
Python3
from selenium import webdriver
from bs4 import BeautifulSoup
import time

# Creating a webdriver instance
driver = webdriver.Chrome("Enter-Location-Of-Your-Web-Driver")
# This instance will be used to log into LinkedIn

# Opening linkedIn's login page
driver.get("https://linkedin.com/uas/login")

# waiting for the page to load
time.sleep(5)

# entering username
username = driver.find_element_by_id("username")

# In case of an error, try changing the element
# tag used here.

# Enter Your Email Address
username.send_keys("User_email")

# entering password
pword = driver.find_element_by_id("password")
# In case of an error, try changing the element
# tag used here.

# Enter Your Password
pword.send_keys("User_pass")

# Clicking on the log in button
# Format (syntax) of writing XPath -->
# //tagname[@attribute='value']
driver.find_element_by_xpath("//button[@type='submit']").click()
# In case of an error, try changing the
# XPath used here.
Python3
from selenium import webdriver
from bs4 import BeautifulSoup
import time

# Creating an instance
driver = webdriver.Chrome("Enter-Location-Of-Your-Web-Driver")

# Logging into LinkedIn
driver.get("https://linkedin.com/uas/login")
time.sleep(5)

username = driver.find_element_by_id("username")
username.send_keys("")  # Enter Your Email Address

pword = driver.find_element_by_id("password")
pword.send_keys("")        # Enter Your Password

driver.find_element_by_xpath("//button[@type='submit']").click()

# Opening Kunal's Profile
# paste the URL of Kunal's profile here
profile_url = "https://www.linkedin.com/in/kunalshah1/"

driver.get(profile_url)        # this will open the link
Python3
start = time.time()

# will be used in the while loop
initialScroll = 0
finalScroll = 1000

while True:
    driver.execute_script(f"window.scrollTo({initialScroll},
                                            {finalScroll})
                          ")
    # this command scrolls the window starting from
    # the pixel value stored in the initialScroll
    # variable to the pixel value stored at the
    # finalScroll variable
    initialScroll = finalScroll
    finalScroll += 1000

    # we will stop the script for 3 seconds so that
    # the data can load
    time.sleep(3)
    # You can change it as per your needs and internet speed

    end = time.time()

    # We will scroll for 20 seconds.
    # You can change it as per your needs and internet speed
    if round(end - start) > 20:
        break
Python3
src = driver.page_source

# Now using beautiful soup
soup = BeautifulSoup(src, 'lxml')
Python3
# Extracting the HTML of the complete introduction box
# that contains the name, company name, and the location
intro = soup.find('div', {'class': 'pv-text-details__left-panel'})

print(intro)
Python3
# In case of an error, try changing the tags used here.

name_loc = intro.find("h1")

# Extracting the Name
name = name_loc.get_text().strip()
# strip() is used to remove any extra blank spaces

works_at_loc = intro.find("div", {'class': 'text-body-medium'})

# this gives us the HTML of the tag in which the Company Name is present
# Extracting the Company Name
works_at = works_at_loc.get_text().strip()


location_loc = intro.find_all("span", {'class': 'text-body-small'})

# Ectracting the Location
# The 2nd element in the location_loc variable has the location
location = location_loc[1].get_text().strip()

print("Name -->", name,
      "\nWorks At -->", works_at,
      "\nLocation -->", location)
Python3
# Getting the HTML of the Experience section in the profile
experience = soup.find("section", {"id": "experience-section"}).find('ul')

print(experience)
Python3
# In case of an error, try changing the tags used here.

li_tags = experience.find('div')
a_tags = li_tags.find("a")
job_title = a_tags.find("h3").get_text().strip()

print(job_title)

company_name = a_tags.find_all("p")[1].get_text().strip()
print(company_name)

joining_date = a_tags.find_all("h4")[0].find_all("span")[1].get_text().strip()

employment_duration = a_tags.find_all("h4")[1].find_all(
    "span")[1].get_text().strip()

print(joining_date + ", " + employment_duration)
Python3
jobs = driver.find_element_by_xpath("//a[@data-link-to='jobs']/span")
# In case of an error, try changing the XPath.

jobs.click()
Python3
job_src = driver.page_source

soup = BeautifulSoup(job_src, 'lxml')
Python3
jobs_html = soup.find_all('a', {'class': 'job-card-list__title'})
# In case of an error, try changing the XPath.

job_titles = []

for title in jobs_html:
    job_titles.append(title.text.strip())

print(job_titles)
Python3
company_name_html = soup.find_all(
  'div', {'class': 'job-card-container__company-name'})
company_names = []

for name in company_name_html:
    company_names.append(name.text.strip())

print(company_names)
Python3
import re   # for removing the extra blank spaces

location_html = soup.find_all(
    'ul', {'class': 'job-card-container__metadata-wrapper'})

location_list = []

for loc in location_html:
    res = re.sub('\n\n +', ' ', loc.text.strip())

    location_list.append(res)

print(location_list)
执行上述命令后,您将登录到您的 LinkedIn 个人资料。这就是它的样子。
第 1 部分代码执行
从 LinkedIn 个人资料中提取数据
下面是完整代码的执行视频。
第 2 部分代码执行
2.A) 打开配置文件并滚动到底部
假设您想从 Kunal Shah 的 LinkedIn 个人资料中提取数据。首先,我们需要使用他的个人资料的 URL 打开他的个人资料。然后我们必须滚动到网页底部,以便加载完整的数据。
蟒蛇3
from selenium import webdriver
from bs4 import BeautifulSoup
import time

# Creating an instance
driver = webdriver.Chrome("Enter-Location-Of-Your-Web-Driver")

# Logging into LinkedIn
driver.get("https://linkedin.com/uas/login")
time.sleep(5)

username = driver.find_element_by_id("username")
username.send_keys("")  # Enter Your Email Address

pword = driver.find_element_by_id("password")
pword.send_keys("")        # Enter Your Password

driver.find_element_by_xpath("//button[@type='submit']").click()

# Opening Kunal's Profile
# paste the URL of Kunal's profile here
profile_url = "https://www.linkedin.com/in/kunalshah1/"

driver.get(profile_url)        # this will open the link
输出:

Kunal Shah – LinkedIn 个人资料
现在,我们需要滚动到底部。这是执行此操作的代码:
蟒蛇3
start = time.time()

# will be used in the while loop
initialScroll = 0
finalScroll = 1000

while True:
    driver.execute_script(f"window.scrollTo({initialScroll},
                                            {finalScroll})
                          ")
    # this command scrolls the window starting from
    # the pixel value stored in the initialScroll
    # variable to the pixel value stored at the
    # finalScroll variable
    initialScroll = finalScroll
    finalScroll += 1000

    # we will stop the script for 3 seconds so that
    # the data can load
    time.sleep(3)
    # You can change it as per your needs and internet speed

    end = time.time()

    # We will scroll for 20 seconds.
    # You can change it as per your needs and internet speed
    if round(end - start) > 20:
        break
该页面现在滚动到底部。随着页面完全加载,我们将抓取我们想要的数据。
从配置文件中提取数据
要提取数据,首先将网页的源代码存储在一个变量中。然后,使用此源代码创建一个 Beautiful Soup 对象。
蟒蛇3
src = driver.page_source

# Now using beautiful soup
soup = BeautifulSoup(src, 'lxml')
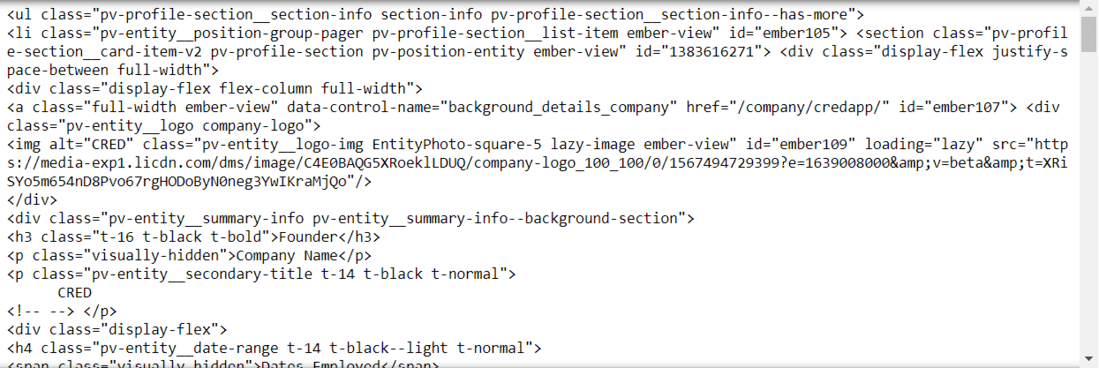
提取配置文件简介:
要提取简介,即姓名、公司名称和位置,我们需要找到每个元素的源代码。首先,我们将找到包含配置文件介绍的div 标签的源代码。
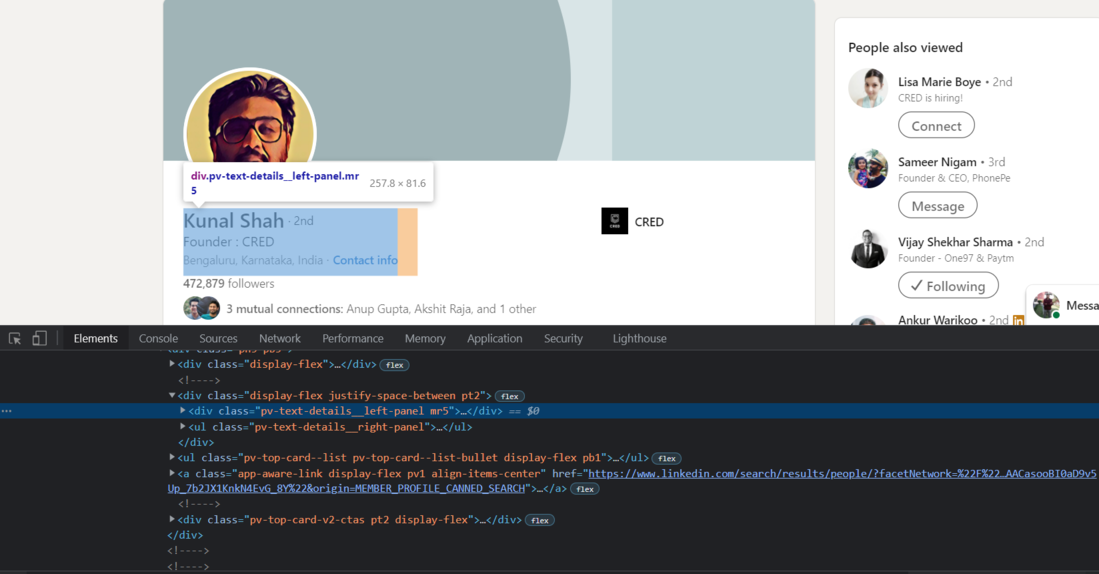
Chrome – 检查元素
现在,我们将使用 Beautiful Soup 将这个div 标签导入Python。
蟒蛇3
# Extracting the HTML of the complete introduction box
# that contains the name, company name, and the location
intro = soup.find('div', {'class': 'pv-text-details__left-panel'})

print(intro)
输出:

(潦草的)简介 HTML
我们现在拥有提取名称、公司名称和位置所需的 HTML。现在让我们提取信息:
蟒蛇3
# In case of an error, try changing the tags used here.

name_loc = intro.find("h1")

# Extracting the Name
name = name_loc.get_text().strip()
# strip() is used to remove any extra blank spaces

works_at_loc = intro.find("div", {'class': 'text-body-medium'})

# this gives us the HTML of the tag in which the Company Name is present
# Extracting the Company Name
works_at = works_at_loc.get_text().strip()


location_loc = intro.find_all("span", {'class': 'text-body-small'})

# Ectracting the Location
# The 2nd element in the location_loc variable has the location
location = location_loc[1].get_text().strip()

print("Name -->", name,
      "\nWorks At -->", works_at,
      "\nLocation -->", location)
输出:
Name --> Kunal Shah
Works At --> Founder : CRED
Location --> Bengaluru, Karnataka, India
从体验部分提取数据
接下来,我们将从配置文件中提取经验。
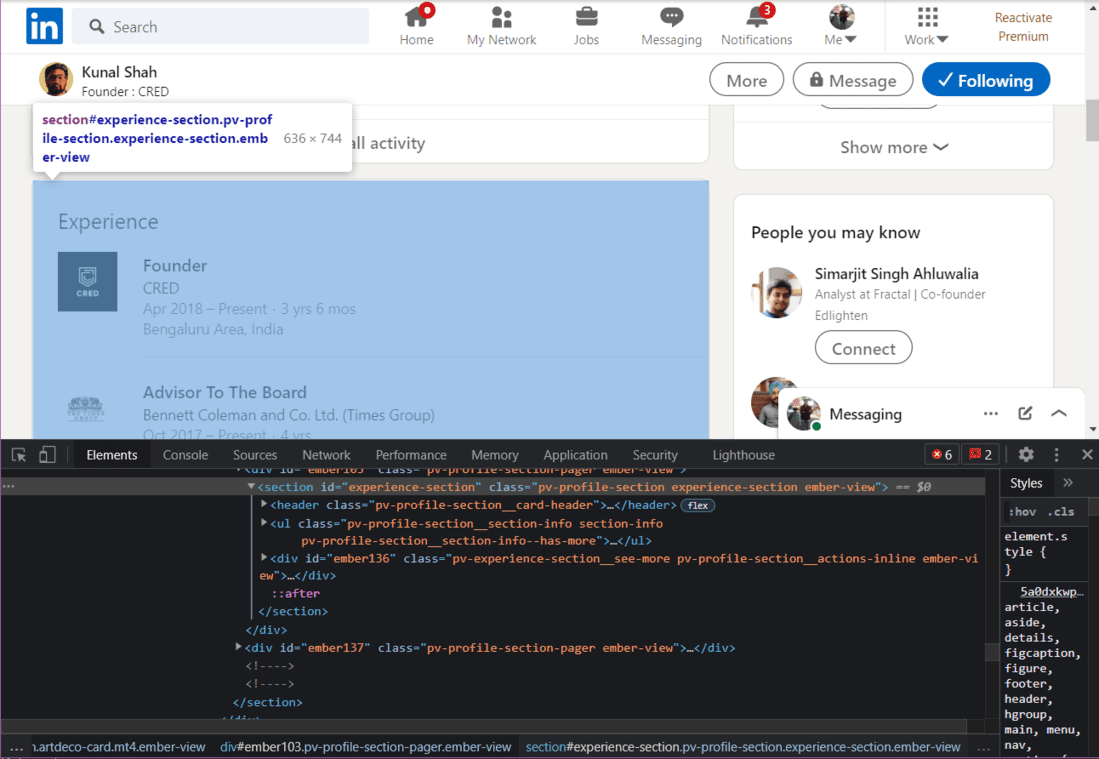
体验部分的 HTML
蟒蛇3
# Getting the HTML of the Experience section in the profile
experience = soup.find("section", {"id": "experience-section"}).find('ul')

print(experience)
输出:
体验 HTML 输出
我们必须深入 HTML 标签,直到找到所需的信息。在上图中,我们可以看到提取当前职位和公司名称的 HTML。我们现在需要进入每个标签来提取数据
Scrape职位,公司名称和经验:
蟒蛇3
# In case of an error, try changing the tags used here.

li_tags = experience.find('div')
a_tags = li_tags.find("a")
job_title = a_tags.find("h3").get_text().strip()

print(job_title)

company_name = a_tags.find_all("p")[1].get_text().strip()
print(company_name)

joining_date = a_tags.find_all("h4")[0].find_all("span")[1].get_text().strip()

employment_duration = a_tags.find_all("h4")[1].find_all(
    "span")[1].get_text().strip()

print(joining_date + ", " + employment_duration)
输出:
'Founder'
'CRED'
Apr 2018 – Present, 3 yrs 6 mos
提取工作搜索数据
我们将使用selenium打开工作页面。
蟒蛇3
jobs = driver.find_element_by_xpath("//a[@data-link-to='jobs']/span")
# In case of an error, try changing the XPath.

jobs.click()
现在工作页面已打开,我们将创建一个 BeautifulSoup 对象来抓取数据。
蟒蛇3
job_src = driver.page_source

soup = BeautifulSoup(job_src, 'lxml')
刮刮职位:
首先,我们将抓取职位。
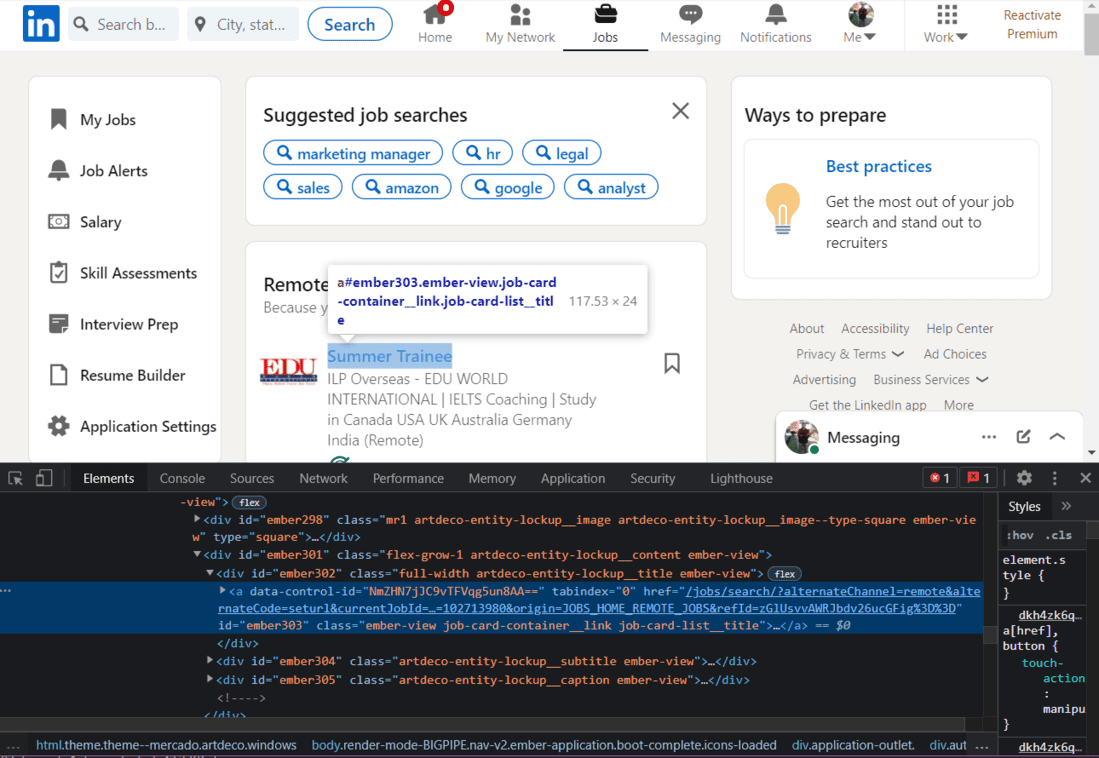
职位名称的 HTML
浏览此页面的 HTML 时,我们会发现每个职位都有类名“job-card-list__title”。我们将使用这个类名来提取职位。
蟒蛇3
jobs_html = soup.find_all('a', {'class': 'job-card-list__title'})
# In case of an error, try changing the XPath.

job_titles = []

for title in jobs_html:
    job_titles.append(title.text.strip())

print(job_titles)
输出:

职位列表
刮刮公司名称:
接下来,我们将提取公司名称。

公司名称的 HTML
我们将使用类名来提取公司的名称:
蟒蛇3
company_name_html = soup.find_all(
  'div', {'class': 'job-card-container__company-name'})
company_names = []

for name in company_name_html:
    company_names.append(name.text.strip())

print(company_names)
输出:

公司名称列表
刮刮工作地点:
最后,我们将提取 Job Location。
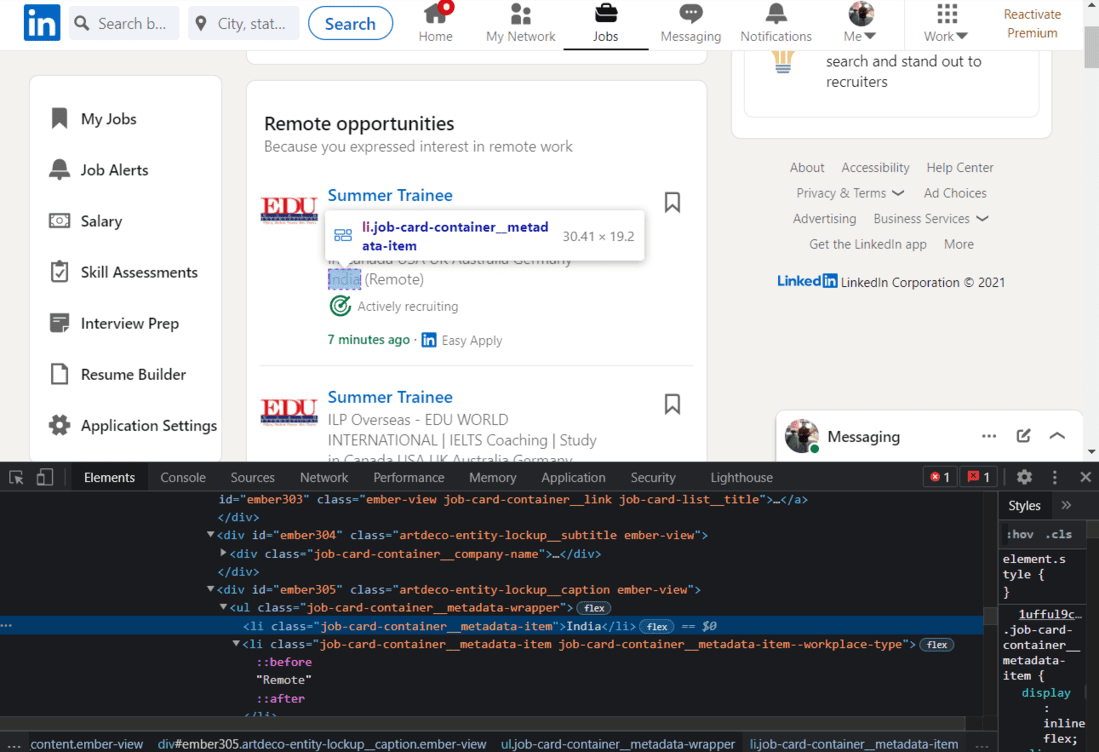
工作地点的 HTML
再一次,我们将使用类名来提取位置。
蟒蛇3
import re   # for removing the extra blank spaces

location_html = soup.find_all(
    'ul', {'class': 'job-card-container__metadata-wrapper'})

location_list = []

for loc in location_html:
    res = re.sub('\n\n +', ' ', loc.text.strip())

    location_list.append(res)

print(location_list)
输出:

工作地点列表