Flutter中的神经拟态
Neumorphism 是一种使用阴影来创建高程效果的 UI 元素。考虑容器的两个相对边缘,一个在光源前面而另一个相对。这会在容器的另一侧创建一个阴影。这使我们的小部件看起来优雅而干净。因此,要创建 Neumorphic 设计,我们将首先在Flutter 中创建一个无状态小部件,并将其命名为 NeumorphicDesign 。
在本文中,我们将介绍一个有趣的 UI 元素,称为Neumorphism 。我们将研究如何将Flutter中的基本容器修改为可以在应用程序中使用的 Neumorphic 容器。此外,我们将使用Flutter容器来创建 Neumorphism,并使用 VS Code 来创建Flutter应用程序。
Dart
import 'package:flutter/material.dart';

void main() {
  runApp(const MyApp());
}

// Root widget of your app
class MyApp extends StatelessWidget {
  const MyApp({Key? key}) : super(key: key);

  @override
  Widget build(BuildContext context) {
    return MaterialApp(
      home: const NeumorphicDesign(),
    );
  }
}

class NeumorphicDesign extends StatelessWidget {
  const NeumorphicDesign({Key? key}) : super(key: key);
  // Write your widget here
  @override
  Widget build(BuildContext context) {
    return Scaffold(
        body: Container(),
    );
  }
}
Dart
class HomePage extends StatelessWidget {
@override
Widget build(BuildContext context) {
    return Scaffold(
      // Background color to the app
      backgroundColor: Colors.grey[300],
      // Widget to center the widgets inside it.
      body: Center(
        child: Container(
            // Providing Container
              // with height and width
            height: 200.0,
            width: 200.0,
        ),
      );
    }
}
Dart
BoxDecoration({
    this.color,
    this.image,
    this.border,
    this.borderRadius,
    this.boxShadow,
    this.gradient,
    this.backgroundBlendMode,
    this.shape = BoxShape.rectangle,
)}
Dart
Container(
  height = 200.0,
  width = 200.0,
  decoration: BoxDecoration(
    // Providing container with rounded corners.
    borderRadius: BorderRadius.circular(50),
  ),
),
Dart
BoxDecoration(
  color: Colors.grey[300],
  borderRadius: BorderRadius.circular(50),
  boxShadow: [
    // Shadow for top-left corner
    const BoxShadow(
      color: Colors.grey,
      offset: Offset(10, 10),
      blurRadius: 6,
      spreadRadius: 1,
    ),
    // Shadow for bottom-right corner
    const BoxShadow(
      color: Colors.white12,
      offset: Offset(-10, -10),
      blurRadius: 6,
      spreadRadius: 1,
    ),
  ]
),
Dart
import 'package:flutter/material.dart';

void main() {
  runApp(const MyApp());
}

class MyApp extends StatelessWidget {
  const MyApp({Key? key}) : super(key: key);

  @override
  Widget build(BuildContext context) {
    return MaterialApp(
      home: const NeumorphicDesign(),
    );
  }
}

class NeumorphicDesign extends StatelessWidget {
  const NeumorphicDesign({Key? key}) : super(key: key);

  @override
  Widget build(BuildContext context) {
    return Scaffold(
      body: Container(
        height: 200,
        width: 200,
        padding: EdgeInsets.all(8),
        child: Image.asset(
          "assets/gfg.png",
        ),
        decoration: BoxDecoration(
          color: Colors.grey[300],
          borderRadius: BorderRadius.circular(50),
          boxShadow: [
            const BoxShadow(
              color: Color(0xFFBEBEBE),
              offset: Offset(10, 10),
              blurRadius: 30,
              spreadRadius: 1,
            ),
            const BoxShadow(
              color: Colors.white,
              offset: Offset(-10, -10),
              blurRadius: 30,
              spreadRadius: 1,
            ),
          ]
        ),
      ),
    );
  }
}
首先,让我们为我们的应用程序提供背景颜色。由于我们只创建了一个容器,当我们运行应用程序时,我们只会看到一个空白屏幕,因为容器本身不包含任何内容。所以让我们给我们的容器一些高度和宽度。此外,通过使用 Center 包装 Container,我们可以使其成为我们应用程序的中心。
Dart
class HomePage extends StatelessWidget {
@override
Widget build(BuildContext context) {
    return Scaffold(
      // Background color to the app
      backgroundColor: Colors.grey[300],
      // Widget to center the widgets inside it.
      body: Center(
        child: Container(
            // Providing Container
              // with height and width
            height: 200.0,
            width: 200.0,
        ),
      );
    }
}
要更改颜色或将边框半径分配给容器,我们需要使用 BoxDecoration。
BoxDecoration 类的构造函数:
Dart
BoxDecoration({
    this.color,
    this.image,
    this.border,
    this.borderRadius,
    this.boxShadow,
    this.gradient,
    this.backgroundBlendMode,
    this.shape = BoxShape.rectangle,
)}
我们将使用borderRadius 和boxShadow 来定制我们的容器。
Dart
Container(
  height = 200.0,
  width = 200.0,
  decoration: BoxDecoration(
    // Providing container with rounded corners.
    borderRadius: BorderRadius.circular(50),
  ),
),
现在要首先制作一个 Neumorphic 小部件,小部件的颜色应该与背景颜色相同。小部件与其背景的分离是使用 BoxDecoration 的 boxShadow 参数创建的。为了创建设计,让我们将应用程序的左上角视为光源。当它落在我们的 Container 上时,左上角将直接在光的前面,而右下角将与光相反,这意味着我们必须为左上角选择一个浅色阴影,而为深色阴影左下角的背景。所以按照这个逻辑,我们会给我们的容器添加阴影。在 blurRadius 的帮助下,我们可以控制阴影的模糊度。
Dart
BoxDecoration(
  color: Colors.grey[300],
  borderRadius: BorderRadius.circular(50),
  boxShadow: [
    // Shadow for top-left corner
    const BoxShadow(
      color: Colors.grey,
      offset: Offset(10, 10),
      blurRadius: 6,
      spreadRadius: 1,
    ),
    // Shadow for bottom-right corner
    const BoxShadow(
      color: Colors.white12,
      offset: Offset(-10, -10),
      blurRadius: 6,
      spreadRadius: 1,
    ),
  ]
),
Note: Here Offset(+ve, +ve) means bottom-left corner, while Offset(-ve, -ve) means top-right corner for position of shadow.
完整代码:
Dart
import 'package:flutter/material.dart';

void main() {
  runApp(const MyApp());
}

class MyApp extends StatelessWidget {
  const MyApp({Key? key}) : super(key: key);

  @override
  Widget build(BuildContext context) {
    return MaterialApp(
      home: const NeumorphicDesign(),
    );
  }
}

class NeumorphicDesign extends StatelessWidget {
  const NeumorphicDesign({Key? key}) : super(key: key);

  @override
  Widget build(BuildContext context) {
    return Scaffold(
      body: Container(
        height: 200,
        width: 200,
        padding: EdgeInsets.all(8),
        child: Image.asset(
          "assets/gfg.png",
        ),
        decoration: BoxDecoration(
          color: Colors.grey[300],
          borderRadius: BorderRadius.circular(50),
          boxShadow: [
            const BoxShadow(
              color: Color(0xFFBEBEBE),
              offset: Offset(10, 10),
              blurRadius: 30,
              spreadRadius: 1,
            ),
            const BoxShadow(
              color: Colors.white,
              offset: Offset(-10, -10),
              blurRadius: 30,
              spreadRadius: 1,
            ),
          ]
        ),
      ),
    );
  }
}
输出:
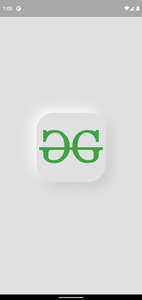
所以在这篇文章中,我们看到了如何赋予Flutter Container Neumorphic 风格来制作更好的 UI 元素。