Kivy 中的 GridLayouts | Python
Kivy 是一个独立于平台的平台,它可以在 Android、IOS、Linux 和 Windows 等平台上运行。Kivy 为您提供了一次编写代码并在不同平台上运行的功能。基本上是用来开发安卓应用的,但不代表不能用在桌面应用上。
使用此命令安装 kivy:
pip install kivyKivy Tutorial – Learn Kivy with Examples.
Gridlayout是创建孩子并以矩阵格式排列它们的函数。它占用可用空间(正方形)并将该空间划分为行和列,然后将小部件相应地添加到生成的单元格或网格中。
我们不能明确地将小部件放置在特定的列/行中。每个孩子被分配一个特定的位置,由布局配置和孩子列表中的孩子索引自动确定。网格布局必须至少包含输入约束,即列和行。如果我们不为其指定列或行,则布局会给您一个例外。
列和行 –
现在列代表宽度,行代表高度,就像矩阵一样。
- 初始大小由 col_default_width 和 row_default_height 属性给出。我们可以通过设置 col_force_default 或 row_force_default 属性来强制使用默认大小。这将强制布局忽略子项的 width 和size_hint属性并使用默认大小。
- 要自定义单个列或行的大小,请使用 cols_minimum 或 rows_minimum。
- 不必同时给出行和列,这取决于要求。我们可以相应地提供两者或任何人。
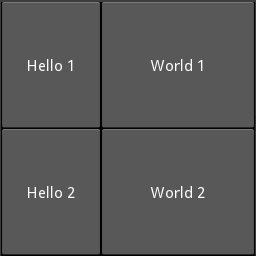
在下面给出的示例中,所有小部件将具有相同或相等的大小。默认情况下,大小为 (1, 1),因此子级将采用父级的全尺寸。
Python3
# main.py
# import the kivy module
import kivy

# It’s required that the base Class
# of your App inherits from the App class.
from kivy.app import App
from kivy.uix.gridlayout import GridLayout

# This class stores the info of .kv file
# when it is called goes to my.kv file
class MainWidget(GridLayout):
    pass

# we are defining the Base Class of our Kivy App
class myApp(App):
    def build(self):
        # return a MainWidget() as a root widget
        return MainWidget()

if __name__ == '__main__':

    # Here the class MyApp is initialized
    # and its run() method called.
    myApp().run()
Python3
# my.kv file code here
:

    cols: 2
    rows: 2

    Button:
         text: 'Hello 1'
    Button:
        text: 'World 1'
    Button:
        text: 'Hello 2'
    Button:
        text: 'World 2'
Python3
# just do change in the above my.kv
# (code #1) file else all are same.
:

    cols: 2
    rows: 2

    Button:
        text: 'Hello 1'
        size_hint_x: None
        width: 100
    Button:
        text: 'World 1'
    Button:
        text: 'Hello 2'
        size_hint_x: None
        width: 100
    Button:
        text: 'World 2'
Python3
# just do change in the above my.kv
# (code #1)file else all are same.

:

    cols: 2
    rows: 2
    row_force_default: True
    row_default_height: 40
    Button:
        text: 'Hello 1'
        size_hint_x: None
        width: 100
    Button:
        text: 'World 1'
    Button:
        text: 'Hello 2'
        size_hint_x: None
        width: 100
    Button:
text: 'World 2' 注意:要了解如何使用 .kv 文件,请访问这里。
代码#1:
Python3
# my.kv file code here
:

    cols: 2
    rows: 2

    Button:
         text: 'Hello 1'
    Button:
        text: 'World 1'
    Button:
        text: 'Hello 2'
    Button:
        text: 'World 2'
输出:

注意:要运行此代码,您必须为上述Python代码创建 main.py Python文件和另一个文件 my.kv 文件。代码#2:
现在让我们将按钮的大小固定为 100px 而不是默认的size_hint_x = 1 。
Python3
# just do change in the above my.kv
# (code #1) file else all are same.
:

    cols: 2
    rows: 2

    Button:
        text: 'Hello 1'
        size_hint_x: None
        width: 100
    Button:
        text: 'World 1'
    Button:
        text: 'Hello 2'
        size_hint_x: None
        width: 100
    Button:
        text: 'World 2'
输出 :

代码#3:
我们还可以将行高固定为特定大小。
Python3
# just do change in the above my.kv
# (code #1)file else all are same.

:

    cols: 2
    rows: 2
    row_force_default: True
    row_default_height: 40
    Button:
        text: 'Hello 1'
        size_hint_x: None
        width: 100
    Button:
        text: 'World 1'
    Button:
        text: 'Hello 2'
        size_hint_x: None
        width: 100
    Button:
        text: 'World 2'
输出:
