使用Python的 ROS 订阅者
在模拟中为机器人编写订阅者似乎会带来很多复杂性,但事实并非如此。学习机器人操作系统 (ROS) 教程提供了大量知识,但提供更多洞察力可能会很好。本文旨在提供对订阅者如何工作以及更好地用Python编写的理解。
ROS 订阅者
由于机器人主要打算使人类原本会做的事情自动化,我们将在简单的人体解剖学或人造用具与机器人的构造之间进行比较以构建透视。因此,读者理解什么是 ROS 节点和 ROS 主题是至关重要的。
简单地说,一个节点可以被认为是机器人的一个迷你邮箱!因此,它本身的存在是为了向我们提供一些它从某个地方接收到的信息和过程(我们很快就会对此进行限定)。同样重要的是要注意,一个机器人可以有几个这样的节点(几个迷你邮箱),每个节点都可以访问重要信息。但这是什么信息?节点可以访问不同类型的消息和节点本身!
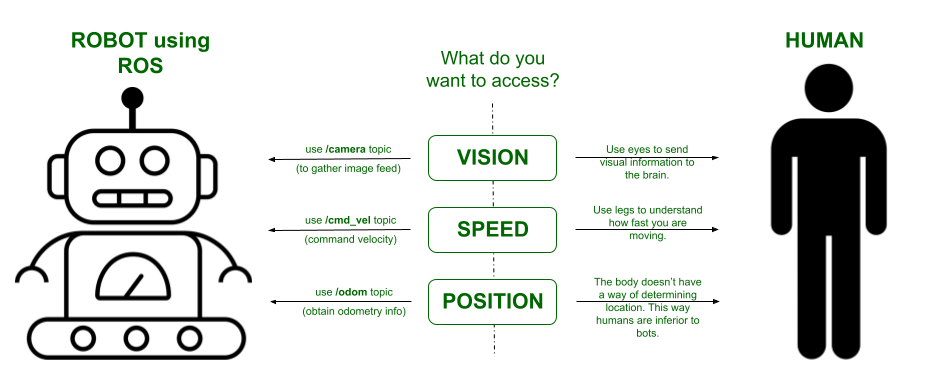
同时,最好将 ROS 主题理解为身体的一个器官(以人类为例)。每个器官/主题都使大脑可以访问某些“种类”的信息。从下图中可以推断,为了让我们的机器人有一些视觉(使用它的眼睛),它必须访问正确的器官(眼睛),这在 ROS 中是/camera主题。

这里的 ROS 主题是机器人广播信息的频道。 (使用 Google Draw 创建的图像)
那么订阅者在哪里出现呢?订阅者是一个节点(迷你邮箱),它使机器人的大脑可以“订阅”不断发出信息的几个主题。因此,订阅者的主要目标是在 ROS 主题和节点之间建立这种类型的通信。这使得订阅者成为我们控制机器人的基本方式。为了更清楚起见,下面提供了正式定义:
ROS 中的订阅者是一个“节点”,本质上是一个进程或可执行程序,用于“获取”或“订阅”发布在 ROS 主题上的消息和信息。订阅者不能自行发布或广播信息。
先决条件
为了与示例一起工作,必须具备以下条件:
- ROS noetic 安装在您的本机 Windows 机器或 Ubuntu(首选)上。许多用户还通过虚拟机在 Ubuntu 上运行 ROS。
- Turtlebot3 模拟器。虽然它包含在 ROS noetic 安装中。
首先,确保您有一个备用包,您可以在其中存储您的Python脚本文件。如果您不知道如何创建包,请略过此部分。这可能类似于 practice_pkg 或您希望立即开始工作的包。
无论您希望如何存储 .py 文件,请继续导航到您的工作区和包的/src文件夹。在此处创建您的订阅者文件。我们将其命名为subscriber.py。
$ cd ~/catkin_ws/src/package_name/src
$ gedit subscriber.py
现在让我们看一下模板。
模板
Python3
# DO NOT skip the next commented line
#!/usr/bin/env python

import rospy
from std_msgs.msg import String


def callback(data):

    # print the actual message in its raw format
    rospy.loginfo("Here's what was subscribed: %s", data.data)

    # otherwise simply print a convenient message on the terminal
    print('Data from /topic_name received')


def main():

    # initialize a node by the name 'listener'.
    # you may choose to name it however you like,
    # since you don't have to use it ahead
    rospy.init_node('listener', anonymous=True)
    rospy.Subscriber("/topic_name", String, callback)

    # spin() simply keeps python from
    # exiting until this node is stopped
    rospy.spin()

if __name__ == '__main__':

    # you could name this function
    try:
        main()
    except rospy.ROSInterruptException:
        pass
Python3
#!/usr/bin/env python

import rospy
# in this example we try to obtain linear
# and angular velocity related information.
# So we import Twist
from geometry_msgs.msg import Twist


class basic_subscriber:

    def __init__(self):
        # initialize the subscriber node now.
        # here we deal with messages of type Twist()
        self.image_sub = rospy.Subscriber("/cmd_vel",
                                          Twist, self.callback)
        print("Initializing the instance!")

    def callback(self, Twist):

        # now simply display what
        # you've received from the topic
        rospy.loginfo(rospy.get_caller_id() + "The velocities are %s",
                      Twist)
        print('Callback executed!')


def main():
    # create a subscriber instance
    sub = basic_subscriber()

    # follow it up with a no-brainer sequence check
    print('Currently in the main function...')

    # initializing the subscriber node
    rospy.init_node('listener', anonymous=True)
    rospy.spin()

if __name__ == '__main__':
    try:
        main()
    except rospy.ROSInterruptException:
        pass
解释
- 从 main函数开始,注意使用错误处理块总是最好的。从这里调用并执行 main函数。
- 首先初始化节点。您可以使用任何名称调用您的节点。在这里,我们将其称为“侦听器”。通过设置anonymous = True ,我们让编译器将数字附加到节点名称的末尾,以确保匿名。这最好用 rqt 图来可视化。
- 在下一行中,我们定义了这个节点的订阅者方面。
- 将 替换为您希望订阅的 ROS 主题。了解当前可访问和发布的主题的一种方法是使用以下命令。
- 第二个字段表示我们订阅的消息的数据类型。在这里,我们订阅了一个 String 类型。重要提示:始终从其各自的包中导入此数据类型。这里,String 是 std_msgs.msg 包的可执行文件。
- 第三个领域是最关键的领域。它指明了这个获得的数据将被发送到的函数的名称。每次从指定的 ROS 主题接收到任何信息时,都会将其发送到此回调函数。不要在函数名后面加上'( )'。
$ roscore
# Press Ctrl+shift_T to open a new terminal
#now build your executables. This is good practice.
$ catkin_make
$ rostopic list- 我们的订阅者节点从 ROS 主题接收到的数据现在被发送到 callback()。
- 在上面的示例中,我们只是使用 ros.loginfo( ) 命令将此数据信息打印到日志文件中。然而,真正的工作在于改进我们使用这些获得的数据的目的。因此,实际应用程序总是会在回调()之后出现冗长的代码。
使用面向对象的架构
始终建议选择创建节点的实例。这使得机器人-人类类比或机器人-“迷你邮箱”类比更加明显和更容易理解,即使不仅仅是调试的想法。
在这个例子中,我们将尝试获取我们的turtlebot 移动的速度。将此文件另存为subscriber.py - 只是为了方便。
Python3
#!/usr/bin/env python

import rospy
# in this example we try to obtain linear
# and angular velocity related information.
# So we import Twist
from geometry_msgs.msg import Twist


class basic_subscriber:

    def __init__(self):
        # initialize the subscriber node now.
        # here we deal with messages of type Twist()
        self.image_sub = rospy.Subscriber("/cmd_vel",
                                          Twist, self.callback)
        print("Initializing the instance!")

    def callback(self, Twist):

        # now simply display what
        # you've received from the topic
        rospy.loginfo(rospy.get_caller_id() + "The velocities are %s",
                      Twist)
        print('Callback executed!')


def main():
    # create a subscriber instance
    sub = basic_subscriber()

    # follow it up with a no-brainer sequence check
    print('Currently in the main function...')

    # initializing the subscriber node
    rospy.init_node('listener', anonymous=True)
    rospy.spin()

if __name__ == '__main__':
    try:
        main()
    except rospy.ROSInterruptException:
        pass
解释
- 代码执行从 try-except 块开始。函数main() 在这里被调用。
- 在 main() 中:
- 创建一个 basic_subscriber() 类型的对象或实例。这将初始化类。
- 执行继续到我们创建和初始化节点“侦听器”的下一行。
- rospy.spin() 确保代码在无限循环中执行,直到收到关闭信号。
- 在 basic_subscriber 类中,我们使用构造函数等效的 __init__(self) 来定义类的属性。
- 现在定义了订阅者实体。
- 它订阅了“/cmd_vel”主题。
- 我们在这里订阅的消息类型是 Twist() 类型 - 一种在速度上为我们提供线索的消息。
- 最后一个字段现在调用 callback()函数。
- 这是我们将订阅信息打印到终端和日志文件的地方。
- 为了确认我们的 callback()函数已成功执行,我们打印一条简单的消息“Callback executed”。
确保将此文件设为可执行文件。为此,请导航到您的包目录并键入以下内容:
$ chmod +x subscriber.py部署 ROS
首先,从终端运行turtlebot3。
$ roscore
# Press Ctrl+Shift+T to open a new terminal
$ caktin_make
# always source your base files in every new terminal that you open.
$ source devel/setup.bash
# now run the turtlebot3 simulator
$ roslaunch turtlebot3_gazebo turtlebot3_world.launch
您会注意到凉亭启动并且默认再次在新终端中键入以下内容:
$ source devel/setup.bash
$ roslaunch turtlebot3_teleop turtlebot3_teleop_key.launch
您现在可以使用键盘控制在单独窗口中打开的turtlebot3 模拟器。现在运行您的订阅者脚本。在新终端中,运行以下命令:
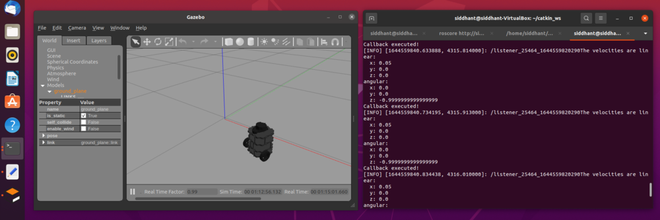
$ rosrun subscriber.py 输出:

当turtlebot3静止时。

使用 teleop_key 移动turtlebot3 后。