使用Python的 ROS 发布者
人们通常认为,在机器人操作系统 (ROS) 中编写发布者比使用订阅者要容易得多。在大多数情况下,这是正确的,因为发布是一项极简任务——我们只在模拟中向机器人或机器人提供值。坦率地说,这就是 ROS 出版商的工作程度。事实上,一些专业人士甚至会说它类似于 print() 或显示函数!
ROS 出版商
由于机器人主要打算使人类原本会做的事情自动化,我们将在简单的人造用具和机器人构建透视图之间进行比较。因此,读者理解什么是 ROS 节点和 ROS 主题是至关重要的。这是 ROS 中节点和主题的快速回顾。
A ROS node is a computational process which runs as a program in a package. Since we can have several nodes running concurrently, nodes are analogous to human organs, wherein each organ (node) performs a dedicated task for the entire human (robot) to function in the desired manner.
如果您希望确定包中当前处于活动状态的节点,只需执行以下命令。
# only if the master node is not running
$ roscore
# to list all active nodes
$ rosnode list
# to obtain info on a specific node
$ rosnode info /
另一种选择是使用 rqt 图来显示树形图,以了解节点之间的数据流。
A ROS topic is essentially a named bus over which nodes exchange messages. They may be thought of as radio channels on which information is sent and received. Note that every topic has a unique format of data being exchanged.
发布信息的想法来自于如何指挥机器人做某事的问题,因为我们正在控制它。请注意,我们将单独与主题保持沟通:我们为特定主题编写发布者,而不是整个机器人。
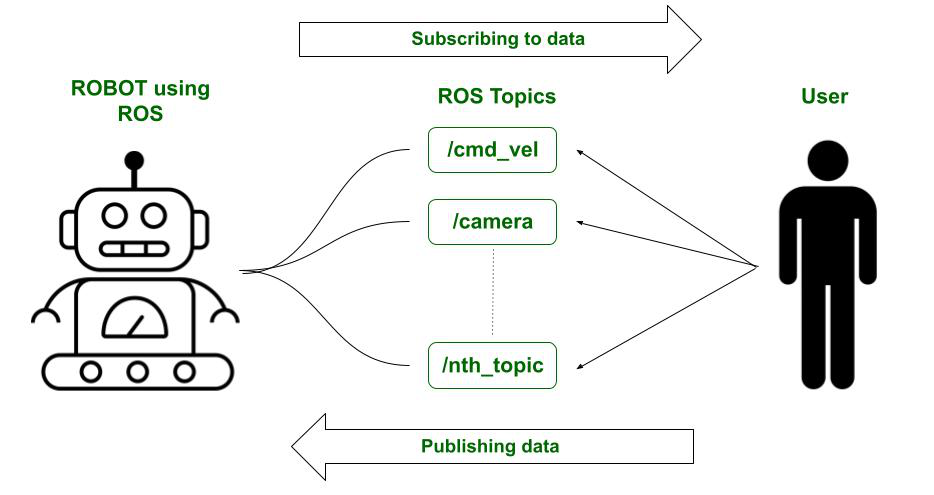
我们向机器人发布数据。订阅数据则相反。两者都是通过主题完成的。
现在已经对发布者的概念提供了一些清晰的说明,我们将看一个用Python编写发布者的简单模板。
模板
Python
# Do not skip line 2
#!/usr/bin/env python

import rospy
# the following line depends upon the
# type of message you are trying to publish
from std_msgs.msg import String


def publisher():

    # define the actions the publisher will make
    pub = rospy.Publisher('/',
                          String, queue_size=10)
    # initialize the publishing node
    rospy.init_node('', anonymous=True)

    # define how many times per second
    # will the data be published
    # let's say 10 times/second or 10Hz
    rate = rospy.Rate(10)
    # to keep publishing as long as the core is running
    while not rospy.is_shutdown():
        data = "The data that you wish to publish."

        # you could simultaneously display the data
        # on the terminal and to the log file
        rospy.loginfo(data)

        # publish the data to the topic using publish()
        pub.publish(data)

        # keep a buffer based on the rate defined earlier
        rate.sleep()


if __name__ == '__main__':
    # it is good practice to maintain
    # a 'try'-'except' clause
    try:
        publisher()
    except rospy.ROSInterruptException:
        pass
Python
#!/usr/bin/env python3
import rospy
from geometry_msgs.msg import Twist


def increase(Twist):

    print('We are in the callback function!')
    velo_msg = Twist

    # l = Twist.linear.x
    # print(l)
    # define the rate at which
    # we will be publishing the velocity.
    rate = rospy.Rate(5)

    # prompt the user for the acceleration value
    speed = float(input('By how much would \
    you like to accelerate? '))

    while not rospy.is_shutdown():

        # increase the current velocity by the speed defined.
        velo_msg.linear.x = (Twist.linear.x) + speed

        # publish the increased velocity
        pub.publish(velo_msg)
        print('Publishing was successful!')
        rate.sleep()


def main():
    print("In main...")

    # initializing the publisher node
    rospy.init_node('Velocity_publisher', anonymous=True)
    sub = rospy.Subscriber('/cmd_vel', Twist, increase)
    rospy.spin()


if __name__ == '__main__':
    try:
        pub = rospy.Publisher('/cmd_vel', Twist, queue_size=10)
        main()
    except rospy.ROSInterruptException:
        pass
解释
- 代码执行从 try 和 except 子句开始。从这里调用发布者函数。
- 定义发布者函数:
- 第一个字段表示您希望向其发布数据的主题的名称。例如,/odom 或 /rosout。
- 第二个字段表示正在发布的数据类型。 String、Float32 或 Twist 是一些示例。
- 最后一个字段声明了可以排队到主题的消息数量的限制。
- 我们通过节点初始化来遵循这一点。
- 模板的其余部分是不言自明的(请参阅代码中的注释)。
例子
此示例实现了将数据发布到 /rosout 主题的代码。虽然有一种更简单的方法(使用 rostopic echo),但它可以作为一个易于理解的演示。
目标是将数据发布到 /cmd_vel(命令速度)主题,从而提高机器人的速度。由于模板中显示的 while 循环,我们会注意到机器人的加速度。
Python
#!/usr/bin/env python3
import rospy
from geometry_msgs.msg import Twist


def increase(Twist):

    print('We are in the callback function!')
    velo_msg = Twist

    # l = Twist.linear.x
    # print(l)
    # define the rate at which
    # we will be publishing the velocity.
    rate = rospy.Rate(5)

    # prompt the user for the acceleration value
    speed = float(input('By how much would \
    you like to accelerate? '))

    while not rospy.is_shutdown():

        # increase the current velocity by the speed defined.
        velo_msg.linear.x = (Twist.linear.x) + speed

        # publish the increased velocity
        pub.publish(velo_msg)
        print('Publishing was successful!')
        rate.sleep()


def main():
    print("In main...")

    # initializing the publisher node
    rospy.init_node('Velocity_publisher', anonymous=True)
    sub = rospy.Subscriber('/cmd_vel', Twist, increase)
    rospy.spin()


if __name__ == '__main__':
    try:
        pub = rospy.Publisher('/cmd_vel', Twist, queue_size=10)
        main()
    except rospy.ROSInterruptException:
        pass
代码说明
- 我们首先定义发布节点“pub”。在这里,我们定义了主题(/cmd_vel),它将向其发布 Twist 类型的消息。然后我们转到 main()。
- 初始化节点是关键。没有这个,我们的主节点(roscore)将无法定义所有节点之间的信息流。
- 为了增加机器人的速度,我们需要知道它的当前速度。因此,我们订阅了命令速度主题。
- rospy.Subscriber() 命令中的回调函数是increase()。
- 在 increase()函数内部:
- 首先将速度获取到一个变量上——这里是 velo_msg。注意 velo_msg 是如何属于 Twist 类型的。
- 现在定义发布值的速率。
- 现在提示用户选择速度变化。
- 在while循环中:
- 我们得到线速度的 x 分量。根据应用程序,我们也可以使用 y 组件。
- x 分量现在增加了用户指定的数量。
- 现在速度已发布并重新运行 while 循环。
部署 ROS
输入(终端):
$roscore
#open new terminal
$source devel/setup.bash
#launch turtlebot3 on gazebo
$roslaunch turtlebot3_gazebo turtlebot3_empty_world.launch
#open new terminal
#give turtlebot3 some starting velocity
$roslaunch turtlebot3_teleop turtlebot3_teleop_key.launch
#now press w
#open a new terminal
#run your python script from your package
$rosrun  publisher.py
输出:
In main...
In the callback function.
0.01
By how much would you like to increase the speed?
Publishing Successful!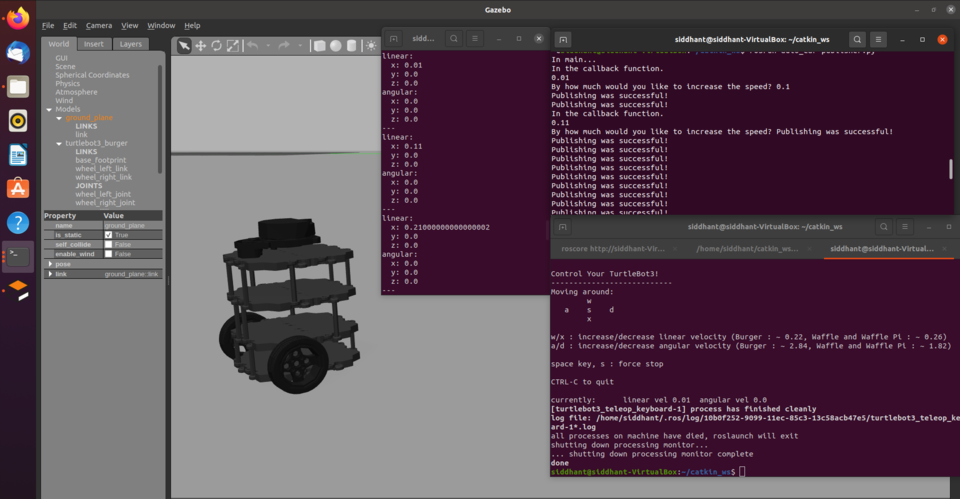
有关完整执行,请参阅下面的视频链接。