在 Android 中使用 Jetpack Compose 构建 UI
Jetpack Compose 是一个现代 UI 工具包,旨在简化 Android 中的 UI 开发。它由一个反应式编程模型组成,具有 Kotlin 编程语言的简洁和易用性。它是完全声明性的,因此您可以通过调用一些将您的数据转换为 UI 层次结构的函数来描述您的 UI。当数据更改或更新时,框架会自动调用这些函数并为您更新视图。
先决条件:
- 熟悉 Kotlin 和 OOP 概念
- 关于 Jetpack Compose 的基本了解
- 安卓工作室
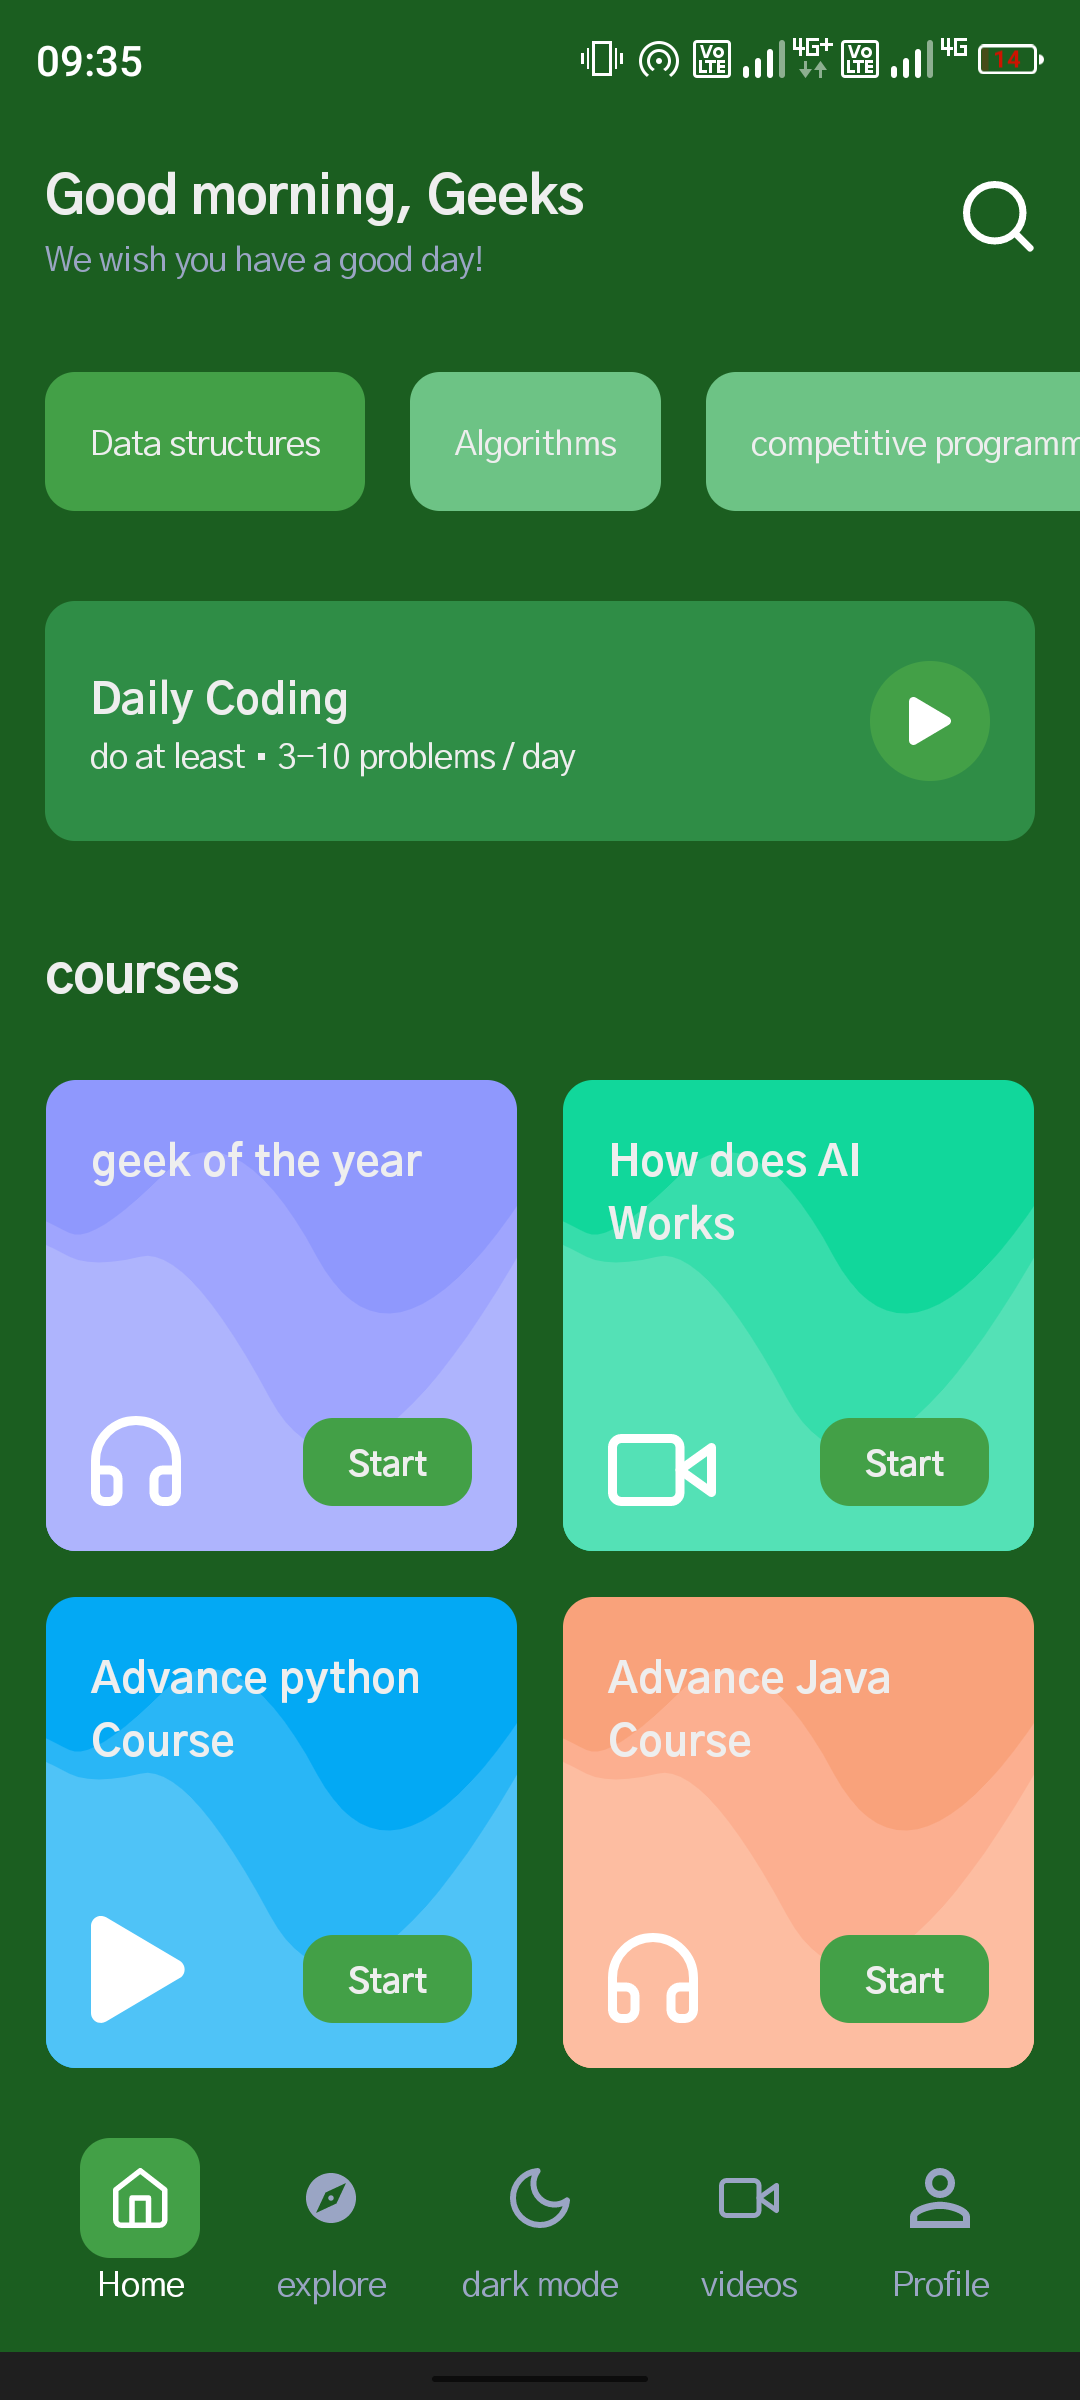
因此,我们将使用 jetpack compose (Kotlin) 创建一个应用程序 UI。我们最终的 UI 将看起来像它。
这是一个使用 jetpack compose 构建的简单 UI,但使用 XML 有点困难。所以,让我们一步一步开始吧。
分步实施
步骤 1:创建一个新的 android studio 项目
要使用 Jetpack Compose 在 Android Studio 中创建新项目,请参阅:- 如何使用 Jetpack Compose 在 Android Studio Canary 版本中创建新项目。
第 2 步:让我们将资源添加到项目中
有一些资源,如颜色、图像资源、字体和一些小东西。您可以轻松找到它们,否则只需从 GitHub 存储库中获取它们。
第三步:创建一个 Kotlin 类 HomeScreen.kt
我们也可以在 MainActivity.kt 中执行相同的任务,但最好创建另一个文件。最初,我们从顶部开始,因此创建 UI 的第一个标题。有两个带有搜索图标图像的文本。在这种情况下事情很简单,我们只需创建函数并调用它们,这就是我们可以很容易地重用代码的方式。
Kotlin
package com.cuid.geekscourse.ui.theme

import androidx.compose.foundation.background
import androidx.compose.foundation.layout.*
import androidx.compose.material.Icon
import androidx.compose.material.MaterialTheme
import androidx.compose.material.Text
import androidx.compose.runtime.Composable
import androidx.compose.ui.Alignment
import androidx.compose.ui.Modifier
import androidx.compose.ui.graphics.Color
import androidx.compose.ui.res.painterResource
import androidx.compose.ui.tooling.preview.Preview
import androidx.compose.ui.unit.dp
import com.cuid.composeui.R

// here we have created HomeScreen function
// and we will call all functions inside it.
// and finally just call this function from mainActivity
@Composable
fun HomeScreen() {
      // this is the most outer box that will
      // contain all the views,buttons,chips,etc.
    Box(
        modifier = Modifier
            .background(DeepBlue)
            .fillMaxSize()
    ) {
        Column {
              // this is how we call
              // function adding whole UI
            GreetingSection()
        }
 }


@Composable

// and this is the function
// just for creating header at top
fun GreetingSection(
    name: String = "Geeks"
) {
      // here we just arrange the views
    Row(
        horizontalArrangement = Arrangement.SpaceBetween,
        verticalAlignment = Alignment.CenterVertically,
        modifier = Modifier
            .fillMaxWidth()
            .padding(15.dp)
    ) {
        Column(
            verticalArrangement = Arrangement.Center
        ) {
              // heading text view
            Text(
                text = "Good morning, $name",
                style = MaterialTheme.typography.h1
            )
            Text(
                text = "We wish you have a good day!",
                style = MaterialTheme.typography.body1
            )
        }
        // search icon
        Icon(
            painter = painterResource(id = R.drawable.ic_search),
            contentDescription = "Search",
            tint = Color.White,
            modifier = Modifier.size(24.dp)
        )
    }
}
Kotlin
// This is how we can create chip seaction at the top of app

@Composable
fun ChipSection(
     // function with single argument
    chips: List
) {
    var selectedChipIndex by remember {
        // it will not update the string
        // but save and it will helpful for us
        mutableStateOf(0)
    }
    LazyRow {
        items(chips.size) {
            Box(
                contentAlignment = Alignment.Center,
                modifier = Modifier
                    .padding(start = 15.dp, top = 15.dp, bottom = 15.dp)
                    .clickable {
                        selectedChipIndex = it
                    }
                    .clip(RoundedCornerShape(10.dp))
                    .background(
                        // this is basic condition for selected chip index
                        if (selectedChipIndex == it) ButtonGreen
                        else DarkerButtonGreen
                    )
                    .padding(15.dp)
            ) {
                Text(text = chips[it], color = TextWhite)
            }
        }
    }
}
Kotlin
// This function is for suggestion secation

@Composable
fun SuggestionSection(
    color: Color = LightBlue
) {
    Row(
        verticalAlignment = Alignment.CenterVertically,
        horizontalArrangement = Arrangement.SpaceBetween,
        modifier = Modifier
            .padding(15.dp)
            .clip(RoundedCornerShape(10.dp))
            .background(color)
            .padding(horizontal = 15.dp, vertical = 20.dp)
            .fillMaxWidth()
    ) {
        Column {
            // here are two text views or we can say only text
            Text(
                text = "Daily Coding",
                  // it can be litile bit confusing but
                  // it is just text style alternate
                  // of fontfamily in XML
                style = MaterialTheme.typography.h2

            )
            Text(
                // same as above
                text = "do at least • 3-10 problems / day",
                style = MaterialTheme.typography.body1,
                color = TextWhite
            )
        }
        Box(
            // box containing icon
            contentAlignment = Alignment.Center,
            modifier = Modifier
                .size(40.dp)
                .clip(CircleShape)
                .background(ButtonGreen)
                .padding(10.dp)
        ) {
            Icon(
                painter = painterResource(id = R.drawable.ic_play),
                contentDescription = "Play",
                tint = Color.White,
                modifier = Modifier.size(16.dp)
            )
        }
    }
}
Kotlin
package com.cuid.geekscourses

import androidx.annotation.DrawableRes
// having two parameters title and iconid
data class BottomMenuContent(
    val title: String,
    @DrawableRes val iconId: Int
)
Kotlin
@Composable
// this function tells us that
// how menu item should look like
fun BottomMenu(
    items: List,
    modifier: Modifier = Modifier,
    activeHighlightColor: Color = ButtonGreen,
    activeTextColor: Color = Color.White,
    inactiveTextColor: Color = AquaBlue,
    initialSelectedItemIndex: Int = 0
) {
    var selectedItemIndex by remember {
        mutableStateOf(initialSelectedItemIndex)
    }
    Row(
        horizontalArrangement = Arrangement.SpaceAround,
        verticalAlignment = Alignment.CenterVertically,
        modifier = modifier
            .fillMaxWidth()
            .background(DeepBlue)
            .padding(15.dp)
    ) {
          // it is basically what we should have
          // for creating an element of BottomMenuItem
        items.forEachIndexed { index, item ->
            BottomMenuItem(
                item = item,
                isSelected = index == selectedItemIndex,
                activeHighlightColor = activeHighlightColor,
                activeTextColor = activeTextColor,
                inactiveTextColor = inactiveTextColor
            ) {
                selectedItemIndex = index
            }
        }
    }
}
// it's basically how menu item should look like
@Composable
fun BottomMenuItem(
    item: BottomMenuContent,
    isSelected: Boolean = false,
    activeHighlightColor: Color = ButtonGreen,
    activeTextColor: Color = Color.White,
    inactiveTextColor: Color = AquaBlue,
    onItemClick: () -> Unit
) {
    Column(
        horizontalAlignment = Alignment.CenterHorizontally,
        verticalArrangement = Arrangement.Center,
        modifier = Modifier.clickable {
            onItemClick()
        }
    ) {
          // here are some peremetens
          // for how elements will align
        Box(
            contentAlignment = Alignment.Center,
            modifier = Modifier
                .clip(RoundedCornerShape(10.dp))
                .background(if (isSelected) activeHighlightColor else Color.Transparent)
                .padding(10.dp)
        ) {
            Icon(
                painter = painterResource(id = item.iconId),
                contentDescription = item.title,
                tint = if (isSelected) activeTextColor else inactiveTextColor,
                modifier = Modifier.size(20.dp)
            )
        }
        Text(
            text = item.title,
              // it's basic condition
            color = if(isSelected) activeTextColor else inactiveTextColor
        )
    }
}
Kotlin
package com.cuid.geekscourses

import androidx.annotation.DrawableRes
import androidx.compose.ui.graphics.Color

data class Course(
    val title: String,
    @DrawableRes val iconId: Int,
    val lightColor: Color,
    val mediumColor: Color,
    val darkColor: Color
)
Kotlin
@ExperimentalFoundationApi
@Composable
// here we have just passed the list of courses
fun CourseSection(courses: List) {
    Column(modifier = Modifier.fillMaxWidth()) {
        Text(
            text = "courses",
            style = MaterialTheme.typography.h1,
            modifier = Modifier.padding(15.dp)
        )
        // we have used lazyVertically grid
        LazyVerticalGrid(
            cells = GridCells.Fixed(2), // it basically tells no. of cells in a row
            contentPadding = PaddingValues(start = 7.5.dp, end = 7.5.dp,bottom = 100.dp),
            modifier = Modifier.fillMaxHeight()
        ) {
            items(courses.size) {
              // here we have to define how one of these item is look like
              // we will tell after defining item design
              // let me comment it for now and after
              // creating you just have to remove

              // CourseItem(course = courses[it])
            }
        }
    }
}
Kotlin
@Composable
fun CourseItem(
    course: Course
) {
    BoxWithConstraints(
          // Box with some attributes
        modifier = Modifier
            .padding(7.5.dp)
            .aspectRatio(1f)
            .clip(RoundedCornerShape(10.dp))
            .background(feature.darkColor)
    ) {
        val width = constraints.maxWidth
        val height = constraints.maxHeight
        // setting 5 points for medium
        // color or we can say for another
        // Medium colored path
        val mediumColoredPoint1 = Offset(0f, height * 0.3f)
        val mediumColoredPoint2 = Offset(width * 0.1f, height * 0.35f)
        val mediumColoredPoint3 = Offset(width * 0.4f, height * 0.05f)
        val mediumColoredPoint4 = Offset(width * 0.75f, height * 0.7f)
        val mediumColoredPoint5 = Offset(width * 1.4f, -height.toFloat())
        // joining points to make curves with the help of path class
        // path file that we have created earlier
        // having function that just help to reduce our code
        // and the function is standardQuadFromTo(m1,m2) taking
        // two peramente and connect them
        val mediumColoredPath = Path().apply {
            moveTo(mediumColoredPoint1.x, mediumColoredPoint1.y)
            standardQuadFromTo(mediumColoredPoint1, mediumColoredPoint2)
            standardQuadFromTo(mediumColoredPoint2, mediumColoredPoint3)
            standardQuadFromTo(mediumColoredPoint3, mediumColoredPoint4)
            standardQuadFromTo(mediumColoredPoint4, mediumColoredPoint5)
            lineTo(width.toFloat() + 100f, height.toFloat() + 100f)
            lineTo(-100f, height.toFloat() + 100f)
            close()
        }
        // it's another part of that
          // texture with light color
        // Light colored path
        val lightPoint1 = Offset(0f, height * 0.35f)
        val lightPoint2 = Offset(width * 0.1f, height * 0.4f)
        val lightPoint3 = Offset(width * 0.3f, height * 0.35f)
        val lightPoint4 = Offset(width * 0.65f, height.toFloat())
        val lightPoint5 = Offset(width * 1.4f, -height.toFloat() / 3f)

        val lightColoredPath = Path().apply {
            moveTo(lightPoint1.x, lightPoint1.y)
            standardQuadFromTo(lightPoint1, lightPoint2)
            standardQuadFromTo(lightPoint2, lightPoint3)
            standardQuadFromTo(lightPoint3, lightPoint4)
            standardQuadFromTo(lightPoint4, lightPoint5)
            lineTo(width.toFloat() + 100f, height.toFloat() + 100f)
            lineTo(-100f, height.toFloat() + 100f)
            close()
        }
        // canvas is used when we
          // want to draw something
        Canvas(
            modifier = Modifier
                .fillMaxSize()
        ) {
            drawPath(
                  // function for drawing paths
                  // just pass the path
                path = mediumColoredPath,
                color = course.mediumColor
            )
            drawPath( // it's for the lighter path
                path = lightColoredPath,
                color = course.lightColor
            )
        }
         // so , we have done with texture and
         // now just creating box and other things
        // box containing course elements
        Box(
            modifier = Modifier
                .fillMaxSize()
                .padding(15.dp)
        ) {
            Text(
                text = course.title,
                style = MaterialTheme.typography.h2,
                lineHeight = 26.sp,
                modifier = Modifier.align(Alignment.TopStart)
            )
            Icon(
                painter = painterResource(id = course.iconId),
                contentDescription = course.title,
                tint = Color.White,
                modifier = Modifier.align(Alignment.BottomStart)
            )
            Text(
                text = "Start",
                color = TextWhite,
                fontSize = 14.sp,
                fontWeight = FontWeight.Bold,
                modifier = Modifier
                    .clickable {
                        // Handle the clicks
                    }
                    .align(Alignment.BottomEnd)
                    .clip(RoundedCornerShape(10.dp))
                    .background(ButtonGreen)
                    .padding(vertical = 6.dp, horizontal = 15.dp)
            )
        }
    }
}
Kotlin
package com.cuid.geekscourses

import androidx.compose.ui.geometry.Offset
import androidx.compose.ui.graphics.Path
import kotlin.math.abs
// The function is standardQuadFromTo(m1,m2)
// taking two peramente those are nothing but points
// that we are created and just add.
fun Path.standardQuadFromTo(from: Offset, to: Offset) {
      // this function is basically draw
      // a line to our second point and
      // also smooth on that line and make it curve
    quadraticBezierTo(
        from.x,
        from.y,
        abs(from.x + to.x) / 2f,
        abs(from.y + to.y) / 2f
    )
}
Kotlin
@ExperimentalFoundationApi
@Composable
fun HomeScreen() {
    // this is the most outer box
      // having all the views inside it
    Box(
        modifier = Modifier
            .background(DeepBlue)
            .fillMaxSize()
    ) {
        Column {
              // this is the function for header
            GreetingSection()
            // it's for chipsSecation, and pass
              // as many strings as you want
            ChipSection(chips = listOf("Data structures", "Algorithms", "competitive programming", "python"))
             // function for suggestionSection
             suggestionSection()
              // this is for course secation
            CourseSection(
                  // function require list of courses and
                  // one course contain 5 attributes
                courses = listOf(
                    Course(
                        title = "geek of the year",
                        R.drawable.ic_headphone,
                          // these are colors.......
                        BlueViolet1,
                        BlueViolet2,
                        BlueViolet3
                    ),
                      // below are the copies of the objects
                      // and you can add as many as you want
                    Course(
                        title = "How does AI Works",
                        R.drawable.ic_videocam,
                        LightGreen1,
                        LightGreen2,
                        LightGreen3
                    ),
                    Course(
                        title = "Advance python Course",
                        R.drawable.ic_play,
                        skyblue1,
                        skyblue2,
                        skyblue3
                    ),
                    Course(
                        title = "Advance Java Course",
                        R.drawable.ic_headphone,
                        Beige1,
                        Beige2,
                        Beige3
                    ),
                    Course(
                        title = "prepare for aptitude test",
                        R.drawable.ic_play,
                        OrangeYellow1,
                        OrangeYellow2,
                        OrangeYellow3
                    ),
                    Course(
                        title = "How does AI Works",
                        R.drawable.ic_videocam,
                        LightGreen1,
                        LightGreen2,
                        LightGreen3
                    ),
                )
            )
        }
        // this is the final one that is bottomMenu
        BottomMenu(items = listOf(
              // having 5 instances
            BottomMenuContent("Home", R.drawable.ic_home),
            BottomMenuContent("explore", R.drawable.ic_baseline_explore_24),
            BottomMenuContent("dark mode", R.drawable.ic_moon),
            BottomMenuContent("videos", R.drawable.ic_videocam),
            BottomMenuContent("Profile", R.drawable.ic_profile),
        ), modifier = Modifier.align(Alignment.BottomCenter))
    }
}
Kotlin
package com.cuid.geekscourses

import android.os.Bundle
import androidx.activity.ComponentActivity
import androidx.activity.compose.setContent
import androidx.compose.foundation.ExperimentalFoundationApi
import com.cuid.geekscourses.ui.HomeScreen
import com.cuid.geekscourses.ui.theme.Geekscourse

class MainActivity : ComponentActivity() {
    @ExperimentalFoundationApi
    override fun onCreate(savedInstanceState: Bundle?) {
        super.onCreate(savedInstanceState)
        setContent {
            Geekscourse{
                HomeScreen()
            }
        }
    }
}
第 4 步:为芯片创建另一个函数
正如我们在上面的应用内预览中显示的那样,我们可以更换筹码。所以让我们构建它。
科特林
// This is how we can create chip seaction at the top of app

@Composable
fun ChipSection(
     // function with single argument
    chips: List
) {
    var selectedChipIndex by remember {
        // it will not update the string
        // but save and it will helpful for us
        mutableStateOf(0)
    }
    LazyRow {
        items(chips.size) {
            Box(
                contentAlignment = Alignment.Center,
                modifier = Modifier
                    .padding(start = 15.dp, top = 15.dp, bottom = 15.dp)
                    .clickable {
                        selectedChipIndex = it
                    }
                    .clip(RoundedCornerShape(10.dp))
                    .background(
                        // this is basic condition for selected chip index
                        if (selectedChipIndex == it) ButtonGreen
                        else DarkerButtonGreen
                    )
                    .padding(15.dp)
            ) {
                Text(text = chips[it], color = TextWhite)
            }
        }
    }
}
第 5 步:为 SuggestionSection 创建一个函数
这确实是这个应用程序的一个非常基本的部分。
科特林
// This function is for suggestion secation

@Composable
fun SuggestionSection(
    color: Color = LightBlue
) {
    Row(
        verticalAlignment = Alignment.CenterVertically,
        horizontalArrangement = Arrangement.SpaceBetween,
        modifier = Modifier
            .padding(15.dp)
            .clip(RoundedCornerShape(10.dp))
            .background(color)
            .padding(horizontal = 15.dp, vertical = 20.dp)
            .fillMaxWidth()
    ) {
        Column {
            // here are two text views or we can say only text
            Text(
                text = "Daily Coding",
                  // it can be litile bit confusing but
                  // it is just text style alternate
                  // of fontfamily in XML
                style = MaterialTheme.typography.h2

            )
            Text(
                // same as above
                text = "do at least • 3-10 problems / day",
                style = MaterialTheme.typography.body1,
                color = TextWhite
            )
        }
        Box(
            // box containing icon
            contentAlignment = Alignment.Center,
            modifier = Modifier
                .size(40.dp)
                .clip(CircleShape)
                .background(ButtonGreen)
                .padding(10.dp)
        ) {
            Icon(
                painter = painterResource(id = R.drawable.ic_play),
                contentDescription = "Play",
                tint = Color.White,
                modifier = Modifier.size(16.dp)
            )
        }
    }
}
下一步应该是课程卡,但这并不容易,或者我们可以说是整个 UI 中最难的部分,所以我们将在最后一个之后进行。
- 让我们创建一个 BottomSection,但在此之前,为了简单起见,我们应该创建类
- 因为我们的 BottomSection 元素有两个字段或视图,所以让我们这样做
第 6 步:为 ButtomSection 创建类 (BottomMenuContent.kt)
科特林
package com.cuid.geekscourses

import androidx.annotation.DrawableRes
// having two parameters title and iconid
data class BottomMenuContent(
    val title: String,
    @DrawableRes val iconId: Int
)
第 7 步:为 ButtomSection 创建函数
科特林
@Composable
// this function tells us that
// how menu item should look like
fun BottomMenu(
    items: List,
    modifier: Modifier = Modifier,
    activeHighlightColor: Color = ButtonGreen,
    activeTextColor: Color = Color.White,
    inactiveTextColor: Color = AquaBlue,
    initialSelectedItemIndex: Int = 0
) {
    var selectedItemIndex by remember {
        mutableStateOf(initialSelectedItemIndex)
    }
    Row(
        horizontalArrangement = Arrangement.SpaceAround,
        verticalAlignment = Alignment.CenterVertically,
        modifier = modifier
            .fillMaxWidth()
            .background(DeepBlue)
            .padding(15.dp)
    ) {
          // it is basically what we should have
          // for creating an element of BottomMenuItem
        items.forEachIndexed { index, item ->
            BottomMenuItem(
                item = item,
                isSelected = index == selectedItemIndex,
                activeHighlightColor = activeHighlightColor,
                activeTextColor = activeTextColor,
                inactiveTextColor = inactiveTextColor
            ) {
                selectedItemIndex = index
            }
        }
    }
}
// it's basically how menu item should look like
@Composable
fun BottomMenuItem(
    item: BottomMenuContent,
    isSelected: Boolean = false,
    activeHighlightColor: Color = ButtonGreen,
    activeTextColor: Color = Color.White,
    inactiveTextColor: Color = AquaBlue,
    onItemClick: () -> Unit
) {
    Column(
        horizontalAlignment = Alignment.CenterHorizontally,
        verticalArrangement = Arrangement.Center,
        modifier = Modifier.clickable {
            onItemClick()
        }
    ) {
          // here are some peremetens
          // for how elements will align
        Box(
            contentAlignment = Alignment.Center,
            modifier = Modifier
                .clip(RoundedCornerShape(10.dp))
                .background(if (isSelected) activeHighlightColor else Color.Transparent)
                .padding(10.dp)
        ) {
            Icon(
                painter = painterResource(id = item.iconId),
                contentDescription = item.title,
                tint = if (isSelected) activeTextColor else inactiveTextColor,
                modifier = Modifier.size(20.dp)
            )
        }
        Text(
            text = item.title,
              // it's basic condition
            color = if(isSelected) activeTextColor else inactiveTextColor
        )
    }
}
现在,应用程序的最后一部分有点棘手,它只是课程项目,这个:
课程项目
这里我们也有字符串和图标三种颜色,然后和上面一样我们将创建一个类,并在函数调用期间设置数据
第 8 步:创建课程 Course.kt
本节有五个字段,因此创建它们类型的五个变量。您也可以在代码中看到的字段。
科特林
package com.cuid.geekscourses

import androidx.annotation.DrawableRes
import androidx.compose.ui.graphics.Color

data class Course(
    val title: String,
    @DrawableRes val iconId: Int,
    val lightColor: Color,
    val mediumColor: Color,
    val darkColor: Color
)
现在想想,如何在卡片上制作这些曲线。所以基本上,我们设置一些点并通过连接创建的点来创建平滑曲线
第 9 步:创建 CourseSection
这基本上就是我们的网格将如何排列。
科特林
@ExperimentalFoundationApi
@Composable
// here we have just passed the list of courses
fun CourseSection(courses: List) {
    Column(modifier = Modifier.fillMaxWidth()) {
        Text(
            text = "courses",
            style = MaterialTheme.typography.h1,
            modifier = Modifier.padding(15.dp)
        )
        // we have used lazyVertically grid
        LazyVerticalGrid(
            cells = GridCells.Fixed(2), // it basically tells no. of cells in a row
            contentPadding = PaddingValues(start = 7.5.dp, end = 7.5.dp,bottom = 100.dp),
            modifier = Modifier.fillMaxHeight()
        ) {
            items(courses.size) {
              // here we have to define how one of these item is look like
              // we will tell after defining item design
              // let me comment it for now and after
              // creating you just have to remove

              // CourseItem(course = courses[it])
            }
        }
    }
}
第 10 步:创建课程卡项目设计
科特林
@Composable
fun CourseItem(
    course: Course
) {
    BoxWithConstraints(
          // Box with some attributes
        modifier = Modifier
            .padding(7.5.dp)
            .aspectRatio(1f)
            .clip(RoundedCornerShape(10.dp))
            .background(feature.darkColor)
    ) {
        val width = constraints.maxWidth
        val height = constraints.maxHeight
        // setting 5 points for medium
        // color or we can say for another
        // Medium colored path
        val mediumColoredPoint1 = Offset(0f, height * 0.3f)
        val mediumColoredPoint2 = Offset(width * 0.1f, height * 0.35f)
        val mediumColoredPoint3 = Offset(width * 0.4f, height * 0.05f)
        val mediumColoredPoint4 = Offset(width * 0.75f, height * 0.7f)
        val mediumColoredPoint5 = Offset(width * 1.4f, -height.toFloat())
        // joining points to make curves with the help of path class
        // path file that we have created earlier
        // having function that just help to reduce our code
        // and the function is standardQuadFromTo(m1,m2) taking
        // two peramente and connect them
        val mediumColoredPath = Path().apply {
            moveTo(mediumColoredPoint1.x, mediumColoredPoint1.y)
            standardQuadFromTo(mediumColoredPoint1, mediumColoredPoint2)
            standardQuadFromTo(mediumColoredPoint2, mediumColoredPoint3)
            standardQuadFromTo(mediumColoredPoint3, mediumColoredPoint4)
            standardQuadFromTo(mediumColoredPoint4, mediumColoredPoint5)
            lineTo(width.toFloat() + 100f, height.toFloat() + 100f)
            lineTo(-100f, height.toFloat() + 100f)
            close()
        }
        // it's another part of that
          // texture with light color
        // Light colored path
        val lightPoint1 = Offset(0f, height * 0.35f)
        val lightPoint2 = Offset(width * 0.1f, height * 0.4f)
        val lightPoint3 = Offset(width * 0.3f, height * 0.35f)
        val lightPoint4 = Offset(width * 0.65f, height.toFloat())
        val lightPoint5 = Offset(width * 1.4f, -height.toFloat() / 3f)

        val lightColoredPath = Path().apply {
            moveTo(lightPoint1.x, lightPoint1.y)
            standardQuadFromTo(lightPoint1, lightPoint2)
            standardQuadFromTo(lightPoint2, lightPoint3)
            standardQuadFromTo(lightPoint3, lightPoint4)
            standardQuadFromTo(lightPoint4, lightPoint5)
            lineTo(width.toFloat() + 100f, height.toFloat() + 100f)
            lineTo(-100f, height.toFloat() + 100f)
            close()
        }
        // canvas is used when we
          // want to draw something
        Canvas(
            modifier = Modifier
                .fillMaxSize()
        ) {
            drawPath(
                  // function for drawing paths
                  // just pass the path
                path = mediumColoredPath,
                color = course.mediumColor
            )
            drawPath( // it's for the lighter path
                path = lightColoredPath,
                color = course.lightColor
            )
        }
         // so , we have done with texture and
         // now just creating box and other things
        // box containing course elements
        Box(
            modifier = Modifier
                .fillMaxSize()
                .padding(15.dp)
        ) {
            Text(
                text = course.title,
                style = MaterialTheme.typography.h2,
                lineHeight = 26.sp,
                modifier = Modifier.align(Alignment.TopStart)
            )
            Icon(
                painter = painterResource(id = course.iconId),
                contentDescription = course.title,
                tint = Color.White,
                modifier = Modifier.align(Alignment.BottomStart)
            )
            Text(
                text = "Start",
                color = TextWhite,
                fontSize = 14.sp,
                fontWeight = FontWeight.Bold,
                modifier = Modifier
                    .clickable {
                        // Handle the clicks
                    }
                    .align(Alignment.BottomEnd)
                    .clip(RoundedCornerShape(10.dp))
                    .background(ButtonGreen)
                    .padding(vertical = 6.dp, horizontal = 15.dp)
            )
        }
    }
}
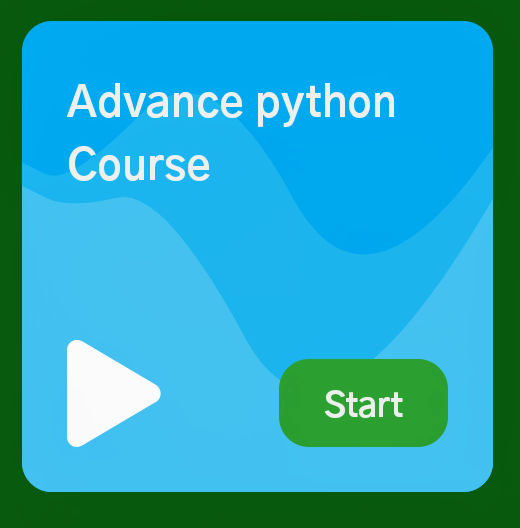
这就是我们的项目的外观。所以只需通过课程部分中的项目
CourseItem(course = courses[it])
就是我们上面讨论的那个文件来减少我们的代码
科特林
package com.cuid.geekscourses

import androidx.compose.ui.geometry.Offset
import androidx.compose.ui.graphics.Path
import kotlin.math.abs
// The function is standardQuadFromTo(m1,m2)
// taking two peramente those are nothing but points
// that we are created and just add.
fun Path.standardQuadFromTo(from: Offset, to: Offset) {
      // this function is basically draw
      // a line to our second point and
      // also smooth on that line and make it curve
    quadraticBezierTo(
        from.x,
        from.y,
        abs(from.x + to.x) / 2f,
        abs(from.y + to.y) / 2f
    )
}
现在我们已经准备好了所有的东西,所以只需调用所有函数并查看您的结果
科特林
@ExperimentalFoundationApi
@Composable
fun HomeScreen() {
    // this is the most outer box
      // having all the views inside it
    Box(
        modifier = Modifier
            .background(DeepBlue)
            .fillMaxSize()
    ) {
        Column {
              // this is the function for header
            GreetingSection()
            // it's for chipsSecation, and pass
              // as many strings as you want
            ChipSection(chips = listOf("Data structures", "Algorithms", "competitive programming", "python"))
             // function for suggestionSection
             suggestionSection()
              // this is for course secation
            CourseSection(
                  // function require list of courses and
                  // one course contain 5 attributes
                courses = listOf(
                    Course(
                        title = "geek of the year",
                        R.drawable.ic_headphone,
                          // these are colors.......
                        BlueViolet1,
                        BlueViolet2,
                        BlueViolet3
                    ),
                      // below are the copies of the objects
                      // and you can add as many as you want
                    Course(
                        title = "How does AI Works",
                        R.drawable.ic_videocam,
                        LightGreen1,
                        LightGreen2,
                        LightGreen3
                    ),
                    Course(
                        title = "Advance python Course",
                        R.drawable.ic_play,
                        skyblue1,
                        skyblue2,
                        skyblue3
                    ),
                    Course(
                        title = "Advance Java Course",
                        R.drawable.ic_headphone,
                        Beige1,
                        Beige2,
                        Beige3
                    ),
                    Course(
                        title = "prepare for aptitude test",
                        R.drawable.ic_play,
                        OrangeYellow1,
                        OrangeYellow2,
                        OrangeYellow3
                    ),
                    Course(
                        title = "How does AI Works",
                        R.drawable.ic_videocam,
                        LightGreen1,
                        LightGreen2,
                        LightGreen3
                    ),
                )
            )
        }
        // this is the final one that is bottomMenu
        BottomMenu(items = listOf(
              // having 5 instances
            BottomMenuContent("Home", R.drawable.ic_home),
            BottomMenuContent("explore", R.drawable.ic_baseline_explore_24),
            BottomMenuContent("dark mode", R.drawable.ic_moon),
            BottomMenuContent("videos", R.drawable.ic_videocam),
            BottomMenuContent("Profile", R.drawable.ic_profile),
        ), modifier = Modifier.align(Alignment.BottomCenter))
    }
}
现在在 MainActivity 中添加包含所有功能的有趣 HomeScreen()
科特林
package com.cuid.geekscourses

import android.os.Bundle
import androidx.activity.ComponentActivity
import androidx.activity.compose.setContent
import androidx.compose.foundation.ExperimentalFoundationApi
import com.cuid.geekscourses.ui.HomeScreen
import com.cuid.geekscourses.ui.theme.Geekscourse

class MainActivity : ComponentActivity() {
    @ExperimentalFoundationApi
    override fun onCreate(savedInstanceState: Bundle?) {
        super.onCreate(savedInstanceState)
        setContent {
            Geekscourse{
                HomeScreen()
            }
        }
    }
}
最后,我们的 UI 看起来像这样:
输出:
项目链接:点击这里