Flutter – TabView 小部件
在许多应用程序中,您经常会遇到选项卡。标签是应用程序中的常见模式。它们位于应用程序栏下方的应用程序顶部。所以今天我们将使用选项卡创建我们自己的应用程序。
目录:
- 项目设置
- 代码
- 结论
项目设置:
您可以在现有项目中创建新项目或新文件。
我们不需要任何其他依赖项。
代码:
我们需要一个 TabController 来控制我们应用程序的选项卡。在本教程中,我们将使用 DefaultTabController,因为它是最简单且可供所有后代访问的。
DefaultTabController用作 MaterialApp 的 home。
所以在主要。dart文件:
Dart
import 'package:flutter/material.dart';

void main() {
  runApp(MyApp());
}

class MyApp extends StatelessWidget {

  // This widget is the root of your application.
  @override
  Widget build(BuildContext context) {
    return MaterialApp(
      title: 'TabView Tutorial GFG',
      theme: ThemeData(

        primarySwatch: Colors.green,
      ),
      home: HomePage(),
    );
  }
}
class HomePage extends StatelessWidget {
  const HomePage({ Key? key }) : super(key: key);

  @override
  Widget build(BuildContext context) {
    return DefaultTabController(
      length: length,
      child: child,
    );
  }
}
Dart
DefaultTabController(
  length: 3,
  child: Scaffold(
    appBar: AppBar(
      title: Text("GeeksForGeeks"),
      bottom: TabBar(
        tabs: [],
      ),
    ),
    body: TabBarView(
      children: [],
    ),
  ),
);
Dart
TabBar(
  tabs: [
    Tab(
      icon: Icon(Icons.home_filled),
      text: "Home",
    ),
    Tab(
      icon: Icon(Icons.account_box_outlined),
      text: "Account",
    ),
    Tab(
      icon: Icon(Icons.alarm),
      text: "Alarm",
    ),
  ],
),
Dart
TabBarView(
  children: [
    Center(
      child: Icon(Icons.home),
    ),
    Center(
      child: Icon(Icons.account_circle),
    ),
    Center(
      child: Icon(Icons.alarm),
    )
  ],
),
Dart
DefaultTabController(
  length: 6,
  child: Scaffold(
    appBar: AppBar(
      title: Text("GeeksForGeeks"),
      bottom: TabBar(
        isScrollable: true,
        tabs: [
          Tab(
            icon: Icon(Icons.home_filled),
            text: "Home",
          ),
          Tab(
            icon: Icon(Icons.account_box_outlined),
            text: "Account",
          ),
          Tab(
            icon: Icon(Icons.alarm),
            text: "Alarm",
          ),
          Tab(
            icon: Icon(Icons.home_filled),
            text: "Home",
          ),
          Tab(
            icon: Icon(Icons.account_box_outlined),
            text: "Account",
          ),
          Tab(
            icon: Icon(Icons.alarm),
            text: "Alarm",
          ),
        ],
      ),
    ),
    body: TabBarView(
      children: [
        Center(
          child: Icon(Icons.home),
        ),
        Center(
          child: Icon(Icons.account_circle),
        ),
        Center(
          child: Icon(Icons.alarm),
        ),
        Center(
          child: Icon(Icons.home),
        ),
        Center(
          child: Icon(Icons.account_circle),
        ),
        Center(
          child: Icon(Icons.alarm),
        )
      ],
    ),
  ),
);
Dart
import 'package:flutter/material.dart';

void main() {
  runApp(MyApp());
}

class MyApp extends StatelessWidget {

  // This widget is the root of your application.
  @override
  Widget build(BuildContext context) {
    return MaterialApp(
      title: 'TabView Tutorial GFG',
      theme: ThemeData(
        primarySwatch: Colors.green,
      ),
      home: HomePage(),
    );
  }
}

class HomePage extends StatelessWidget {
  const HomePage({Key? key}) : super(key: key);

  @override
  Widget build(BuildContext context) {
    return DefaultTabController(
      length: 3,
      child: Scaffold(
        appBar: AppBar(
          title: Text("GeeksForGeeks"),
          bottom: TabBar(
            tabs: [
              Tab(
                icon: Icon(Icons.home_filled),
                text: "Home",
              ),
              Tab(
                icon: Icon(Icons.account_box_outlined),
                text: "Account",
              ),
              Tab(
                icon: Icon(Icons.alarm),
                text: "Alarm",
              ),
            ],
          ),
        ),
        body: TabBarView(
          children: [
            Center(
              child: Icon(Icons.home),
            ),
            Center(
              child: Icon(Icons.account_circle),
            ),
            Center(
              child: Icon(Icons.alarm),
            )
          ],
        ),
      ),
    );
  }
}所以如你所见,我们需要提供两个字段,一个是长度,另一个是子项。这些是必填字段。
- 长度:标签数
- child:要显示的小部件
现在我想要 3 个标签,所以我提供了 3 个长度。此外,孩子显然是 Scaffold,因为这是必要的。
Dart
DefaultTabController(
  length: 3,
  child: Scaffold(
    appBar: AppBar(
      title: Text("GeeksForGeeks"),
      bottom: TabBar(
        tabs: [],
      ),
    ),
    body: TabBarView(
      children: [],
    ),
  ),
);
在这里您可以看到两个新的小部件,TabBar 和 TabBarView。
- TabBar:用于显示选项卡的顶视图或更具体地说,它显示选项卡的内容。
- TabBarView:用于在按下选项卡时显示内容。
所以我们将在 TabBar 中显示图标。
Note: Here you should display 3 tabs or else you will get an error.
Dart
TabBar(
  tabs: [
    Tab(
      icon: Icon(Icons.home_filled),
      text: "Home",
    ),
    Tab(
      icon: Icon(Icons.account_box_outlined),
      text: "Account",
    ),
    Tab(
      icon: Icon(Icons.alarm),
      text: "Alarm",
    ),
  ],
),
在 TabBarView 小部件中,我们需要三个子小部件,它们可以是任何东西。
因此,为了教程的简单性,我将只显示图标。
Dart
TabBarView(
  children: [
    Center(
      child: Icon(Icons.home),
    ),
    Center(
      child: Icon(Icons.account_circle),
    ),
    Center(
      child: Icon(Icons.alarm),
    )
  ],
),
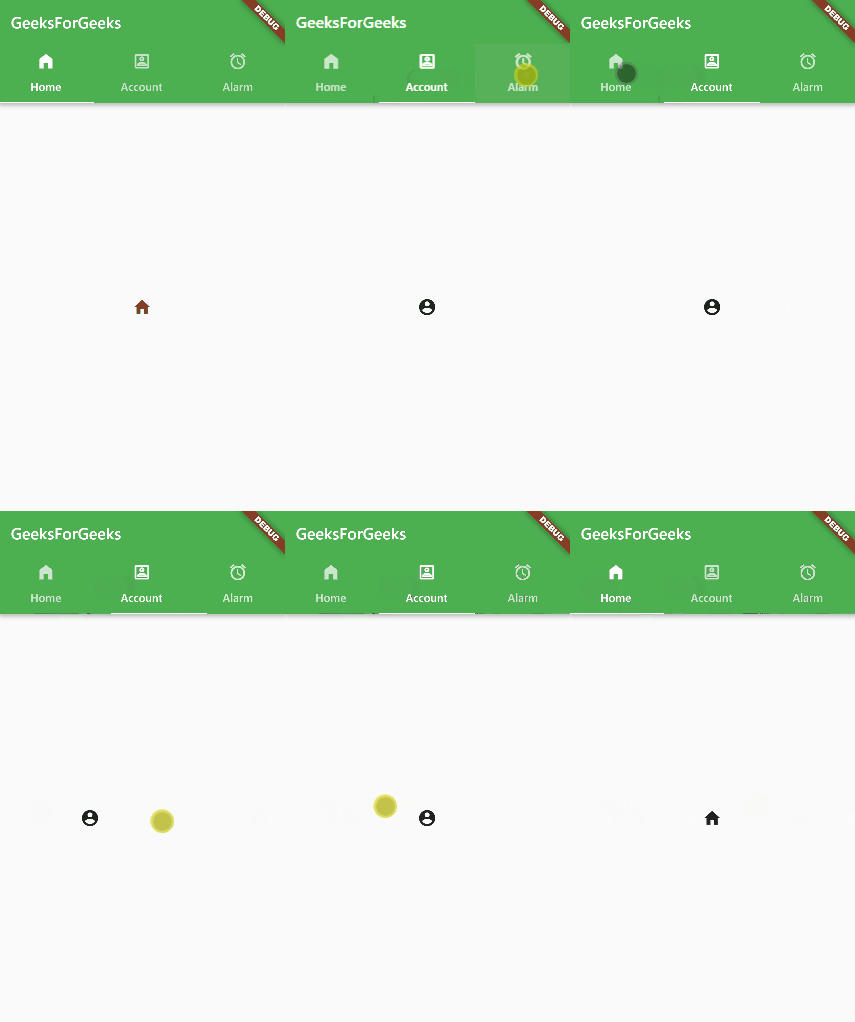
现在运行应用程序。

TabBarView 应用程序
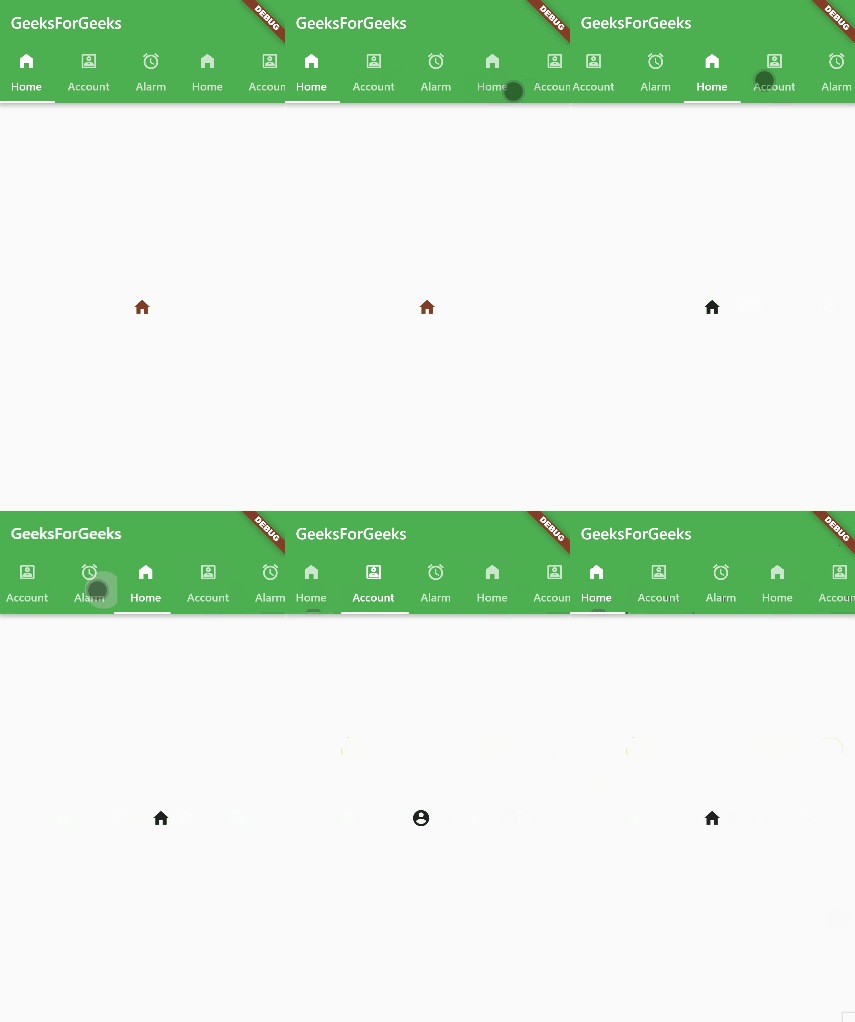
现在,如果您有很多选项卡,例如 5 或 6,我们可以使用 TabView 中的isScrollable字段。如果为false ,则缩小屏幕内的所有选项卡,如果为true ,则生成可滚动的选项卡。
您可以将长度更改为 6 并复制 TabBar 和 TabBarView 下的所有选项卡。
Dart
DefaultTabController(
  length: 6,
  child: Scaffold(
    appBar: AppBar(
      title: Text("GeeksForGeeks"),
      bottom: TabBar(
        isScrollable: true,
        tabs: [
          Tab(
            icon: Icon(Icons.home_filled),
            text: "Home",
          ),
          Tab(
            icon: Icon(Icons.account_box_outlined),
            text: "Account",
          ),
          Tab(
            icon: Icon(Icons.alarm),
            text: "Alarm",
          ),
          Tab(
            icon: Icon(Icons.home_filled),
            text: "Home",
          ),
          Tab(
            icon: Icon(Icons.account_box_outlined),
            text: "Account",
          ),
          Tab(
            icon: Icon(Icons.alarm),
            text: "Alarm",
          ),
        ],
      ),
    ),
    body: TabBarView(
      children: [
        Center(
          child: Icon(Icons.home),
        ),
        Center(
          child: Icon(Icons.account_circle),
        ),
        Center(
          child: Icon(Icons.alarm),
        ),
        Center(
          child: Icon(Icons.home),
        ),
        Center(
          child: Icon(Icons.account_circle),
        ),
        Center(
          child: Icon(Icons.alarm),
        )
      ],
    ),
  ),
);
现在再次运行该应用程序。

更多标签 TabView App
现在清除重复的代码。这是完整的代码。
Dart
import 'package:flutter/material.dart';

void main() {
  runApp(MyApp());
}

class MyApp extends StatelessWidget {

  // This widget is the root of your application.
  @override
  Widget build(BuildContext context) {
    return MaterialApp(
      title: 'TabView Tutorial GFG',
      theme: ThemeData(
        primarySwatch: Colors.green,
      ),
      home: HomePage(),
    );
  }
}

class HomePage extends StatelessWidget {
  const HomePage({Key? key}) : super(key: key);

  @override
  Widget build(BuildContext context) {
    return DefaultTabController(
      length: 3,
      child: Scaffold(
        appBar: AppBar(
          title: Text("GeeksForGeeks"),
          bottom: TabBar(
            tabs: [
              Tab(
                icon: Icon(Icons.home_filled),
                text: "Home",
              ),
              Tab(
                icon: Icon(Icons.account_box_outlined),
                text: "Account",
              ),
              Tab(
                icon: Icon(Icons.alarm),
                text: "Alarm",
              ),
            ],
          ),
        ),
        body: TabBarView(
          children: [
            Center(
              child: Icon(Icons.home),
            ),
            Center(
              child: Icon(Icons.account_circle),
            ),
            Center(
              child: Icon(Icons.alarm),
            )
          ],
        ),
      ),
    );
  }
}
结论
所以我们学习了一个新的小部件 TabView 并创建了一个非常基本的应用程序。但是我们可以使用这个非常简单易用的小部件制作漂亮的应用程序。它配备了所有必要的动画和捕捉,这使得设置非常容易与选项卡的应用程序。如果您有任何疑问,请在下方评论。