在 React 中创建垂直步进器
步进器通过一系列逻辑和编号的步骤显示进度。它们也可用于导航。保存步骤后,步进器可能会显示瞬态反馈消息。
在本文中,我们将学习如何使用react 和 material-ui 创建一个垂直步进器。
创建 React 应用程序
第 1 步:使用以下命令创建反应应用程序。
npx create-react-app my-first-app第 2 步:通过执行命令将目录更改为该文件夹:
cd my-first-app第 3 步:安装必要的依赖项。转到目录'src'并在那里执行命令提示符并运行命令。
npm install @material-ui/core/Stepper
npm install @material-ui/core/Step
npm install @material-ui/core/StepLabel
第 4 步:通过在 src 中执行以下命令来运行您的应用程序
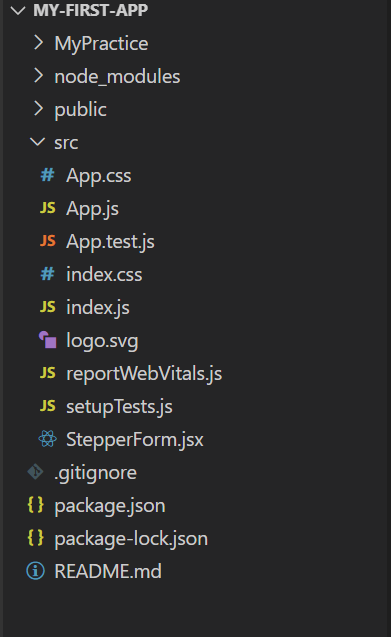
npm start文件结构:

文件名:App.js
在根组件中导入
Javascript
function App() {
return (
Javascript
import React from 'react';
import { makeStyles, Theme, createStyles }
from '@material-ui/core/styles';
import Stepper from '@material-ui/core/Stepper';
import Step from '@material-ui/core/Step';
import StepLabel from '@material-ui/core/StepLabel';
import StepContent from '@material-ui/core/StepContent';
import Button from '@material-ui/core/Button';
import Paper from '@material-ui/core/Paper';
import Typography from '@material-ui/core/Typography';
const useStyles = makeStyles((theme: Theme) =>
createStyles({
root: {
width: '100%',
},
button: {
marginTop: theme.spacing(1),
marginRight: theme.spacing(1),
},
actionsContainer: {
marginBottom: theme.spacing(2),
},
resetContainer: {
padding: theme.spacing(3),
},
}),
);
function getSteps() {
return ['Pending',
'Review', 'Published'];
}
function getStepContent(step: number) {
switch (step) {
case 0:
return `You submit an Article and it goes to Pending state `;
case 1:
return 'Article is reviewed';
case 2:
return `Hey Geek!! Your Article is Published`;
default:
return 'Unknown step';
}
}
export default function GeekStepper() {
const classes = useStyles();
const [activeStep, setActiveStep] = React.useState(0);
const steps = getSteps();
const handleNext = () => {
setActiveStep((prevActiveStep) => prevActiveStep + 1);
};
const handleBack = () => {
setActiveStep((prevActiveStep) => prevActiveStep - 1);
};
const handleReset = () => {
setActiveStep(0);
};
return (
GeeksforGeeks Article Publishing Process
{steps.map((label, index) => (
{label}
{getStepContent(index)}
))}
{activeStep === steps.length && (
All steps completed - your Article is Published
)}
);
}文件名:StepperForm.jsx
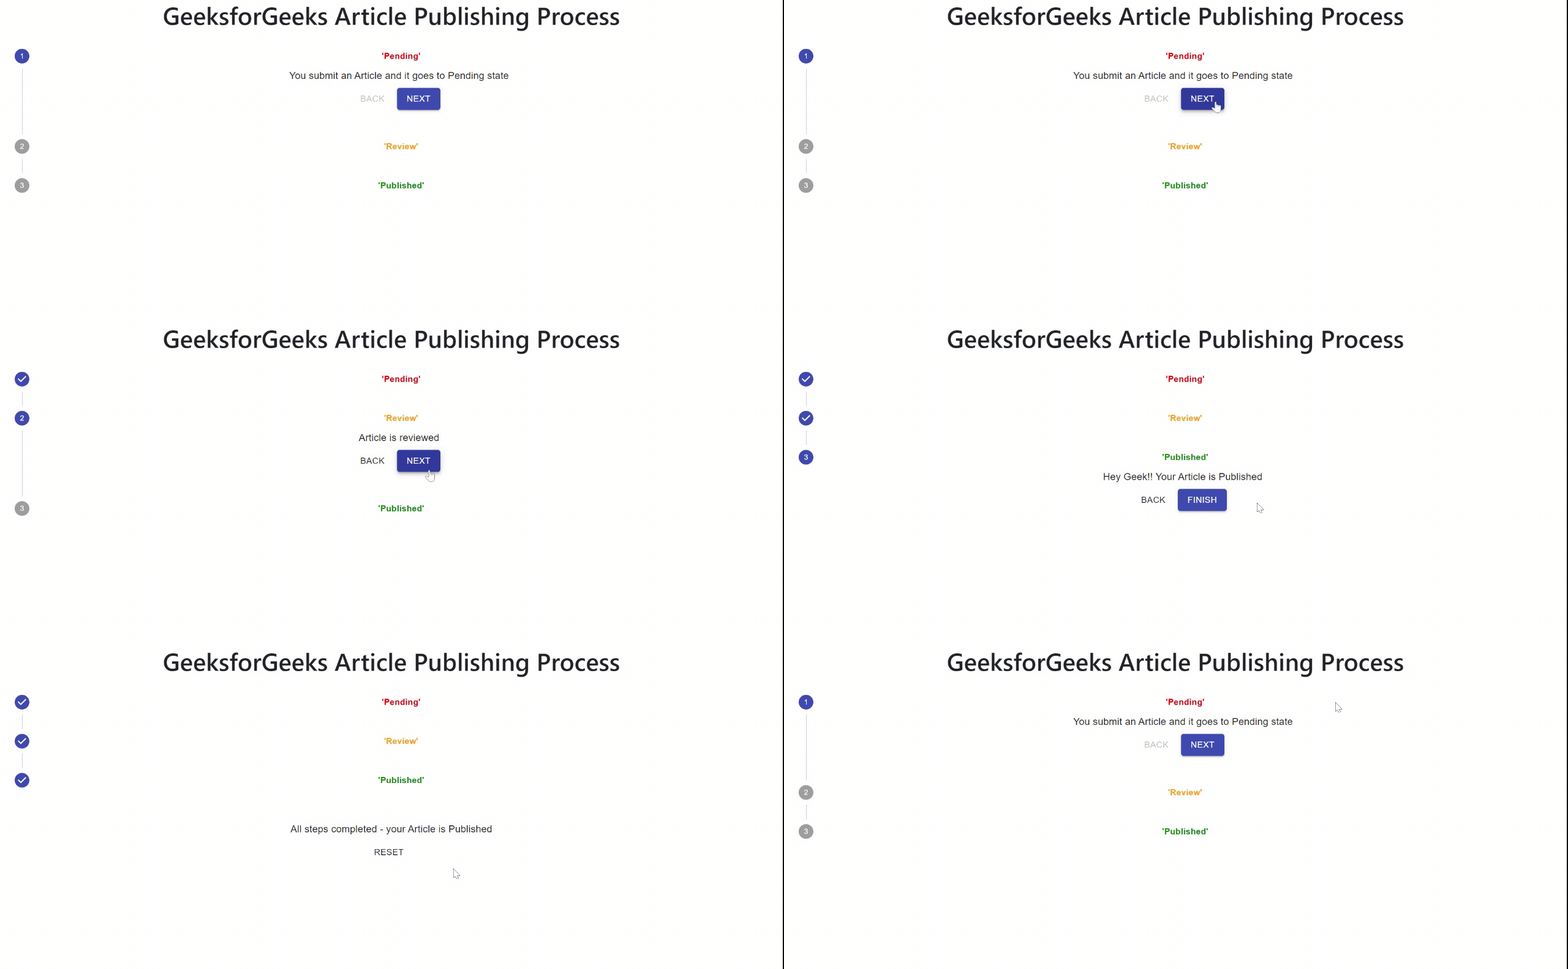
在这个文件中,我们将实现 Stepper。在这个例子中;我们将在 GeeksforGeeks 中解释文章发表的过程。文章经过 3 个州
- 待办的
- 审查
- 发布
Stepper 是在 react 中使用 material-ui 创建的。我们在这个组件中导入了不同的 ui 类,例如 Stepper、StepLabel 等。 Stepper 是使用 preActiveStep 和 ActiveStep 实现的。这些步骤用于显示处于活动状态的表单组件并返回。
Javascript
import React from 'react';
import { makeStyles, Theme, createStyles }
from '@material-ui/core/styles';
import Stepper from '@material-ui/core/Stepper';
import Step from '@material-ui/core/Step';
import StepLabel from '@material-ui/core/StepLabel';
import StepContent from '@material-ui/core/StepContent';
import Button from '@material-ui/core/Button';
import Paper from '@material-ui/core/Paper';
import Typography from '@material-ui/core/Typography';
const useStyles = makeStyles((theme: Theme) =>
createStyles({
root: {
width: '100%',
},
button: {
marginTop: theme.spacing(1),
marginRight: theme.spacing(1),
},
actionsContainer: {
marginBottom: theme.spacing(2),
},
resetContainer: {
padding: theme.spacing(3),
},
}),
);
function getSteps() {
return ['Pending',
'Review', 'Published'];
}
function getStepContent(step: number) {
switch (step) {
case 0:
return `You submit an Article and it goes to Pending state `;
case 1:
return 'Article is reviewed';
case 2:
return `Hey Geek!! Your Article is Published`;
default:
return 'Unknown step';
}
}
export default function GeekStepper() {
const classes = useStyles();
const [activeStep, setActiveStep] = React.useState(0);
const steps = getSteps();
const handleNext = () => {
setActiveStep((prevActiveStep) => prevActiveStep + 1);
};
const handleBack = () => {
setActiveStep((prevActiveStep) => prevActiveStep - 1);
};
const handleReset = () => {
setActiveStep(0);
};
return (
GeeksforGeeks Article Publishing Process
{steps.map((label, index) => (
{label}
{getStepContent(index)}
))}
{activeStep === steps.length && (
All steps completed - your Article is Published
)}
);
}
运行应用程序的步骤:打开终端并键入以下命令。
npm 开始
输出:
