Flutter – 创建应用介绍屏幕
Flutter以其易于创建跨平台应用程序而闻名。它正在为应用程序或任何屏幕创建介绍屏幕。我们有一种使用Flutter的intro_slider库为应用程序创建 Intros 的简单方法。在本文中,我们将在示例应用程序中实现它。
在这个示例应用程序中,我们创建了三张幻灯片,由文本、背景图像、背景颜色、跳过和完成按钮等组成。
执行:
第 1 步:在pubspec.yaml文件中安装包。
Dart
intro_slider: ^2.2.9Dart
flutter pub add intro_sliderDart
import 'package:intro_slider/intro_slider.dart';Dart
import 'package:intro_slider/intro_slider.dart';
import 'package:intro_slider/slide_object.dart';
import 'package:intro_slider/scrollbar_behavior_enum.dart';
Dart
List slides = [];

  @override
  void initState() {
    super.initState();

    // initializing slides at the runtime of app
    slides.add(
      new Slide(
        title: "GeeksForGeeks ",
        maxLineTitle: 2,
        styleTitle: TextStyle(
          color: Colors.green,
          fontSize: 30.0,
          fontWeight: FontWeight.bold,
        ),
        description:
            "GeeksForGeeks present you the intro_slider
            tutorial making your learning phase Easier.",
        styleDescription: TextStyle(
          color: Colors.green,
          fontSize: 20.0,
        ),
        marginDescription:
            EdgeInsets.only(left: 20.0,
                            right: 20.0,
                            top: 20.0,
                            bottom: 70.0),
        backgroundColor: Colors.yellow,
        directionColorBegin: Alignment.topLeft,
        directionColorEnd: Alignment.bottomRight,
        onCenterItemPress: () {},
      ),
    );
    slides.add(
      new Slide(
        title: "Second Slide",
        styleTitle: TextStyle(
          color: Colors.white,
          fontSize: 30.0,
          fontWeight: FontWeight.bold,
        ),
        description: "Do video call anywhere anytime with this app.",
        styleDescription: TextStyle(
          color: Colors.white,
          fontSize: 20.0,
        ),
        backgroundImage: "assets/image1.png",
        directionColorBegin: Alignment.topRight,
        directionColorEnd: Alignment.bottomLeft,
      ),
    );
    slides.add(
      new Slide(
        title: "Third Slide",
        styleTitle: TextStyle(
          color: Colors.white,
          fontSize: 30.0,
          fontWeight: FontWeight.bold,
        ),
        description: "Now track the location with this app easilly.",
        styleDescription: TextStyle(
          color: Colors.white,
          fontSize: 20.0,
        ),
        backgroundImage: "assets/image2.png",
        directionColorBegin: Alignment.topCenter,
        directionColorEnd: Alignment.bottomCenter,
        maxLineTextDescription: 3,
      ),
    );
  }
Dart
IntroSlider(
      slides: this.slides,
      renderSkipBtn: TextButton(
          onPressed: () {},
          child: Text(
            "Skip",
            style: TextStyle(fontSize: 20),
          )),
      renderNextBtn: Icon(
        Icons.navigate_next,
        color: Colors.green,
        size: 40.0,
      ),
      renderDoneBtn: TextButton(
          onPressed: () {},
          child: Text("Done", style: TextStyle(fontSize: 20))),
      colorDot: Colors.green,
      colorActiveDot: Colors.green,
      sizeDot: 13.0,
      hideStatusBar: true,
      backgroundColorAllSlides: Colors.black,
    );
Dart
import 'package:flutter/material.dart';
import 'package:intro_slider/intro_slider.dart';
import 'package:intro_slider/slide_object.dart';
import 'package:intro_slider/scrollbar_behavior_enum.dart';

void main() {
  runApp(MyApp());
}

class MyApp extends StatelessWidget {
  @override
  Widget build(BuildContext context) {
    return MaterialApp(
      debugShowCheckedModeBanner: false,
      title: 'Flutter Demo',
      theme: ThemeData(
        primarySwatch: Colors.green,
      ),
      home: IntroScreen(),
    );
  }
}

class IntroScreen extends StatefulWidget {
  @override
  _IntroScreenState createState() => _IntroScreenState();
}

class _IntroScreenState extends State {

  // creating List of Slide objects
  // to store data of all intro slides
  List slides = [];

  @override
  void initState() {
    super.initState();

    // initializing slides at
    // the runtime of app
    slides.add(
      new Slide(
        title: "GeeksForGeeks ",
        maxLineTitle: 2,
        styleTitle: TextStyle(
          color: Colors.green,
          fontSize: 30.0,
          fontWeight: FontWeight.bold,
        ),
        description:
            "GeeksForGeeks present you the intro_slider
            tutorial making your learning phase Easier.",
        styleDescription: TextStyle(
          color: Colors.green,
          fontSize: 20.0,
        ),
        marginDescription:
            EdgeInsets.only(left: 20.0,
                            right: 20.0,
                            top: 20.0,
                            bottom: 70.0),
        backgroundColor: Colors.yellow,
        directionColorBegin: Alignment.topLeft,
        directionColorEnd: Alignment.bottomRight,
        onCenterItemPress: () {},
      ),
    );
    slides.add(
      new Slide(
        title: "Second Slide",
        styleTitle: TextStyle(
          color: Colors.white,
          fontSize: 30.0,
          fontWeight: FontWeight.bold,
        ),
        description: "Do video call anywhere anytime with this app.",
        styleDescription: TextStyle(
          color: Colors.white,
          fontSize: 20.0,
        ),
        backgroundImage: "assets/image1.png",
        directionColorBegin: Alignment.topRight,
        directionColorEnd: Alignment.bottomLeft,
      ),
    );
    slides.add(
      new Slide(
        title: "Third Slide",
        styleTitle: TextStyle(
          color: Colors.white,
          fontSize: 30.0,
          fontWeight: FontWeight.bold,
        ),
        description: "Now track the location with this app easilly.",
        styleDescription: TextStyle(
          color: Colors.white,
          fontSize: 20.0,
        ),
        backgroundImage: "assets/image2.png",
        directionColorBegin: Alignment.topCenter,
        directionColorEnd: Alignment.bottomCenter,
        maxLineTextDescription: 3,
      ),
    );
  }

  @override
  Widget build(BuildContext context) {
    return new IntroSlider(

      // List slides
      slides: this.slides,

      // Skip button
      renderSkipBtn: TextButton(
          onPressed: () {},
          child: Text(
            "Skip",
            style: TextStyle(fontSize: 20),
          )),

      // Next button
      renderNextBtn: Icon(
        Icons.navigate_next,
        color: Colors.green,
        size: 40.0,
      ),
      // Done button
      renderDoneBtn: TextButton(
          onPressed: () {},
          child: Text("Done",
                      style: TextStyle(fontSize: 20))),

      // Dot indicator
      colorDot: Colors.green,
      colorActiveDot: Colors.green,
      sizeDot: 13.0,

      // Show or hide status bar
      hideStatusBar: true,
      backgroundColorAllSlides: Colors.black,

      // Scrollbar
      verticalScrollbarBehavior: scrollbarBehavior.SHOW_ALWAYS,
    );
  }
}
现在,在 IDE 的终端中运行 pub get。或者我们可以使用以下命令添加依赖项 -
Dart
flutter pub add intro_slider
这将在pubspec.yaml文件中添加依赖项。
第 2 步:现在,是时候在工作文件 ( dart) 中导入库了。
Dart
import 'package:intro_slider/intro_slider.dart';
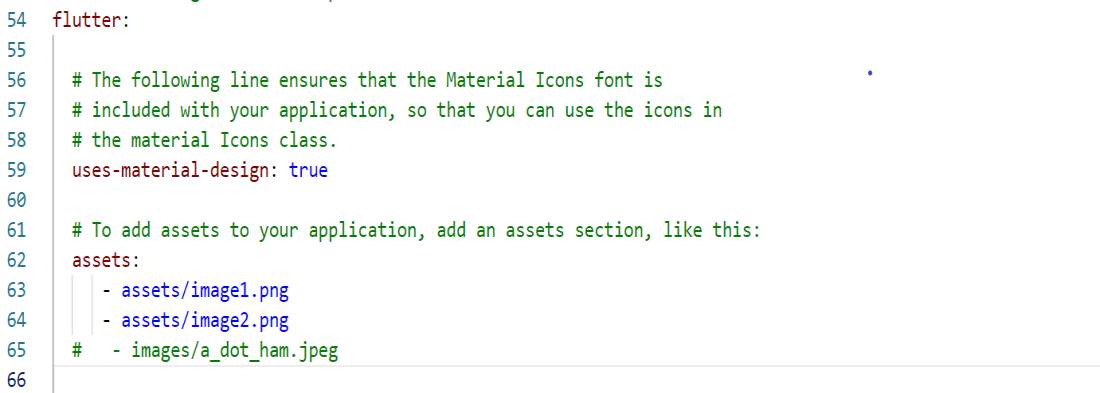
第 3 步:在项目中创建一个 assets 文件夹,将图像添加到屏幕上。然后运行 pub get 将更改保存在pubspec.yaml文件中。
第 4 步:要创建幻灯片对象、幻灯片屏幕并赋予幻灯片行为,我们需要导入多个文件,如下所示:
Dart
import 'package:intro_slider/intro_slider.dart';
import 'package:intro_slider/slide_object.dart';
import 'package:intro_slider/scrollbar_behavior_enum.dart';
现在,让我们创建一个 Slide 对象列表。
Dart
List slides = [];

  @override
  void initState() {
    super.initState();

    // initializing slides at the runtime of app
    slides.add(
      new Slide(
        title: "GeeksForGeeks ",
        maxLineTitle: 2,
        styleTitle: TextStyle(
          color: Colors.green,
          fontSize: 30.0,
          fontWeight: FontWeight.bold,
        ),
        description:
            "GeeksForGeeks present you the intro_slider
            tutorial making your learning phase Easier.",
        styleDescription: TextStyle(
          color: Colors.green,
          fontSize: 20.0,
        ),
        marginDescription:
            EdgeInsets.only(left: 20.0,
                            right: 20.0,
                            top: 20.0,
                            bottom: 70.0),
        backgroundColor: Colors.yellow,
        directionColorBegin: Alignment.topLeft,
        directionColorEnd: Alignment.bottomRight,
        onCenterItemPress: () {},
      ),
    );
    slides.add(
      new Slide(
        title: "Second Slide",
        styleTitle: TextStyle(
          color: Colors.white,
          fontSize: 30.0,
          fontWeight: FontWeight.bold,
        ),
        description: "Do video call anywhere anytime with this app.",
        styleDescription: TextStyle(
          color: Colors.white,
          fontSize: 20.0,
        ),
        backgroundImage: "assets/image1.png",
        directionColorBegin: Alignment.topRight,
        directionColorEnd: Alignment.bottomLeft,
      ),
    );
    slides.add(
      new Slide(
        title: "Third Slide",
        styleTitle: TextStyle(
          color: Colors.white,
          fontSize: 30.0,
          fontWeight: FontWeight.bold,
        ),
        description: "Now track the location with this app easilly.",
        styleDescription: TextStyle(
          color: Colors.white,
          fontSize: 20.0,
        ),
        backgroundImage: "assets/image2.png",
        directionColorBegin: Alignment.topCenter,
        directionColorEnd: Alignment.bottomCenter,
        maxLineTextDescription: 3,
      ),
    );
  }
第 5 步:调用 IntroSlider() 小部件并为其属性赋值。自定义 IntroSlider() 小部件并添加任意数量的幻灯片很容易。我们可以定义跳过、完成和下一步按钮,自定义选项卡和点。下面是一个简单小部件的示例。
Dart
IntroSlider(
      slides: this.slides,
      renderSkipBtn: TextButton(
          onPressed: () {},
          child: Text(
            "Skip",
            style: TextStyle(fontSize: 20),
          )),
      renderNextBtn: Icon(
        Icons.navigate_next,
        color: Colors.green,
        size: 40.0,
      ),
      renderDoneBtn: TextButton(
          onPressed: () {},
          child: Text("Done", style: TextStyle(fontSize: 20))),
      colorDot: Colors.green,
      colorActiveDot: Colors.green,
      sizeDot: 13.0,
      hideStatusBar: true,
      backgroundColorAllSlides: Colors.black,
    );
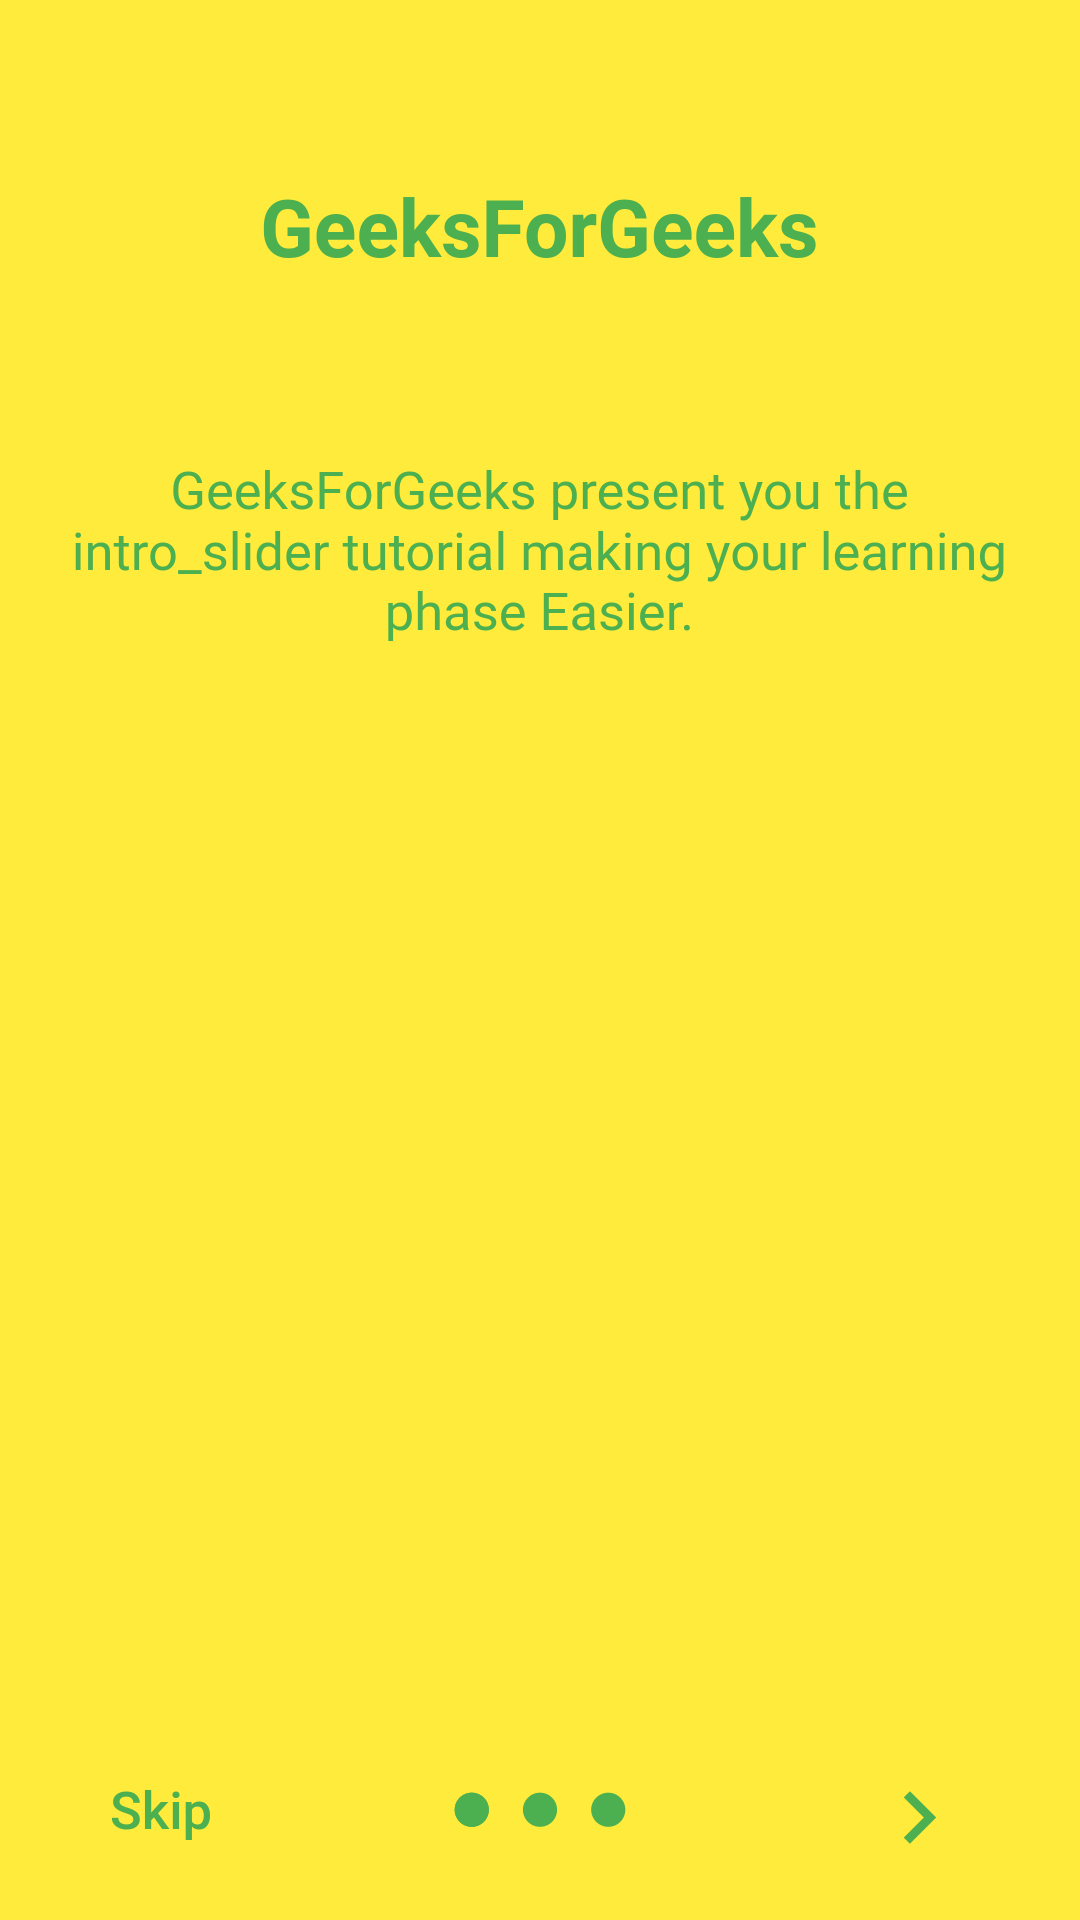
输出:
完整的源代码:
Dart
import 'package:flutter/material.dart';
import 'package:intro_slider/intro_slider.dart';
import 'package:intro_slider/slide_object.dart';
import 'package:intro_slider/scrollbar_behavior_enum.dart';

void main() {
  runApp(MyApp());
}

class MyApp extends StatelessWidget {
  @override
  Widget build(BuildContext context) {
    return MaterialApp(
      debugShowCheckedModeBanner: false,
      title: 'Flutter Demo',
      theme: ThemeData(
        primarySwatch: Colors.green,
      ),
      home: IntroScreen(),
    );
  }
}

class IntroScreen extends StatefulWidget {
  @override
  _IntroScreenState createState() => _IntroScreenState();
}

class _IntroScreenState extends State {

  // creating List of Slide objects
  // to store data of all intro slides
  List slides = [];

  @override
  void initState() {
    super.initState();

    // initializing slides at
    // the runtime of app
    slides.add(
      new Slide(
        title: "GeeksForGeeks ",
        maxLineTitle: 2,
        styleTitle: TextStyle(
          color: Colors.green,
          fontSize: 30.0,
          fontWeight: FontWeight.bold,
        ),
        description:
            "GeeksForGeeks present you the intro_slider
            tutorial making your learning phase Easier.",
        styleDescription: TextStyle(
          color: Colors.green,
          fontSize: 20.0,
        ),
        marginDescription:
            EdgeInsets.only(left: 20.0,
                            right: 20.0,
                            top: 20.0,
                            bottom: 70.0),
        backgroundColor: Colors.yellow,
        directionColorBegin: Alignment.topLeft,
        directionColorEnd: Alignment.bottomRight,
        onCenterItemPress: () {},
      ),
    );
    slides.add(
      new Slide(
        title: "Second Slide",
        styleTitle: TextStyle(
          color: Colors.white,
          fontSize: 30.0,
          fontWeight: FontWeight.bold,
        ),
        description: "Do video call anywhere anytime with this app.",
        styleDescription: TextStyle(
          color: Colors.white,
          fontSize: 20.0,
        ),
        backgroundImage: "assets/image1.png",
        directionColorBegin: Alignment.topRight,
        directionColorEnd: Alignment.bottomLeft,
      ),
    );
    slides.add(
      new Slide(
        title: "Third Slide",
        styleTitle: TextStyle(
          color: Colors.white,
          fontSize: 30.0,
          fontWeight: FontWeight.bold,
        ),
        description: "Now track the location with this app easilly.",
        styleDescription: TextStyle(
          color: Colors.white,
          fontSize: 20.0,
        ),
        backgroundImage: "assets/image2.png",
        directionColorBegin: Alignment.topCenter,
        directionColorEnd: Alignment.bottomCenter,
        maxLineTextDescription: 3,
      ),
    );
  }

  @override
  Widget build(BuildContext context) {
    return new IntroSlider(

      // List slides
      slides: this.slides,

      // Skip button
      renderSkipBtn: TextButton(
          onPressed: () {},
          child: Text(
            "Skip",
            style: TextStyle(fontSize: 20),
          )),

      // Next button
      renderNextBtn: Icon(
        Icons.navigate_next,
        color: Colors.green,
        size: 40.0,
      ),
      // Done button
      renderDoneBtn: TextButton(
          onPressed: () {},
          child: Text("Done",
                      style: TextStyle(fontSize: 20))),

      // Dot indicator
      colorDot: Colors.green,
      colorActiveDot: Colors.green,
      sizeDot: 13.0,

      // Show or hide status bar
      hideStatusBar: true,
      backgroundColorAllSlides: Colors.black,

      // Scrollbar
      verticalScrollbarBehavior: scrollbarBehavior.SHOW_ALWAYS,
    );
  }
}
输出:
现在我们可以轻松地为我们的应用程序创建漂亮的介绍屏幕。