📅 最后修改于: 2020-10-16 07:21:24 🧑 作者: Mango
在本章中,我们将看到在Yii中创建一个事件。为了显示实际事件,我们需要数据。
准备数据库
步骤1-创建一个新的数据库。可以通过以下两种方式来准备数据库。
-
在终端中运行mysql -u root –p
-
通过CREATE DATABASE helloworld创建一个新数据库。CHARACTER SET utf8 COLLATE utf8_general_ci;
步骤2-在config / db.php文件中配置数据库连接。以下配置适用于当前使用的系统。
 'yii\db\Connection',
      'dsn' => 'mysql:host=localhost;dbname=helloworld',
      'username' => 'vladimir',
      'password' => '12345',
      'charset' => 'utf8',
   ];
?>
步骤3-在根文件夹中运行./yii migration / create test_table 。此命令将创建数据库迁移以管理我们的数据库。迁移文件应显示在项目根目录的迁移文件夹中。
步骤4-以这种方式修改迁移文件(在本例中为m160106_163154_test_table.php )。
createTable("user", [
            "id" => Schema::TYPE_PK,
            "name" => Schema::TYPE_STRING,
            "email" => Schema::TYPE_STRING,
         ]);
         $this->batchInsert("user", ["name", "email"], [
            ["User1", "user1@gmail.com"],
            ["User2", "user2@gmail.com"],
            ["User3", "user3@gmail.com"],
            ["User4", "user4@gmail.com"],
            ["User5", "user5@gmail.com"],
            ["User6", "user6@gmail.com"],
            ["User7", "user7@gmail.com"],
            ["User8", "user8@gmail.com"],
            ["User9", "user9@gmail.com"],
            ["User10", "user10@gmail.com"],
            ["User11", "user11@gmail.com"],
         ]);
      }
      public function safeDown() {
         $this->dropTable('user');
      }
   }
?>
上面的迁移将创建一个用户表,其中包含以下字段:ID,名称和电子邮件。它还增加了一些演示用户。
步骤5-在项目根目录内运行./yii migration,以将迁移应用于数据库。
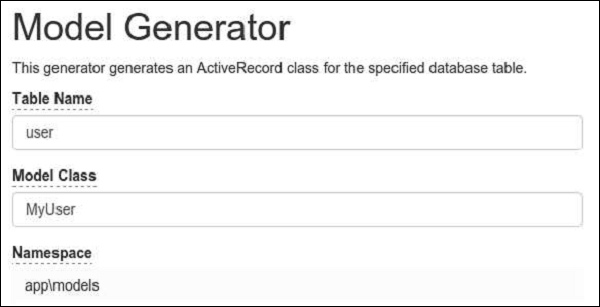
步骤6-现在,我们需要为我们的用户表创建一个模型。为了简单起见,我们将使用Gii代码生成工具。打开以下网址:http:// localhost:8080 / index.php?r = gii 。然后,单击“模型生成器”标题下的“开始”按钮。填写表名称(“用户”)和模型类(“ MyUser”),单击“预览”按钮,最后单击“生成”按钮。
MyUser模型应出现在models目录中。
建立活动
假设我们希望每当新用户在我们的网站上注册时就向管理员发送电子邮件。
步骤1-以这种方式修改models / MyUser.php文件。
on(self::EVENT_NEW_USER, [$this, 'sendMailToAdmin']);
      }
      /**
      * @inheritdoc
      */
      public static function tableName() {
         return 'user';
      }
      /**
      * @inheritdoc
      */
      public function rules() {
         return [
            [['name', 'email'], 'string', 'max' => 255]
         ];
      }
      /**
      * @inheritdoc
      */
      public function attributeLabels() {
         return [
            'id' => 'ID',
            'name' => 'Name',
            'email' => 'Email',
         ];
      }
      public function sendMailToAdmin($event) {
         echo 'mail sent to admin using the event';
      }
   }
?>
在上面的代码中,我们定义了一个“新用户”事件。然后,在init()方法中,将sendMailToAdmin函数附加到“ new-user”事件。现在,我们需要触发此事件。
步骤2-在SiteController中创建一个名为actionTestEvent的方法。
public function actionTestEvent() {
   $model = new MyUser();
   $model->name = "John";
   $model->email = "john@gmail.com";
   if($model->save()) {
      $model->trigger(MyUser::EVENT_NEW_USER);
   }
}
在上面的代码中,我们创建一个新用户并触发“ new-user”事件。
步骤3-现在键入http:// localhost:8080 / index.php?r = site / test-event ,您将看到以下内容。
