- Grav-安装
- Grav-安装(1)
- Grav-页面
- Grav教程
- Grav教程(1)
- 讨论Grav
- 讨论Grav(1)
- Grav-权限(1)
- grav 权限 (1)
- Grav-权限
- Grav-概述
- Grav-概述(1)
- Grav-多语言
- Grav-多语言(1)
- Grav-CLI(1)
- Grav-CLI
- Grav-开发(1)
- Grav-开发
- Grav-媒体(1)
- Grav-媒体
- Grav-图像链接(1)
- Grav-图像链接
- Grav-生命周期
- Grav-生命周期(1)
- Grav-服务器错误(1)
- Grav-服务器错误
- grav 权限 - 任何代码示例
- Grav-页面链接
- Grav-页面链接(1)
📅 最后修改于: 2020-10-25 05:33:37 🧑 作者: Mango
您可以使用此链接中提供的表单插件来创建表单。搜索表单插件并将其安装在您的Grav文件夹中。
您也可以使用$ bin / gpm install Form命令安装此插件。导航到Grav的根文件夹,然后键入此命令。它将自动下载表单插件并安装必要的依赖项。
创建一个简单的表格
您可以创建一个简单的表单,该表单可以在页面YAML前端中定义。以下是表格的示例-
---
title: Contact Form

form:
   name: contact

   fields:
      - name: name
         label: Name
         placeholder: Enter your name
         autofocus: on
         autocomplete: on
         type: text
         validate:
            required: true

      - name: email
         label: Email
         placeholder: Enter your email address
         type: email
         validate:
            required: true

      - name: message
         label: Message
         placeholder: Enter your message
         type: textarea
         validate:
            required: true

      - name: g-recaptcha-response
         label: Captcha
         type: captcha
         recatpcha_site_key: 6LelOg4TAAAAALAt1CjjjVMxFLKY8rrnednYVbr8
         recaptcha_not_validated: 'Captcha not valid!'
         validate:
            required: true

   buttons:
      - type: submit
         value: Submit
      - type: reset
         value: Reset

   process:
      - email:
         subject: "[Site Contact Form] {{ form.value.name|e }}"
         body: "{% include 'forms/data.html.twig' %}"
      - save:
         fileprefix: contact-
         dateformat: Ymd-His-u
         extension: txt
         body: "{% include 'forms/data.txt.twig' %}"
      - message: Thank you for getting in touch!
      - display: thankyou
---
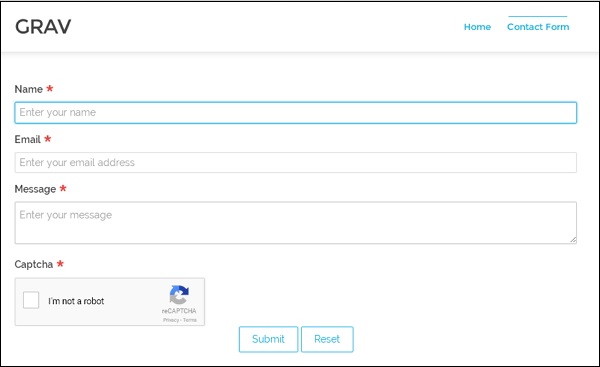
上面的代码显示了一个简单的表单页面,其中包含名称,电子邮件,消息和验证码字段。当您在填写表单后提交信息时,将通过将过程字段添加到YAML前题中来处理表单,如代码所示。
流程字段使用以下信息-
-
email选项使用两个字段,例如from字段指定电子邮件的发送者和to字段指定邮件的接收者。
-
主题使用[反馈] [输入的邮件]选项,在该选项中,电子邮件被发送到输入的电子邮件中。
-
电子邮件的正文是在主题文件夹中的form / data.html.twig文件中指定的。
-
表单输入数据存储在用户/数据文件夹下。模板在主题文件夹中的forms / data.txt.twig文件中定义。
-
在thankyou /子文件夹下创建一个子页面,当用户提交表单时,该子页面将重定向到该页面。
您可以将某些字段与表单插件一起使用,如下表所示:
| Sr.No. | Field & Description |
|---|---|
| 1 |
Captcha It is an antispam field which is used in computing to determine whether or not the user is human. |
| 2 |
Checkbox It displays a simple checkbox. |
| 3 |
Checkboxes It displays multiple checkboxes. |
| 4 |
Date and Datetime Both fields are used to display date and date along with time respectively. |
| 5 |
It is an email field with validation. |
| 6 |
Hidden It specifies the hidden field. |
| 7 |
Password It specifies the password field. |
| 8 |
Radio It displays the simple radio buttons. |
| 9 |
Select It provides select field. |
| 10 |
Spacer It allows to add title, text or horizontal line to the form. |
| 11 |
Text It displays simple text field. |
| 12 |
Textarea It displays simple text area field. |
| 13 |
Display It displays the text or instruction field, not the input field. |
字段参数
每个字段都接受以下参数,这些参数可用于自定义表单的外观。
| Sr.No. | Parameter & Description |
|---|---|
| 1 |
label It defines the label field. |
| 2 |
validate.required It makes the element required. |
| 3 |
validate.pattern It specifies validation pattern. |
| 4 |
validate.message It display the message when validation fails. |
| 5 |
type It defines the field type. |
| 6 |
default It defines the default field type. |
| 7 |
size It displays the field size such as large, x-small, medium, long, small. |
| 8 |
name It defines the field name. |
| 9 |
classes It uses string with css classes. |
| 10 |
id It defines the field id. |
| 11 |
style It specifies the style of the field. |
| 12 |
title It defines the title of the field. |
| 13 |
disabled It determines whether or not the field is in a disabled state. |
| 14 |
placeholder It is a short hint which is displayed in the input field before the user enters a value. |
| 15 |
autofocus It specifies that an input element should automatically get focus when the page loads. |
| 16 |
novalidate It specifies that form data should not be validated when submitted. |
| 17 |
readonly It determines field as read only state. |
| 18 |
autocomplete It displays the options in the field when user starts typing in the field and displays the values based on earlier typed values. |
一些字段包含特定的参数,例如-
| Sr.No. | Parameter & Description |
|---|---|
| 1 |
date and datetime These fields use validate.min and validate.max to set minimum and maximum values. |
| 2 |
spacer It uses underline to add tag. |
| 3 |
select It uses multiple parameter to add multiple values. |
| 4 |
select and checkboxes It uses options field to set the available options. |
| 5 |
display It uses content parameter to display the content. It sets the markdown to true to show the content. |
| 6 |
captcha It uses recatpcha_site_key and recaptcha_not_validated parameters. |
请注意验证码
我们在名为g-recaptcha-response的字段下有关于验证码信息的代码,如下所示-
- name: g-recaptcha-response
   label: Captcha
   type: captcha
   recatpcha_site_key: 6LelOg4TAAAAALAt1CjjjVMxFLKY8rrnednYVbr8
   recaptcha_not_validated: 'Captcha not valid!'
   validate:
        required: true
reCaptcha用于保护您的网站免遭垃圾邮件和滥用。它使用recatpcha_site_key选项,并在您的站点上显示窗口小部件。要使用reCaptcha,只需参考reCaptcha docs 。如果reCaptcha不正确,则它将使用recaptcha_not_validated选项显示消息。
表单动作
电子邮件
您可以在处理字段下发送带有特定选项的电子邮件,如下所示-
- email:
    from: "{{ config.plugins.email.from }}"
    to: "{{ config.plugins.email.to }}"
    subject: "Contact by {{ form.value.name|e }}"
    body: "{% include 'forms/data.html.twig' %}"
它使用包括两个字段的电子邮件选项。通过使用电子邮件插件配置的从字段指定的电子邮件地址的发送者和现场指定电子邮件地址的recevier。电子邮件字段还使用主题选项,其中将电子邮件发送到主题为[联系方式] [输入的名称]的电子邮件,并在主题的form / data.html.twig文件中定义电子邮件的正文。
重定向到其他页面
您可以使用在处理字段下定义的消息和显示选项来重定向到另一个页面。
process:
   - message: Thank you for getting in touch!
   - display: thankyou
消息选项设置了一条消息,当用户单击提交按钮时,该消息应显示。用户提交表单时,应将其重定向到另一个页面。在thankyou子文件夹下创建一个子页面,其中存储了form.md文件。提交表单后,它将在页面上重定向并显示上述消息。
名为thankyou / formdata.md的子页面将包含以下内容。
---
title: Email sent
cache_enable: false
process:
   twig: true
---

## Your email has been sent!
提交表单时,插件将向用户发送电子邮件,数据将保存在data / folder下。
救
它用于将数据保存到保存在用户/数据文件夹下的文件中。
例如-
process:
   - save:
      fileprefix: contact-
      dateformat: Ymd-His-u
      extension: txt
      body: "{% include 'forms/data.txt.twig' %}"
数据将以文本格式存储,扩展名为txt。正文取自主题的template / forms / data.html.twig文件。
以下屏幕显示了一个简单的表格-
