解释 React 组件的生命周期方法
到目前为止,我们已经看到 React Web 应用程序实际上是一组独立组件,它们根据与它们的交互运行。每个 React 组件都有自己的生命周期,组件的生命周期可以定义为在组件存在的不同阶段调用的一系列方法。定义非常简单,但不同阶段是什么意思?一个 React 组件可以经历如下四个生命阶段。
- 初始化:这是使用给定的 Props 和默认状态构造组件的阶段。这是在组件类的构造函数中完成的。
- 挂载:挂载是渲染由 render 方法本身返回的 JSX 的阶段。
- 更新:更新是更新组件状态并重新绘制应用程序的阶段。
- 卸载:顾名思义,卸载是组件生命周期的最后一步,从页面中删除组件。
React 为开发人员提供了一组预定义的函数,如果这些函数存在,则会围绕组件生命周期中的特定事件调用。开发人员应该使用所需的逻辑覆盖功能以相应地执行。我们在下图中说明了要点。

现在让我们描述每个阶段及其相应的功能。
生命周期各阶段的功能
- 初始化:在这个阶段,开发人员必须定义组件的 props 和初始状态,这通常在组件的构造函数中完成。以下代码片段描述了初始化过程。
javascript
class Clock extends React.Component {
  constructor(props) {

    // Calling the constructor of
    // Parent Class React.Component
    super(props);

    // Setting the initial state
    this.state = { date: new Date() };
  }
}
javascript
componentWillRecieveProps(newProps)
{
    if(this.props !== newProps)
    {
        console.log(" New Props have been assigned ");
        // Use this.setState() to rerender the page.
    }
}
Javascript
import React from 'react';
import ReactDOM from 'react-dom';
class Test extends React.Component {
constructor(props)
{
super(props);
this.state = { hello : "World!" };
}
componentWillMount()
{
console.log("componentWillMount()");
}
componentDidMount()
{
console.log("componentDidMount()");
}
changeState()
{
this.setState({ hello : "Geek!" });
}
render()
{
return (
GeeksForGeeks.org, Hello{ this.state.hello }
Press Here!
);
}
shouldComponentUpdate(nextProps, nextState)
{
console.log("shouldComponentUpdate()");
return true;
}
componentWillUpdate()
{
console.log("componentWillUpdate()");
}
componentDidUpdate()
{
console.log("componentDidUpdate()");
}
}
ReactDOM.render(
- 挂载:挂载是组件初始化完成,组件被挂载到 DOM 上并在网页中首次渲染的组件生命周期阶段。现在 React 遵循此预定义函数的命名约定中的默认过程,其中包含“Will”的函数表示某个特定阶段之前,而“Did”表示该阶段完成之后。安装阶段由两个这样的预定义功能组成,如下所述。
- componentWillMount()函数:顾名思义,这个函数在组件被挂载到 DOM 之前被调用,即这个函数在第一次执行 render()函数之前被调用一次。
- componentDidMount()函数:与前一个类似,该函数在组件安装到 DOM 后立即调用,即该函数在第一次执行 render()函数后调用一次。
- 更新: React是一个 JS 库,可帮助轻松创建活动网页。现在活动网页是根据其用户行为的特定页面。例如,让我们以 GeeksforGeeks {IDE} 网页为例,该网页对每个用户的行为都不同。用户 A 可能会在 Light Theme 中用 C 语言编写一些代码,而另一个用户可能会同时在 Dark Theme 中编写Python代码。这种部分取决于用户本身的动态行为使网页成为活动网页。现在这怎么可能与更新有关?更新是更新组件的状态和道具的阶段,随后是一些用户事件,例如单击,按下键盘上的键等。以下是在更新阶段不同点调用的函数的描述。
- componentWillRecieveProps()函数:这是一个 Props 专有函数,独立于状态。在已安装的组件重新分配其道具之前调用此函数。该函数传递了一组新的道具,这些道具可能与原始道具相同,也可能不同。因此,检查是这方面的强制性步骤。以下代码片段显示了一个示例用例。
javascript
componentWillRecieveProps(newProps)
{
    if(this.props !== newProps)
    {
        console.log(" New Props have been assigned ");
        // Use this.setState() to rerender the page.
    }
}
- setState()函数:这不是一个特别的生命周期函数,可以在任何时刻显式调用。该函数用于更新组件的状态。您可以参考这篇文章了解详细信息。
- shouldComponentUpdate()函数:默认情况下,每个状态或道具更新都会重新渲染页面,但这可能并不总是期望的结果,有时希望在更新页面时不会重新绘制。 shouldComponentUpdate()函数通过让 React 知道组件的输出是否会受到更新的影响来满足要求。当接收到新的 props 或 state 时,在渲染已经安装的组件之前调用 shouldComponentUpdate()。如果返回 false 则不会执行后续的渲染步骤。在 forceUpdate() 的情况下不能使用此函数。该函数将新的 Props 和新的状态作为参数,并返回是否重新渲染。
- componentWillUpdate()函数:顾名思义,这个函数在组件被重新渲染之前被调用,即这个函数在状态或道具更新后的render()函数被执行之前被调用一次。
- componentDidUpdate()函数:类似地,该函数在组件重新渲染后调用,即在更新 State 或 Props 后执行 render()函数后调用该函数一次。
- 卸载:这是组件生命周期的最后阶段,即从 DOM 中卸载组件的阶段。以下函数是此阶段的唯一成员。
- componentWillUnmount()函数:在组件最终从 DOM 中卸载之前调用此函数,即在从页面中删除组件之前调用此函数一次,这表示生命周期的结束。
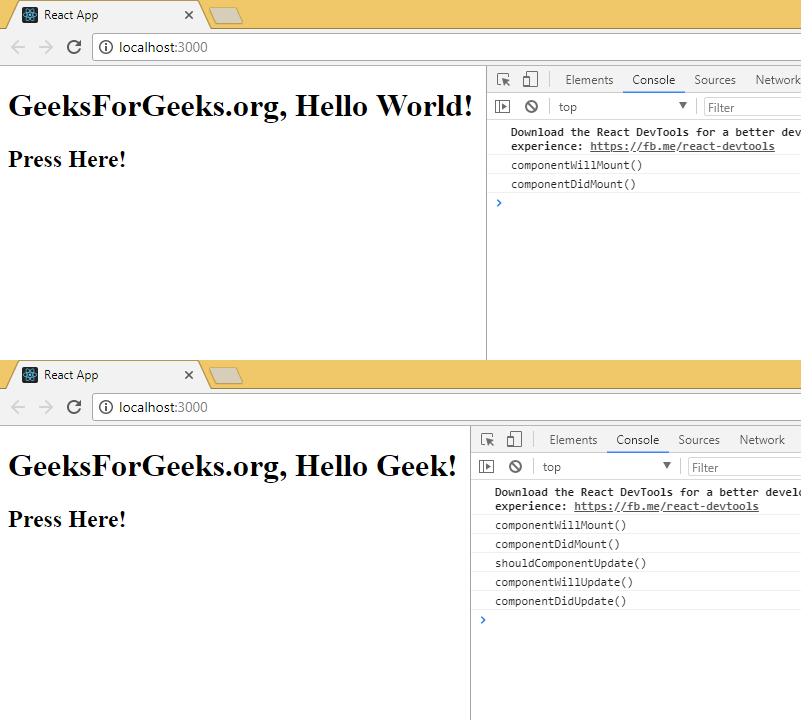
到目前为止,我们已经讨论了组件生命周期中的每个预定义函数,并且我们还指定了函数的执行顺序。现在让我们看看最后一个例子来完成这篇文章,同时修改上面讨论的内容。
Javascript
import React from 'react';
import ReactDOM from 'react-dom';
class Test extends React.Component {
constructor(props)
{
super(props);
this.state = { hello : "World!" };
}
componentWillMount()
{
console.log("componentWillMount()");
}
componentDidMount()
{
console.log("componentDidMount()");
}
changeState()
{
this.setState({ hello : "Geek!" });
}
render()
{
return (
GeeksForGeeks.org, Hello{ this.state.hello }
Press Here!
);
}
shouldComponentUpdate(nextProps, nextState)
{
console.log("shouldComponentUpdate()");
return true;
}
componentWillUpdate()
{
console.log("componentWillUpdate()");
}
componentDidUpdate()
{
console.log("componentDidUpdate()");
}
}
ReactDOM.render(
输出:

在下一篇文章中,我们将使用 state 和生命周期函数来重新创建我们在使用多个 render() 调用之前创建的时钟。