- MFC-Windows资源(1)
- MFC-Windows资源
- MFC-Windows布局
- MFC-Windows布局(1)
- MFC-Windows控件
- MFC-Windows控件(1)
- MFC-字符串(1)
- MFC-字符串
- MFC-属性表(1)
- MFC-属性表
- MFC-VC++项目(1)
- MFC-VC++项目
- MFC教程(1)
- MFC教程
- MFC-链表(1)
- MFC-链表
- MFC-概述
- MFC-概述(1)
- MFC-对话框(1)
- MFC-对话框
- MFC-标准I / O
- MFC-标准I O(1)
- MFC-入门
- MFC-入门(1)
- MFC-环境设置(1)
- MFC-环境设置
- MFC-文件系统(1)
- MFC-文件系统
- MFC-消息和事件(1)
📅 最后修改于: 2020-11-20 06:23:40 🧑 作者: Mango
在本章中,我们将介绍Windows的基础知识。若要创建程序(也称为应用程序),请从MFC的CWinApp派生一个类。 CWinApp代表Windows应用程序的类。
让我们通过创建一个新的Win32项目来研究一个简单的示例。
步骤1-打开Visual Studio,然后单击文件→新建→项目菜单选项。
步骤2-现在您可以看到“新建项目”对话框。

步骤3-在左侧窗格中,选择模板→Visual C++→Win32。
步骤4-在中间窗格中,选择Win32 Project。
步骤5-在“名称”字段中输入项目名称“ MFCWindowDemo”,然后单击“确定”继续。您将看到以下对话框。

步骤6-单击下一步。
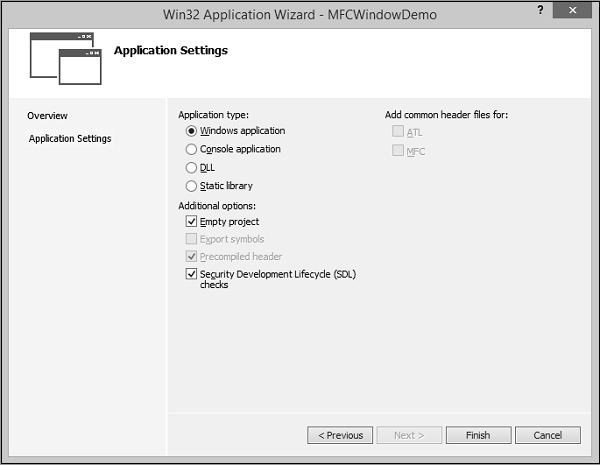
步骤7-选择如上所示对话框中所示的选项,然后单击完成。
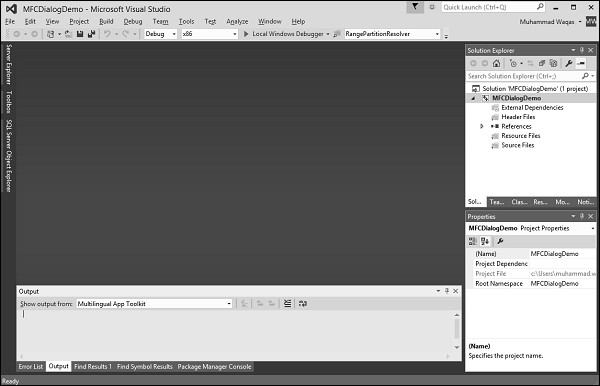
步骤8-创建一个空项目。
步骤9-要使其成为MFC项目,请右键单击该项目,然后选择属性。
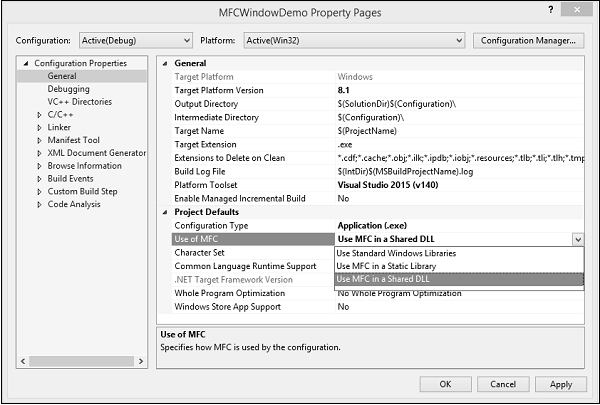
步骤10-在左侧部分,单击配置属性→常规。
步骤11-选择Project Defaults部分中的在共享DLL中使用MFC选项,然后单击OK。
步骤12-添加一个新的源文件。
步骤13-右键单击您的项目,然后选择添加→新建项…
步骤14-在模板部分,单击C++文件(.cpp)。
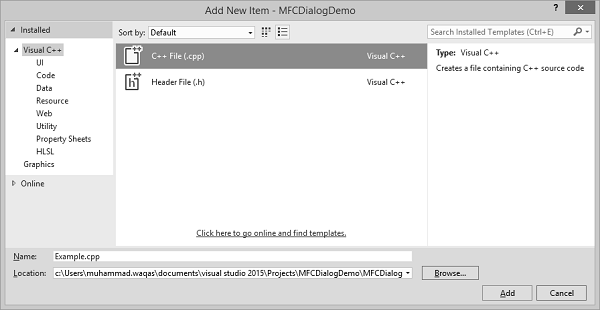
步骤15-将名称设置为示例,然后单击添加。
窗口制作
任何应用程序都有两个主要部分-
- 类
- 框架或窗户
让我们使用以下步骤创建一个窗口-
步骤1-要创建应用程序,我们需要从MFC的CWinApp派生一个类。
#include
class CExample : public CWinApp {
   BOOL InitInstance() {
      return TRUE;
   }
};
步骤2-我们还需要一个框架/窗口来显示应用程序的内容。
步骤3-为此,我们需要添加另一个类,并从MFC的CFrameWnd类派生该类,并实现其构造函数并调用Create()方法,这将创建一个框架/窗口,如以下代码所示。
class CMyFrame : public CFrameWnd {
   public:
      CMyFrame() {
         Create(NULL, _T("MFC Application Tutorial"));
      }
};
步骤4-如您所见,Create()方法需要两个参数,即类名(应作为NULL传递)和窗口名(将在标题栏上显示的字符串) 。
主视窗
创建窗口后,要让应用程序使用它,可以使用指针显示用于创建窗口的类。在这种情况下,指针将为CFrameWnd。若要使用框架窗口,请将其指针分配给CWinThread :: m_pMainWnd成员变量。这是在应用程序的InitInstance()实现中完成的。
步骤1-这是CExample类中InitInstance()的实现。
class CExample : public CWinApp {
   BOOL InitInstance() {
      CMyFrame *Frame = new CMyFrame();  m_pMainWnd = Frame;

      Frame->ShowWindow(SW_NORMAL);
      Frame->UpdateWindow();

      return TRUE;
   }
};
步骤2-以下是Example.cpp文件的完整实现。
#include
class CMyFrame : public CFrameWnd {
public:
CMyFrame() {
Create(NULL, _T("MFC Application Tutorial"));
}
};
class CExample : public CWinApp {
BOOL InitInstance() {
CMyFrame *Frame = new CMyFrame();
m_pMainWnd = Frame;
Frame->ShowWindow(SW_NORMAL);
Frame->UpdateWindow();
return TRUE;
}
};
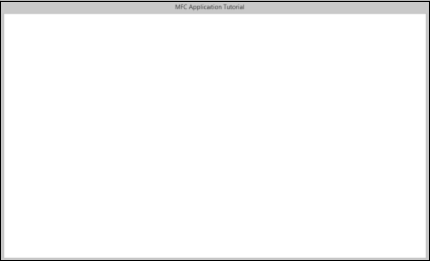
CExample theApp;
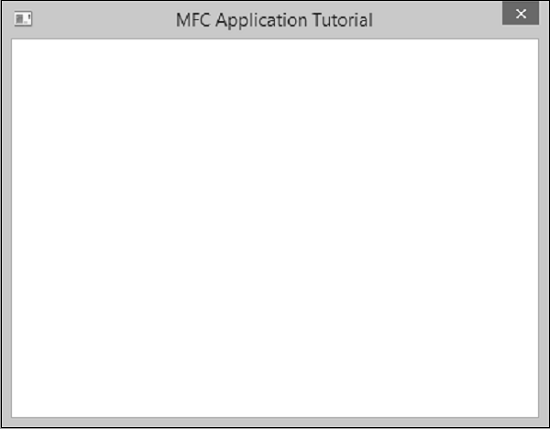
步骤3-当我们运行上述应用程序时,将创建以下窗口。
Windows样式
窗口样式是控制诸如窗口外观,边框,最小化或最大化状态或其他调整大小状态等功能的特征。
| Sr.No. | Style & Description |
|---|---|
| 1 |
WS_BORDER Creates a window that has a border. |
| 2 |
WS_CAPTION Creates a window that has a title bar (implies the WS_BORDER style). Cannot be used with the WS_DLGFRAME style. |
| 3 |
WS_CHILD Creates a child window. Cannot be used with the WS_POPUP style. |
| 4 |
WS_CHILDWINDOW Same as the WS_CHILD style. |
| 5 |
WS_CLIPCHILDREN Excludes the area occupied by child windows when you draw within the parent window. Used when you create the parent window. |
| 6 |
WS_CLIPSIBLINGS Clips child windows relative to each other; that is, when a particular child window receives a paint message, the WS_CLIPSIBLINGS style clips all other overlapped child windows out of the region of the child window to be updated. (If WS_CLIPSIBLINGS is not given and child windows overlap, when you draw within the client area of a child window, it is possible to draw within the client area of a neighboring child window.) For use with the WS_CHILD style only. |
| 7 |
WS_DISABLED Creates a window that is initially disabled. |
| 8 |
WS_DLGFRAME Creates a window with a double border but no title. |
| 9 |
WS_GROUP Specifies the first control of a group of controls in which the user can move from one control to the next with the arrow keys. All controls defined with the WS_GROUP style FALSE after the first control belong to the same group. The next control with the WS_GROUP style starts the next group (that is, one group ends where the next begins). |
| 10 |
WS_HSCROLL Creates a window that has a horizontal scroll bar. |
| 11 |
WS_ICONIC Creates a window that is initially minimized. Same as the WS_MINIMIZE style. |
| 12 |
WS_MAXIMIZE Creates a window of maximum size. |
| 13 |
WS_MAXIMIZEBOX Creates a window that has a Maximize button. |
| 14 |
WS_MINIMIZE Creates a window that is initially minimized. For use with the WS_OVERLAPPED style only. |
| 15 |
WS_MINIMIZEBOX Creates a window that has a Minimize button. |
| 16 |
WS_OVERLAPPED Creates an overlapped window. An overlapped window usually has a caption and a border. |
| 17 |
WS_OVERLAPPED WINDOW Creates an overlapped window with the WS_OVERLAPPED, WS_CAPTION, WS_SYSMENU, WS_THICKFRAME, WS_MINIMIZEBOX, and WS_MAXIMIZEBOX styles. |
| 18 |
WS_POPUP Creates a pop-up window. Cannot be used with the WS_CHILD style. |
| 19 |
WS_POPUPWINDOW Creates a pop-up window with the WS_BORDER, WS_POPUP, and WS_SYSMENU styles. The WS_CAPTION style must be combined with the WS_POPUPWINDOW style to make the Control menu visible. |
| 20 |
WS_SIZEBOX Creates a window that has a sizing border. Same as the WS_THICKFRAME style. |
| 21 |
WS_SYSMENU Creates a window that has a Control-menu box in its title bar. Used only for windows with title bars. |
| 22 |
WS_TABSTOP Specifies one of any number of controls through which the user can move by using the TAB key. The TAB key moves the user to the next control specified by the WS_TABSTOP style. |
| 23 |
WS_THICKFRAME Creates a window with a thick frame that can be used to size the window. |
| 24 |
WS_TILED Creates an overlapped window. An overlapped window has a title bar and a border. Same as the WS_OVERLAPPED style. |
| 25 |
WS_TILEDWINDOW Creates an overlapped window with the WS_OVERLAPPED, WS_CAPTION, WS_SYSMENU, WS_THICKFRAME, WS_MINIMIZEBOX, and WS_MAXIMIZEBOX styles. Same as the WS_OVERLAPPEDWINDOW style. |
| 26 |
WS_VISIBLE Creates a window that is initially visible. |
| 27 |
WS_VSCROLL Creates a window that has a vertical scroll bar. |
步骤1-让我们看一个简单的示例,在其中添加一些样式。创建窗口以显示给用户后,我们可以对其应用WS_VISIBLE样式,此外,我们还将添加WS_OVERLAPPED样式。这是一个实现-
class CMyFrame : public CFrameWnd {
   public:
      CMyFrame() {
         Create(NULL, _T("MFC Application Tutorial"), WS_VISIBLE | WS_OVERLAPPED);
      }
};
步骤2-运行此应用程序时,将创建以下窗口。

现在您可以看到最小化,最大化和关闭选项不再出现。
Windows位置
为了定位监视器上显示的内容,计算机使用类似于笛卡尔坐标系的坐标系,但是原点位于屏幕的左上角。使用此坐标系,可以通过其与水平轴和垂直轴屏幕左上角的距离来定位任何点。
Win32库提供了一种称为POINT的结构,定义如下:
typedef struct tagPOINT {
   LONG x;
   LONG y;
} POINT;
-
“ x”成员变量是从屏幕左边框到该点的距离。
-
“ y”变量代表从屏幕顶部边界到该点的距离。
-
除了Win32的POINT结构外,Microsoft基础类(MFC)库还提供CPoint类。
-
这提供了与POINT结构相同的功能。作为C++类,它增加了定位点所需的更多功能。它提供了两个构造函数。
CPoint();
CPoint(int X, int Y);
视窗尺寸
当使用点在屏幕上定位对象时,每个窗口都有一个大小。大小提供了与对象相关的两个度量。
- 对象的宽度。
- 对象的高度。
Win32库使用如下定义的SIZE结构-
typedef struct tagSIZE {
   int cx;
   int cy;
} SIZE;
除了Win32的SIZE结构外,MFC还提供了CSize类。此类具有与SIZE相同的功能,但增加了C++类的功能。它提供了五个构造函数,可让您以任何选择的方式创建size变量。
CSize();
CSize(int initCX, int initCY);
CSize(SIZE initSize);
CSize(POINT initPt);
CSize(DWORD dwSize);
窗户尺寸
当显示窗口时,可以通过其相对于显示器边框的位置在屏幕上进行识别。窗口也可以通过其宽度和高度来标识。这些特征由Create()方法的rect参数指定或控制。该参数是一个可以通过Win32 RECT结构创建的矩形。
typedef struct _RECT {
   LONG left;
   LONG top;
   LONG right;
   LONG bottom;
} RECT, *PRECT;
除了Win32的RECT结构外,MFC还提供CRect类,该类具有以下构造函数-
CRect();
CRect(int l, int t, int r, int b);
CRect(const RECT& srcRect);
CRect(LPCRECT lpSrcRect);
CRect(POINT point, SIZE size);
CRect(POINT topLeft, POINT bottomRight);
让我们看一个简单的示例,在该示例中,我们将指定窗口的位置和大小
class CMyFrame : public CFrameWnd {
   public:
      CMyFrame() {
         Create(NULL, _T("MFC Application Tutorial"), WS_SYSMENU, CRect(90, 120,
            550, 480));
      }
};
当您运行此应用程序时,将在屏幕的左上角创建以下窗口,如前两个参数在CRect构造函数中所指定。最后两个参数是Window的大小。

Windows家长
在现实世界中,许多应用程序是由不同的Windows组成的。当应用程序使用各种Windows时,大多数对象都依赖于特定的Windows。它可以是创建的第一个窗口,也可以是您指定的另一个窗口。这样的窗口称为父窗口。所有其他窗口直接或间接依赖于它。
-
如果要创建的窗口是另一个窗口的依赖者,则可以指定它具有父窗口。
-
这是通过CFrameWnd :: Create()方法的pParentWnd参数完成的。
-
如果Window没有父项,请为参数传递NULL值。
让我们看一个只有一个Window且没有父Window可用的示例,因此我们将传递带有NULL值的参数,如以下代码所示-
class CMyFrame : public CFrameWnd {
   public:
      CMyFrame() {
         Create(NULL, _T("MFC Application Tutorial"), WS_SYSMENU,
            CRect(90, 120, 550, 480), NULL);
      }
};
当您运行上面的应用程序时,您会看到相同的输出。