- ASP.NET Core-配置(1)
- ASP.NET Core-配置
- ASP.NET Core-身份概述
- ASP.NET Core-身份概述(1)
- ASP.NET Core-身份迁移(1)
- ASP.NET Core-身份迁移
- asp.net core react自定义身份登录 (1)
- ASP.NET-配置
- ASP.NET-配置(1)
- asp.net core react自定义身份登录 - 任何代码示例
- ASP.NET Core-新项目(1)
- ASP.NET Core-新项目
- ASP.NET Core教程
- ASP.NET Core教程(1)
- ASP.NET Core-视图(1)
- ASP.NET Core-视图
- 如何在 asp.net core 中配置会话超时 - C# 代码示例
- ASP.NET Core-异常
- ASP.NET Core-异常(1)
- 讨论ASP.NET Core(1)
- 讨论ASP.NET Core
- ASP.NET Core-概述
- ASP.NET Core-概述(1)
- ASP.NET Core-路由
- ASP.NET Core-路由(1)
- ajax asp.net core - C# (1)
- ASP.NET Core-创建用户
- ASP.NET Core-创建用户(1)
- asp.net core 3.1 路由 - C# 代码示例
📅 最后修改于: 2020-11-21 05:04:20 🧑 作者: Mango
在本章中,我们将安装和配置Identity框架,这仅需要一点工作。如果转到Visual Studio并创建一个新的ASP.NET Core应用程序,然后选择完整的Web应用程序模板,并将身份验证设置为单个用户帐户,则该新项目将包括为您设置的Identity框架的所有内容。

我们从一个空项目开始。现在,我们将从头开始建立Identity框架,这是学习完整应用程序模板中所有部分的一种好方法,因为如果您没有仔细研究所有代码,可能会造成混淆。
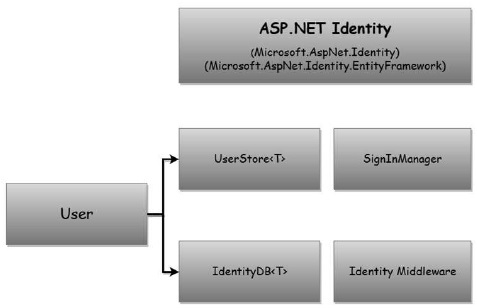
首先,我们需要安装依赖项,即Microsoft.AspNet.Identity 。我们将通过安装Microsoft.AspNet.Identity.EntityFramework进行操作,然后实现与实体框架一起使用的Identity框架。
-
如果我们依赖Identity.EntityFramework,则该包包括Identity包。
-
如果您构建自己的数据存储,则只能使用Identity包。
-
安装依赖项后,我们可以创建一个Customer User类,其中包含我们要存储的有关用户的所有信息。
-
对于此应用程序,我们将从Identity框架提供的类中继承,该类将为我们提供所有必要条件,例如Username属性和用于存储哈希密码的位置。
-
我们还需要修改FirstAppDemoDbContext类以从Identity框架的IdentityDb类继承。
-
IdentityDb为我们提供了我们需要使用实体框架存储为用户信息的所有内容。一旦设置了User类和DBContext ,就需要使用Startup类的ConfigureServices方法将Identity服务配置到应用程序中。
-
就像当我们需要添加支持MVC框架的服务时一样,身份框架也需要向应用程序中添加服务才能正常工作。
-
这些服务包括UserStore服务和SignInManager之类的服务。
-
我们将把这些服务注入我们的控制器中,以在适当的时候创建用户并发布Cookie。
-
最后,在启动Configure方法期间,我们将需要添加Identity中间件。
-
该中间件不仅有助于将cookie转换为用户身份,还可以确保用户不会看到带有401响应的空白页面。
现在让我们按照下面给出的步骤进行操作。
步骤1-我们需要在Identity框架上添加依赖项。让我们将Microsoft.AspNet.Identity.EntityFramework依赖项添加到project.json文件中。这将包括我们需要的所有其他必要的身份软件包。
{
   "version": "1.0.0-*",
   "compilationOptions": {
      "emitEntryPoint": true
   },

   "dependencies": {
      "Microsoft.AspNet.Mvc":  "6.0.0-rc1-final",
      "Microsoft.AspNet.Diagnostics": "1.0.0-rc1-final",
      "Microsoft.AspNet.IISPlatformHandler": "1.0.0-rc1-final",
      "Microsoft.AspNet.Server.Kestrel": "1.0.0-rc1-final",
      "Microsoft.AspNet.StaticFiles": "1.0.0-rc1-final",
      "EntityFramework.MicrosoftSqlServer": "7.0.0-rc1-final",
      "EntityFramework.Commands": "7.0.0-rc1-final",
      "Microsoft.AspNet.Mvc.TagHelpers": "6.0.0-rc1-final",
      "Microsoft.AspNet.Identity.EntityFramework": "3.0.0-rc1-final"
   },

   "commands": {
      "web": "Microsoft.AspNet.Server.Kestrel",
      "ef": "EntityFramework.Commands"
   },

   "frameworks": {
      "dnx451": { },
      "dnxcore50": { }
   },

   "exclude": [
      "wwwroot",
      "node_modules"
   ],

   "publishExclude": [
      "**.user",
      "**.vspscc"
   ]
}
步骤2-保存此文件。 Visual Studio将还原软件包,现在,我们可以添加User类。让我们通过右键单击Models文件夹并选择Add→Class来添加User类。
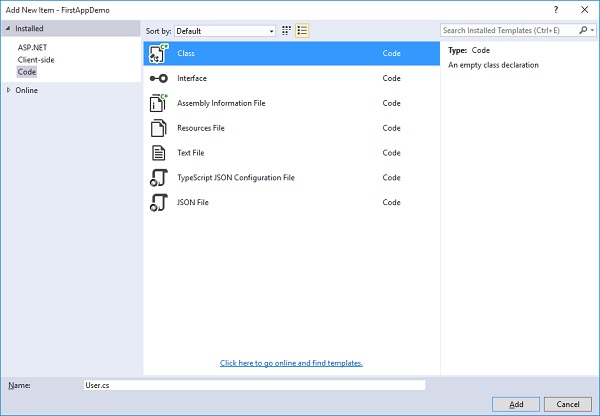
将该类称为“用户”,然后单击“添加”按钮,如上面的屏幕截图所示。在此类中,您可以添加属性以保存要存储的有关用户的任何信息。
步骤3-让我们从Identity框架提供的类派生User类。 Identity.EntityFramework命名空间中的是IdentityUser类。
using Microsoft.AspNet.Identity.EntityFramework;

using System;
using System.Collections.Generic;
using System.Linq;
using System.Threading.Tasks;

namespace FirstAppDemo.Models {
   public class User : IdentityUser {
   }
}
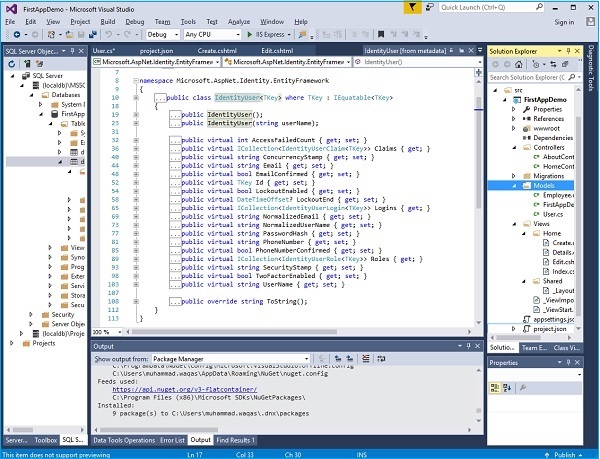
步骤4-现在让我们转到IdentityUser,将光标放在该符号上,然后按F12键以查看Visual Studio的元数据视图。
#region Assembly Microsoft.AspNet.Identity.EntityFramework, Version = 3.0.0.0,

namespace Microsoft.AspNet.Identity.EntityFramework {
   public class IdentityUser : IdentityUser {
      public IdentityUser();
      public IdentityUser(string userName);
   }
}
步骤5-您可以看到IdentityUser是从字符串的IdentityUser派生的。您可以通过派生IdentityUser并指定我们的通用类型参数来更改主键的类型。您还可以使用主键存储事物,主键最好是整数值。
步骤6-现在让我们将光标放在字符串的IdentityUser上,然后再次按F12进入元数据视图。
现在,您可以默认查看与用户有关的所有信息。该信息包括以下内容-
-
我们将在此应用程序中不使用但可以使用的字段。
-
身份框架可以跟踪特定用户失败的登录尝试次数,并可以在一段时间内锁定该帐户。
-
存储密码哈希,电话号码的字段。我们将使用的两个重要字段是PasswordHash和UserName。
-
我们还将隐式使用用户的主键和ID属性。如果需要查询特定用户,也可以使用该属性。
步骤7-现在,我们需要确保用户包含在我们的DBContext中。因此,让我们打开应用程序中拥有的FirstAppDemoDBContext ,而不是直接从内置的Entity Framework基类DBContext派生它,我们现在需要从IdentityDbContext派生它。
using Microsoft.AspNet.Identity.EntityFramework;
using Microsoft.Data.Entity;

namespace FirstAppDemo.Models {
   public class FirstAppDemoDbContext : IdentityDbContext {
      public DbSet Employees { get; set; }

      protected override void OnConfiguring(DbContextOptionsBuilder optionsBuilder) {
         optionsBuilder.UseSqlServer("Data Source = (localdb)\\MSSQLLocalDB;
            Initial Catalog = FirstAppDemo;Integrated Security = True;
            Connect Timeout = 30;Encrypt = False;TrustServerCertificate = True;
            ApplicationIntent = ReadWrite;MultiSubnetFailover = False");
      }
   }
}
步骤8 -IdentityDbContext类也位于Microsoft.AspNet.Identity.EntityFramework命名空间中,我们可以指定应存储的用户类型。这样,我们添加到User类的任何其他字段都将进入数据库。
-
IdentityDbContext带来了附加的DbSet,不仅用于存储用户,而且还提供有关用户角色和用户声明的信息。
-
现在,我们的User类已经准备就绪。我们的FirstAppDemoDbContext类被配置为与Identity框架一起使用。
-
现在,我们可以进入Configure和ConfigureServices来设置身份框架。
步骤9-现在让我们从ConfigureServices开始。除了我们的MVC服务和实体框架服务之外,我们还需要添加身份服务。这将添加Identity框架执行工作所依赖的所有服务。
public void ConfigureServices(IServiceCollection services) {
   services.AddMvc();

   services.AddEntityFramework()
      .AddSqlServer()
      .AddDbContext
      (option => option.UseSqlServer(Configuration["database:connection"]));

   services.AddIdentity()
      .AddEntityFrameworkStores();
}
-
AddIdentity方法采用两个通用的类型参数-用户实体的类型和角色实体的类型。
-
这两个通用类型参数是我们用户的类型-我们刚刚创建的User类和我们要使用的Role类。现在,我们将使用内置的IdentityRole。此类位于EntityFramework命名空间中。
-
当我们使用带有身份的实体框架时,我们还需要调用第二种方法-AddEntityFrameworkStores。
-
AddEntityFrameworkStores方法将配置诸如UserStore之类的服务,该服务用于创建用户并验证其密码。
步骤10-以下两行是我们为应用程序配置服务所需的全部。
services.AddIdentity()
   .AddEntityFrameworkStores();
步骤11-我们还需要添加中间件。插入中间件的位置很重要,因为如果我们在管道中插入中间件的时间太晚,它将永远没有机会处理请求。
而且,如果我们需要在MVC控制器内部进行授权检查,则需要在MVC框架之前插入身份中间件,以确保成功处理Cookie和401错误。
public void Configure(IApplicationBuilder app) {
   app.UseIISPlatformHandler();

   app.UseDeveloperExceptionPage();
   app.UseRuntimeInfoPage();

   app.UseFileServer();

   app.UseIdentity();
   app.UseMvc(ConfigureRoute);

   app.Run(async (context) => {
      var msg = Configuration["message"];
      await context.Response.WriteAsync(msg);
   });
}
步骤12-插入中间件的位置就是我们添加身份中间件的位置。以下是Startup.cs文件的完整实现。
using Microsoft.AspNet.Builder;
using Microsoft.AspNet.Hosting;
using Microsoft.AspNet.Http;

using Microsoft.Extensions.DependencyInjection;
using Microsoft.Extensions.Configuration;

using FirstAppDemo.Services;
using Microsoft.AspNet.Routing;
using System;

using FirstAppDemo.Entities;
using Microsoft.Data.Entity;

using FirstAppDemo.Models;
using Microsoft.AspNet.Identity.EntityFramework;

namespace FirstAppDemo {
   public class Startup {
      public Startup() {
         var builder = new ConfigurationBuilder()
            .AddJsonFile("AppSettings.json");
         Configuration = builder.Build();
      }
      public IConfiguration Configuration { get; set; }

      // This method gets called by the runtime.
      // Use this method to add services to the container.
      // For more information on how to configure your application,
      // visit http://go.microsoft.com/fwlink/?LinkID = 398940
      public void ConfigureServices(IServiceCollection services) {
         services.AddMvc();
            services.AddEntityFramework()
            .AddSqlServer()
            .AddDbContext(option =>
            option.UseSqlServer(Configuration["database:connection"]));

         services.AddIdentity()
            .AddEntityFrameworkStores();
      }
      // This method gets called by the runtime.
      // Use this method to configure the HTTP request pipeline.
      public void Configure(IApplicationBuilder app) {
         app.UseIISPlatformHandler();
         app.UseDeveloperExceptionPage();
         app.UseRuntimeInfoPage();
         app.UseFileServer();
         app.UseIdentity();
         app.UseMvc(ConfigureRoute);

         app.Run(async (context) => {
            var msg = Configuration["message"];
            await context.Response.WriteAsync(msg);
         });
      }
      private void ConfigureRoute(IRouteBuilder routeBuilder) {
         //Home/Index
         routeBuilder.MapRoute("Default", "{controller=Home}/{action=Index}/{id?}");
      }
      // Entry point for the application.
      public static void Main(string[] args) => WebApplication.Run(args);
   }
}
步骤13-现在让我们继续构建应用程序。在下一章中,我们需要添加另一个Entity Framework迁移,以确保我们的SQL Server数据库中具有Identity模式。