Python|使用 Keras 进行图像分类
先决条件:使用 CNN 的图像分类器
图像分类是一种使用以下方法将图像分类为各自类别的方法:
- 从头开始训练一个小型网络
- 使用 VGG16 微调模型的顶层
让我们讨论如何从头开始训练模型并对包含汽车和飞机的数据进行分类。
训练数据:训练数据包含每辆汽车和飞机的 200 张图像,即训练数据集中共有 400 张图像
测试数据:测试数据包含每辆汽车和飞机的 50 张图像,即测试数据集中共有 100 张图像
要下载完整的数据集,请单击此处。
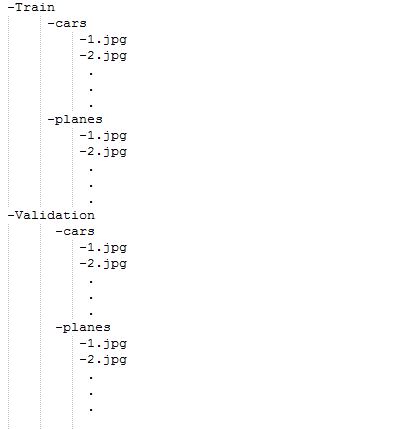
模型描述:在开始使用模型之前,首先准备数据集及其排列。请看下面给出的图像:

为了提供数据集文件夹,它们应该仅以这种格式制作和提供。所以现在,让我们从模型开始:
为了训练模型,我们不需要大型高端机器和 GPU,我们也可以使用 CPU。首先,在给定的代码中包含以下库:
Python3
# Importing all necessary libraries
from keras.preprocessing.image import ImageDataGenerator
from keras.models import Sequential
from keras.layers import Conv2D, MaxPooling2D
from keras.layers import Activation, Dropout, Flatten, Dense
from keras import backend as K

img_width, img_height = 224, 224
Python3
train_data_dir = 'v_data/train'
validation_data_dir = 'v_data/test'
nb_train_samples =400
nb_validation_samples = 100
epochs = 10
batch_size = 16
Python3
if K.image_data_format() == 'channels_first':
    input_shape = (3, img_width, img_height)
else:
    input_shape = (img_width, img_height, 3)
Python3
model = Sequential()
model.add(Conv2D(32, (2, 2), input_shape=input_shape))
model.add(Activation('relu'))
model.add(MaxPooling2D(pool_size=(2, 2)))

model.add(Conv2D(32, (2, 2)))
model.add(Activation('relu'))
model.add(MaxPooling2D(pool_size=(2, 2)))

model.add(Conv2D(64, (2, 2)))
model.add(Activation('relu'))
model.add(MaxPooling2D(pool_size=(2, 2)))

model.add(Flatten())
model.add(Dense(64))
model.add(Activation('relu'))
model.add(Dropout(0.5))
model.add(Dense(1))
model.add(Activation('sigmoid'))
Python3
model.compile(loss='binary_crossentropy',
              optimizer='rmsprop',
              metrics=['accuracy'])
Python3
train_datagen = ImageDataGenerator(
    rescale=1. / 255,
    shear_range=0.2,
    zoom_range=0.2,
    horizontal_flip=True)

test_datagen = ImageDataGenerator(rescale=1. / 255)

train_generator = train_datagen.flow_from_directory(
    train_data_dir,
    target_size=(img_width, img_height),
    batch_size=batch_size,
    class_mode='binary')

validation_generator = test_datagen.flow_from_directory(
    validation_data_dir,
    target_size=(img_width, img_height),
    batch_size=batch_size,
    class_mode='binary')

model.fit_generator(
    train_generator,
    steps_per_epoch=nb_train_samples // batch_size,
    epochs=epochs,
    validation_data=validation_generator,
    validation_steps=nb_validation_samples // batch_size)
Python3
model.save_weights('model_saved.h5')Python3
from keras.models import load_model
from keras.preprocessing.image import load_img
from keras.preprocessing.image import img_to_array
from keras.applications.vgg16 import preprocess_input
from keras.applications.vgg16 import decode_predictions
from keras.applications.vgg16 import VGG16
import numpy as np

from keras.models import load_model

model = load_model('saved_model.h5')

image = load_img('v_data/test/planes/5.jpg', target_size=(227, 227))
img = np.array(image)
img = img / 255.0
img = img.reshape(1,227,227,3)
label = model.predict_classes(img)
print("Predicted Class (0 - Cars , 1- Planes): ", label[0][0])
数据集中的每个图像的大小为 224*224。
Python3
train_data_dir = 'v_data/train'
validation_data_dir = 'v_data/test'
nb_train_samples =400
nb_validation_samples = 100
epochs = 10
batch_size = 16
这里,train_data_dir 是训练数据集目录。 validation_data_dir是验证数据的目录。 nb_train_samples是训练样本的总数。 nb_validation_samples是验证样本的总数。
检查图像格式:
Python3
if K.image_data_format() == 'channels_first':
    input_shape = (3, img_width, img_height)
else:
    input_shape = (img_width, img_height, 3)
这部分是检查数据格式,即 RGB 通道是第一个还是最后一个,所以无论它是什么,模型都会先检查,然后相应地输入输入形状。
Python3
model = Sequential()
model.add(Conv2D(32, (2, 2), input_shape=input_shape))
model.add(Activation('relu'))
model.add(MaxPooling2D(pool_size=(2, 2)))

model.add(Conv2D(32, (2, 2)))
model.add(Activation('relu'))
model.add(MaxPooling2D(pool_size=(2, 2)))

model.add(Conv2D(64, (2, 2)))
model.add(Activation('relu'))
model.add(MaxPooling2D(pool_size=(2, 2)))

model.add(Flatten())
model.add(Dense(64))
model.add(Activation('relu'))
model.add(Dropout(0.5))
model.add(Dense(1))
model.add(Activation('sigmoid'))
关于上面使用的以下术语:
Conv2D is the layer to convolve the image into multiple images
Activation is the activation function.
MaxPooling2D is used to max pool the value from the given size matrix and same is used for the next 2 layers. then, Flatten is used to flatten the dimensions of the image obtained after convolving it.
Dense is used to make this a fully connected model and is the hidden layer.
Dropout is used to avoid overfitting on the dataset.
Dense is the output layer contains only one neuron which decide to which category image belongs.
编译函数:
Python3
model.compile(loss='binary_crossentropy',
              optimizer='rmsprop',
              metrics=['accuracy'])
这里使用了编译函数,涉及损失、优化器和指标的使用。这里使用的损失函数是 binary_crossentropy,使用的优化器是rmsprop 。
使用数据生成器:
Python3
train_datagen = ImageDataGenerator(
    rescale=1. / 255,
    shear_range=0.2,
    zoom_range=0.2,
    horizontal_flip=True)

test_datagen = ImageDataGenerator(rescale=1. / 255)

train_generator = train_datagen.flow_from_directory(
    train_data_dir,
    target_size=(img_width, img_height),
    batch_size=batch_size,
    class_mode='binary')

validation_generator = test_datagen.flow_from_directory(
    validation_data_dir,
    target_size=(img_width, img_height),
    batch_size=batch_size,
    class_mode='binary')

model.fit_generator(
    train_generator,
    steps_per_epoch=nb_train_samples // batch_size,
    epochs=epochs,
    validation_data=validation_generator,
    validation_steps=nb_validation_samples // batch_size)
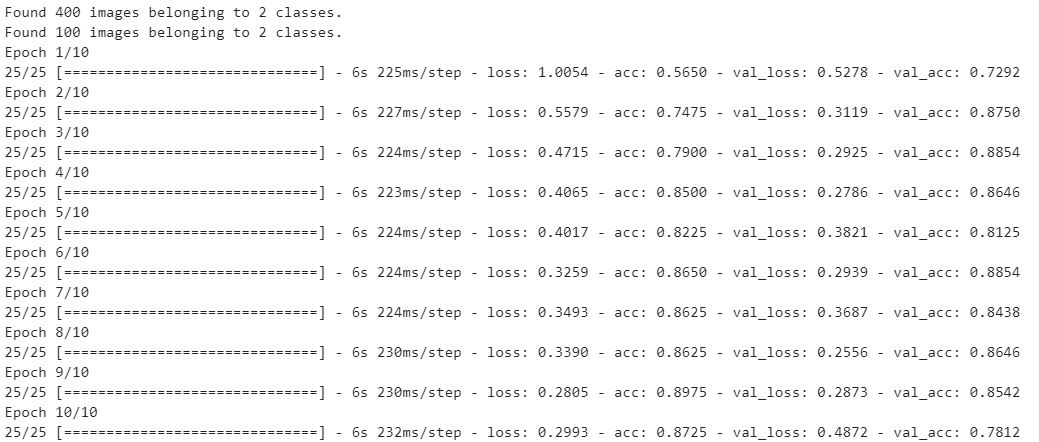
现在, dataGenerator部分出现在图中。我们在其中使用过:
ImageDataGenerator that rescales the image, applies shear in some range, zooms the image and does horizontal flipping with the image. This ImageDataGenerator includes all possible orientation of the image.
train_datagen.flow_from_directory is the function that is used to prepare data from the train_dataset directory Target_size specifies the target size of the image.
test_datagen.flow_from_directory is used to prepare test data for the model and all is similar as above.
fit_generator is used to fit the data into the model made above, other factors used are steps_per_epochs tells us about the number of times the model will execute for the training data.
epochs tells us the number of times model will be trained in forward and backward pass.
validation_data is used to feed the validation/test data into the model.
validation_steps denotes the number of validation/test samples.
Python3
model.save_weights('model_saved.h5')
最后,我们还可以保存模型。
模型输出:

加载和预测
- 使用“load_model”加载模型
- 将图像转换为 Numpy 数组以传递到 ML 模型
- 打印模型的预测输出。
Python3
from keras.models import load_model
from keras.preprocessing.image import load_img
from keras.preprocessing.image import img_to_array
from keras.applications.vgg16 import preprocess_input
from keras.applications.vgg16 import decode_predictions
from keras.applications.vgg16 import VGG16
import numpy as np

from keras.models import load_model

model = load_model('saved_model.h5')

image = load_img('v_data/test/planes/5.jpg', target_size=(227, 227))
img = np.array(image)
img = img / 255.0
img = img.reshape(1,227,227,3)
label = model.predict_classes(img)
print("Predicted Class (0 - Cars , 1- Planes): ", label[0][0])
输出 :
Predicted Class (0 – Cars , 1- Planes): 1