使用迁移学习进行多类图像分类
图像分类是监督机器学习问题之一,旨在将数据集的图像分类为各自的类别或标签。各种狗品种的图像分类是一个经典的图像分类问题,在本文中,我们将通过使用预训练模型InceptionResNetV2和 定制它。
让我们首先讨论一些术语。
迁移学习:迁移学习是一种流行的深度学习方法,它遵循使用在某些任务中学到的知识并应用它来解决相关目标任务的问题的方法。因此,我们不是从头开始创建神经网络,而是“转移”学习到的特征,这些特征基本上是网络的“权重”。为了实现迁移学习的概念,我们使用了“预训练模型”。
预训练模型:预训练模型是在非常大的数据集上训练的深度学习模型,由其他希望为该机器学习社区做出贡献以解决类似问题的开发人员开发和提供。它包含代表训练数据集特征的神经网络的偏差和权重。学习到的特征总是可以转移的。例如,在大型花卉图像数据集上训练的模型将包含学习的特征,例如角、边缘、形状、颜色等。
InceptionResNetV2: InceptionResNetV2是一个深度为164层的卷积神经网络,在ImageNet数据库中的数百万张图片上进行训练,可以将图片分为花卉、动物等1000多个类别,图片的输入大小为299-由-299。
数据集描述:
- The dataset used comprises of 120 breeds of dogs in total.
- Each image has a file name which is its unique id.
- Train dataset ( train.zip ): contains 10,222 images which are to be used for training our model
- Test dataset (test.zip ): contains 10,357 images which we have to classify into the respective categories or labels.
- labels.csv: contains breed names corresponding to the image id.
- sample_submission.csv: contains correct form of sample submission to be made
All the above mentioned files can be downloaded from here.
NOTE: For better performance use GPU.
我们首先导入所有必要的库。
Python3
import numpy as np
import pandas as pd
import seaborn as sns
import matplotlib.pyplot as plt

from sklearn.metrics import classification_report, confusion_matrix

# deep learning libraries
import tensorflow as tf
import keras
from keras.preprocessing.image import ImageDataGenerator
from tensorflow.keras import applications
from keras.models import Sequential, load_model
from keras.layers import Conv2D, MaxPooling2D, GlobalAveragePooling2D, Flatten, Dense, Dropout
from keras.preprocessing import image

import cv2

import warnings
warnings.filterwarnings('ignore')
Python3
from google.colab import drive
drive.mount("/content/drive")

# datasets
labels = pd.read_csv("/content/drive/My Drive/dog/labels.csv")
sample = pd.read_csv('/content/drive/My Drive/dog/sample_submission.csv')

# folders paths
train_path = "/content/drive/MyDrive/dog/train"
test_path = "/content/drive/MyDrive/dog/test"
Python3
labels.head()Python3
def to_jpg(id):
    return id+".jpg"


labels['id'] = labels['id'].apply(to_jpg)
sample['id'] = sample['id'].apply(to_jpg)
Python3
# Data agumentation and pre-processing using tensorflow
gen = ImageDataGenerator(
                  rescale=1./255.,
                  horizontal_flip = True,
                  validation_split=0.2 # training: 80% data, validation: 20% data
                 )

train_generator = gen.flow_from_dataframe(
    labels, # dataframe
    directory = train_path, # images data path / folder in which images are there
    x_col = 'id',
    y_col = 'breed',
    subset="training",
    color_mode="rgb",
    target_size = (331,331), # image height , image width
    class_mode="categorical",
    batch_size=32,
    shuffle=True,
    seed=42,
)


validation_generator = gen.flow_from_dataframe(
    labels, # dataframe
    directory = train_path, # images data path / folder in which images are there
    x_col = 'id',
    y_col = 'breed',
    subset="validation",
    color_mode="rgb",
    target_size = (331,331), # image height , image width
    class_mode="categorical",
    batch_size=32,
    shuffle=True,
    seed=42,
)
Python3
x,y = next(train_generator)
x.shape # input shape of one record is (331,331,3) , 32: is the batch size
Python3
a = train_generator.class_indices
class_names = list(a.keys()) # storing class/breed names in a list

def plot_images(img,labels):
    plt.figure(figsize=[15,10])
    for i in range(25):
        plt.subplot(5,5,i+1)
        plt.imshow(img[i])
        plt.title(class_names[np.argmax(labels[i])])
        plt.axis('off')

 plot_images(x,y)
Python3
# load the InceptionResNetV2 architecture with imagenet weights as base
base_model = tf.keras.applications.InceptionResNetV2(
                     include_top=False,
                     weights='imagenet',
                     input_shape=(331,331,3)
                     )

base_model.trainable=False
# For freezing the layer we make use of layer.trainable = False
# means that its internal state will not change during training.
# model's trainable weights will not be updated during fit(),
# and also its state updates will not run.

model = tf.keras.Sequential([
        base_model,
        tf.keras.layers.BatchNormalization(renorm=True),
        tf.keras.layers.GlobalAveragePooling2D(),
        tf.keras.layers.Dense(512, activation='relu'),
        tf.keras.layers.Dense(256, activation='relu'),
        tf.keras.layers.Dropout(0.5),
        tf.keras.layers.Dense(128, activation='relu'),
        tf.keras.layers.Dense(120, activation='softmax')
    ])
Python3
model.compile(optimizer='Adam',loss='categorical_crossentropy',metrics=['accuracy'])
# categorical cross entropy is taken since its used as a loss function for
# multi-class classification problems where there are two or more output labels.
# using Adam optimizer for better performance
# other optimizers such as sgd can also be used depending upon the model
Python3
model.summary()Python3
early = tf.keras.callbacks.EarlyStopping( patience=10,
                                          min_delta=0.001,
                                          restore_best_weights=True)
# early stopping call back
Python3
batch_size=32
STEP_SIZE_TRAIN = train_generator.n//train_generator.batch_size
STEP_SIZE_VALID = validation_generator.n//validation_generator.batch_size

# fit model
history = model.fit(train_generator,
                    steps_per_epoch=STEP_SIZE_TRAIN,
                    validation_data=validation_generator,
                    validation_steps=STEP_SIZE_VALID,
                    epochs=25,
                    callbacks=[early]
Python3
model.save("Model.h5")Python3
# store results
acc = history.history['accuracy']
val_acc = history.history['val_accuracy']
loss = history.history['loss']
val_loss = history.history['val_loss']


# plot results
# accuracy
plt.figure(figsize=(10, 16))
plt.rcParams['figure.figsize'] = [16, 9]
plt.rcParams['font.size'] = 14
plt.rcParams['axes.grid'] = True
plt.rcParams['figure.facecolor'] = 'white'
plt.subplot(2, 1, 1)
plt.plot(acc, label='Training Accuracy')
plt.plot(val_acc, label='Validation Accuracy')
plt.legend(loc='lower right')
plt.ylabel('Accuracy')
plt.title(f'\nTraining and Validation Accuracy. \nTrain Accuracy:
          {str(acc[-1])}\nValidation Accuracy: {str(val_acc[-1])}')
Python3
# loss
plt.subplot(2, 1, 2)
plt.plot(loss, label='Training Loss')
plt.plot(val_loss, label='Validation Loss')
plt.legend(loc='upper right')
plt.ylabel('Cross Entropy')
plt.title(f'Training and Validation Loss. \nTrain Loss:
          {str(loss[-1])}\nValidation Loss: {str(val_loss[-1])}')
plt.xlabel('epoch')
plt.tight_layout(pad=3.0)
plt.show()
Python3
accuracy_score = model.evaluate(validation_generator)
print(accuracy_score)
print("Accuracy: {:.4f}%".format(accuracy_score[1] * 100))

print("Loss: ",accuracy_score[0])
Python3
test_img_path = test_path+"/000621fb3cbb32d8935728e48679680e.jpg"

img = cv2.imread(test_img_path)
resized_img = cv2.resize(img, (331, 331)).reshape(-1, 331, 331, 3)/255

plt.figure(figsize=(6,6))
plt.title("TEST IMAGE")
plt.imshow(resized_img[0])
Python3
predictions = []

for image in sample.id:
    img = tf.keras.preprocessing.image.load_img(test_path +'/'+ image)
    img = tf.keras.preprocessing.image.img_to_array(img)
    img = tf.keras.preprocessing.image.smart_resize(img, (331, 331))
    img = tf.reshape(img, (-1, 331, 331, 3))
    prediction = model.predict(img/255)
    predictions.append(np.argmax(prediction))

my_submission = pd.DataFrame({'image_id': sample.id, 'label':  predictions})
my_submission.to_csv('submission.csv', index=False)

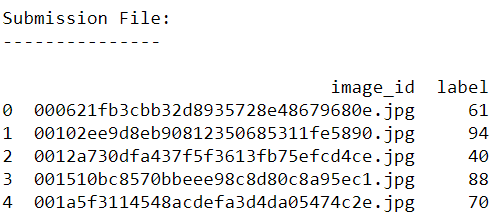
# Submission file ouput
print("Submission File: \n---------------\n")
print(my_submission.head()) # Displaying first five predicted output
加载数据集和图像文件夹
蟒蛇3
from google.colab import drive
drive.mount("/content/drive")

# datasets
labels = pd.read_csv("/content/drive/My Drive/dog/labels.csv")
sample = pd.read_csv('/content/drive/My Drive/dog/sample_submission.csv')

# folders paths
train_path = "/content/drive/MyDrive/dog/train"
test_path = "/content/drive/MyDrive/dog/test"
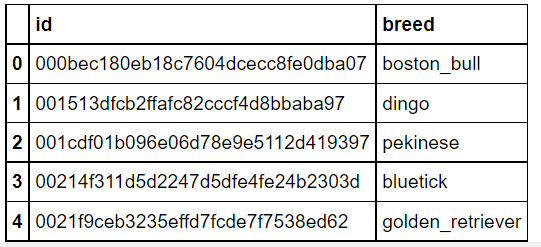
显示标签数据集的前五条记录以查看其属性。
蟒蛇3
labels.head()
输出:
为每个 id 添加“.jpg”扩展名
这样做是为了从文件夹中获取图像,因为图像名称和 ID 是相同的,因此添加.jpg扩展名将帮助我们轻松检索图像。
蟒蛇3
def to_jpg(id):
    return id+".jpg"


labels['id'] = labels['id'].apply(to_jpg)
sample['id'] = sample['id'].apply(to_jpg)
增强数据:
这是一种预处理技术,我们用现有图像的转换版本来扩充现有数据集。我们可以执行缩放、旋转、增加亮度和其他仿射变换。这是一种有用的技术,因为它可以帮助模型很好地概括看不见的数据。
ImageDataGenerator 类用于此目的,它提供了数据的实时扩充。
下面使用的几个参数的描述:
- rescale : 按给定因子重新调整值
- 水平翻转:随机水平翻转输入。
- validation_split :这是为验证保留的图像的分数(在 0 和 1 之间)。
蟒蛇3
# Data agumentation and pre-processing using tensorflow
gen = ImageDataGenerator(
                  rescale=1./255.,
                  horizontal_flip = True,
                  validation_split=0.2 # training: 80% data, validation: 20% data
                 )

train_generator = gen.flow_from_dataframe(
    labels, # dataframe
    directory = train_path, # images data path / folder in which images are there
    x_col = 'id',
    y_col = 'breed',
    subset="training",
    color_mode="rgb",
    target_size = (331,331), # image height , image width
    class_mode="categorical",
    batch_size=32,
    shuffle=True,
    seed=42,
)


validation_generator = gen.flow_from_dataframe(
    labels, # dataframe
    directory = train_path, # images data path / folder in which images are there
    x_col = 'id',
    y_col = 'breed',
    subset="validation",
    color_mode="rgb",
    target_size = (331,331), # image height , image width
    class_mode="categorical",
    batch_size=32,
    shuffle=True,
    seed=42,
)
输出:

让我们看看单批数据的样子。
蟒蛇3
x,y = next(train_generator)
x.shape # input shape of one record is (331,331,3) , 32: is the batch size
输出:
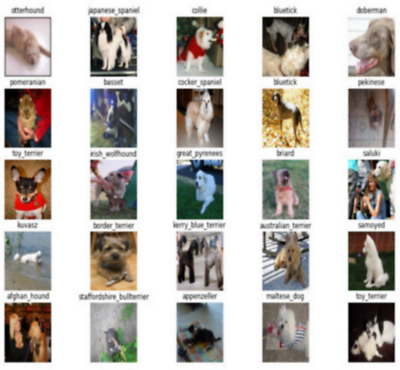
(32, 331, 331, 3)绘制来自训练数据集的图像
蟒蛇3
a = train_generator.class_indices
class_names = list(a.keys()) # storing class/breed names in a list

def plot_images(img,labels):
    plt.figure(figsize=[15,10])
    for i in range(25):
        plt.subplot(5,5,i+1)
        plt.imshow(img[i])
        plt.title(class_names[np.argmax(labels[i])])
        plt.axis('off')

 plot_images(x,y)
输出:
构建我们的模型
这是构建神经卷积模型的主要步骤。
蟒蛇3
# load the InceptionResNetV2 architecture with imagenet weights as base
base_model = tf.keras.applications.InceptionResNetV2(
                     include_top=False,
                     weights='imagenet',
                     input_shape=(331,331,3)
                     )

base_model.trainable=False
# For freezing the layer we make use of layer.trainable = False
# means that its internal state will not change during training.
# model's trainable weights will not be updated during fit(),
# and also its state updates will not run.

model = tf.keras.Sequential([
        base_model,
        tf.keras.layers.BatchNormalization(renorm=True),
        tf.keras.layers.GlobalAveragePooling2D(),
        tf.keras.layers.Dense(512, activation='relu'),
        tf.keras.layers.Dense(256, activation='relu'),
        tf.keras.layers.Dropout(0.5),
        tf.keras.layers.Dense(128, activation='relu'),
        tf.keras.layers.Dense(120, activation='softmax')
    ])
批量标准化:
- 这是一种标准化技术,它是沿着小批量而不是完整数据集完成的。
- 它用于加速训练并使用更高的学习率。
- 它保持平均输出接近 0,输出标准差接近 1。
GlobalAveragePooling2D :
- 它采用大小为(输入宽度)x(输入高度)x(输入通道)的张量,并计算每个(输入通道)的整个(输入宽度)x(输入高度)矩阵中所有值的平均值。
- 通过减少前一神经网络层输出中的像素数来降低图像的维数。
- 通过使用它,我们得到一个大小(输入通道)的一维张量作为我们的输出。
- 2D 全局平均池化操作。这里“深度”=“过滤器”
Dense :这一层是一个规则的全连接神经网络层。它在没有参数的情况下使用。
Drop out layer : 也用到了,它的函数是从输入单元中随机丢弃一些神经元,以防止过拟合。值 0.5 表示必须丢弃 0.5 部分的神经元。即
编译模型:
在训练我们的模型之前,我们首先需要配置它,这是由model.compile()完成的,它定义了损失函数、优化器和预测指标。
蟒蛇3
model.compile(optimizer='Adam',loss='categorical_crossentropy',metrics=['accuracy'])
# categorical cross entropy is taken since its used as a loss function for
# multi-class classification problems where there are two or more output labels.
# using Adam optimizer for better performance
# other optimizers such as sgd can also be used depending upon the model
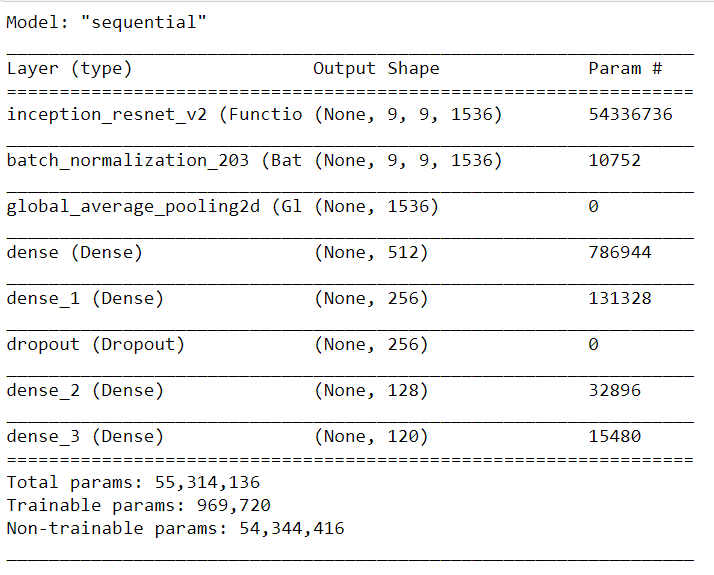
显示模型的总结报告
通过显示摘要,我们可以检查我们的模型以确认一切都符合预期。
蟒蛇3
model.summary()
输出:
定义回调以保持最佳结果:
回调:它是一个可以在训练的各个阶段(例如,在一个时期的开始或结束,单个批次之前或之后等)执行操作的对象。
蟒蛇3
early = tf.keras.callbacks.EarlyStopping( patience=10,
                                          min_delta=0.001,
                                          restore_best_weights=True)
# early stopping call back
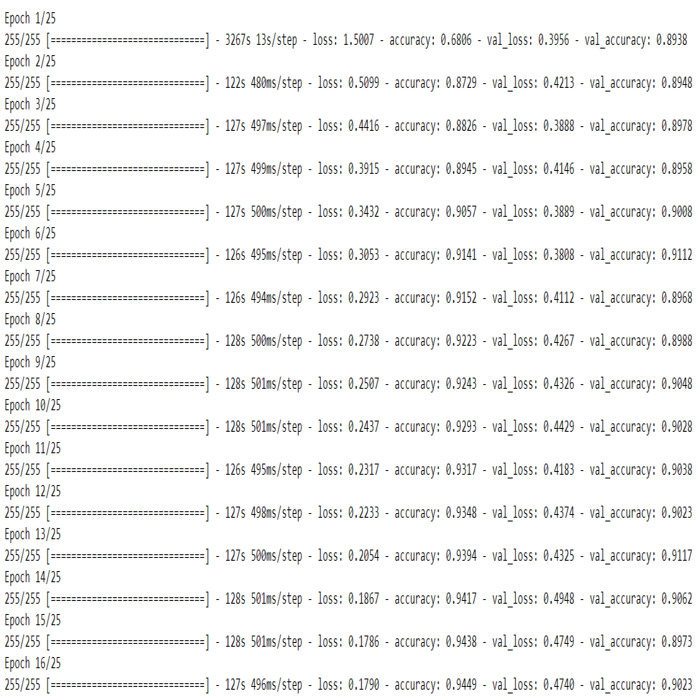
训练模型:这意味着我们正在寻找一组权重和偏差的值,这些值在所有记录中平均具有较低的损失。
蟒蛇3
batch_size=32
STEP_SIZE_TRAIN = train_generator.n//train_generator.batch_size
STEP_SIZE_VALID = validation_generator.n//validation_generator.batch_size

# fit model
history = model.fit(train_generator,
                    steps_per_epoch=STEP_SIZE_TRAIN,
                    validation_data=validation_generator,
                    validation_steps=STEP_SIZE_VALID,
                    epochs=25,
                    callbacks=[early]
输出:
保存模型
我们可以保存模型以供进一步使用。
蟒蛇3
model.save("Model.h5")
可视化模型的性能
蟒蛇3
# store results
acc = history.history['accuracy']
val_acc = history.history['val_accuracy']
loss = history.history['loss']
val_loss = history.history['val_loss']


# plot results
# accuracy
plt.figure(figsize=(10, 16))
plt.rcParams['figure.figsize'] = [16, 9]
plt.rcParams['font.size'] = 14
plt.rcParams['axes.grid'] = True
plt.rcParams['figure.facecolor'] = 'white'
plt.subplot(2, 1, 1)
plt.plot(acc, label='Training Accuracy')
plt.plot(val_acc, label='Validation Accuracy')
plt.legend(loc='lower right')
plt.ylabel('Accuracy')
plt.title(f'\nTraining and Validation Accuracy. \nTrain Accuracy:
          {str(acc[-1])}\nValidation Accuracy: {str(val_acc[-1])}')
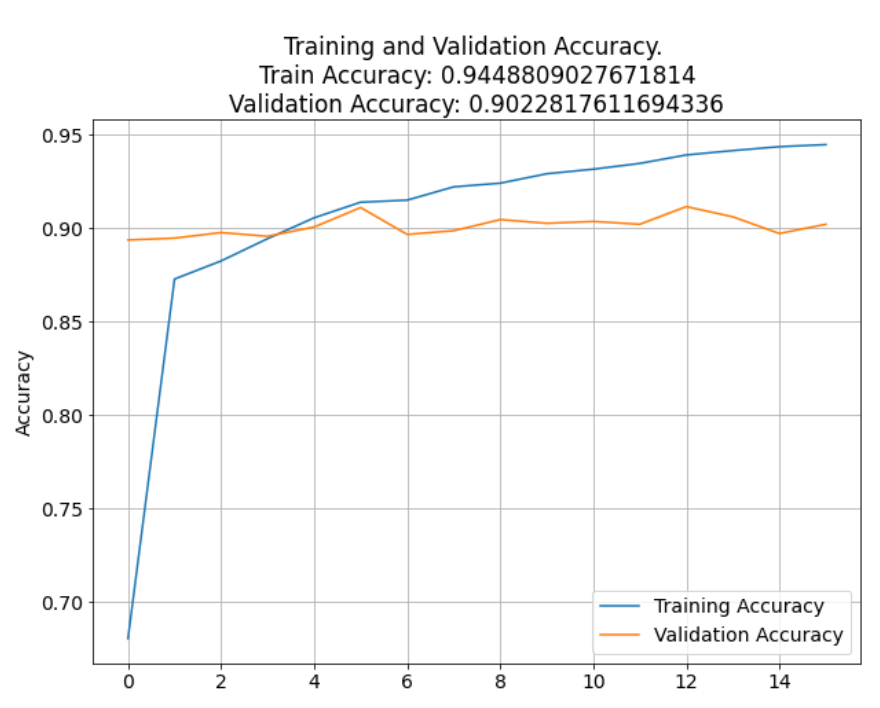
输出: Text(0.5, 1.0, '\n训练和验证准确度。\n训练准确度:0.9448809027671814\n验证准确度:0.9022817611694336')
蟒蛇3
# loss
plt.subplot(2, 1, 2)
plt.plot(loss, label='Training Loss')
plt.plot(val_loss, label='Validation Loss')
plt.legend(loc='upper right')
plt.ylabel('Cross Entropy')
plt.title(f'Training and Validation Loss. \nTrain Loss:
          {str(loss[-1])}\nValidation Loss: {str(val_loss[-1])}')
plt.xlabel('epoch')
plt.tight_layout(pad=3.0)
plt.show()
输出:

还绘制了训练与验证准确性和损失的折线图。该图表明,验证和训练的准确率几乎一致,均在 90% 以上。 CNN 模型的损失是一个负滞后图,这表明模型在每个 epoch 后都按预期运行,损失减少。
评估模型的准确性
蟒蛇3
accuracy_score = model.evaluate(validation_generator)
print(accuracy_score)
print("Accuracy: {:.4f}%".format(accuracy_score[1] * 100))

print("Loss: ",accuracy_score[0])
输出:

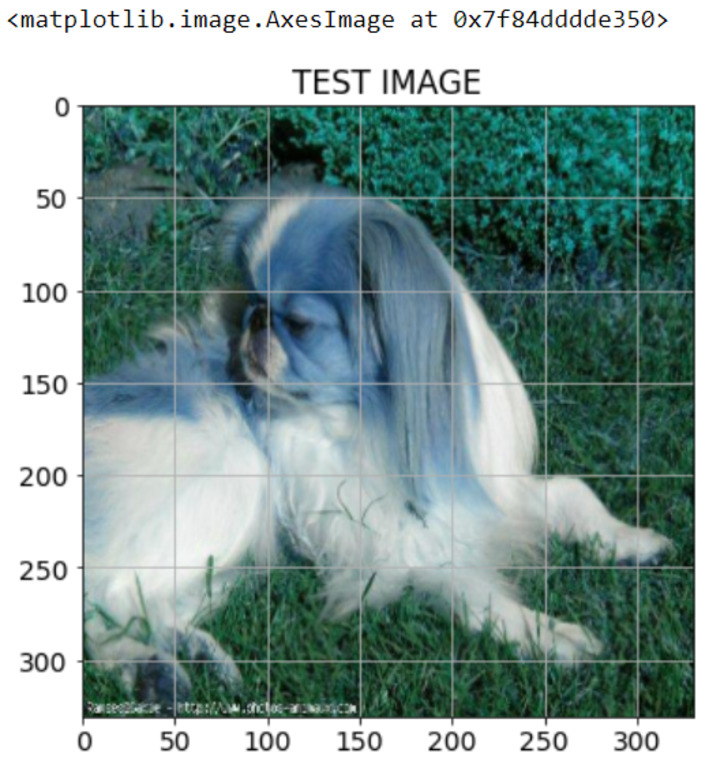
查看测试图像
蟒蛇3
test_img_path = test_path+"/000621fb3cbb32d8935728e48679680e.jpg"

img = cv2.imread(test_img_path)
resized_img = cv2.resize(img, (331, 331)).reshape(-1, 331, 331, 3)/255

plt.figure(figsize=(6,6))
plt.title("TEST IMAGE")
plt.imshow(resized_img[0])
输出:
对测试数据进行预测
蟒蛇3
predictions = []

for image in sample.id:
    img = tf.keras.preprocessing.image.load_img(test_path +'/'+ image)
    img = tf.keras.preprocessing.image.img_to_array(img)
    img = tf.keras.preprocessing.image.smart_resize(img, (331, 331))
    img = tf.reshape(img, (-1, 331, 331, 3))
    prediction = model.predict(img/255)
    predictions.append(np.argmax(prediction))

my_submission = pd.DataFrame({'image_id': sample.id, 'label':  predictions})
my_submission.to_csv('submission.csv', index=False)

# Submission file ouput
print("Submission File: \n---------------\n")
print(my_submission.head()) # Displaying first five predicted output
输出:
