- Flutter – 行和列小部件
- Flutter – 行和列小部件(1)
- python中的最大行和列(1)
- python代码示例中的最大行和列
- 如何在 NumPy 中设置行和列的轴?
- 交换行和列 pandas - Python (1)
- flutter 表
- flutter 卡(1)
- Flutter
- Flutter
- flutter 表(1)
- flutter 卡
- Flutter(1)
- 如何在js中获取矩阵的行和列 - Javascript(1)
- 如何在 R 中获取矩阵的行和列的总和 (1)
- Excel 2010中的行和列
- Excel 2010中的行和列(1)
- 交换行和列 pandas - Python 代码示例
- 将数据帧行和列转换为 R 中的向量
- 将数据帧行和列转换为 R 中的向量(1)
- 对 pandas 中的行和列进行排序 - Python (1)
- 如何在js中获取矩阵的行和列 - Javascript代码示例
- 对 pandas 中的行和列进行排序 - Python 代码示例
- Word 2010中的行和列
- Word 2010中的行和列(1)
- 在Pandas DataFrame中处理行和列(1)
- 在Pandas DataFrame中处理行和列
- 处理 Pandas DataFrame 中的行和列
- 如何在 R 中获取矩阵的行和列的总和 - 无论代码示例
📅 最后修改于: 2021-01-02 04:59:26 🧑 作者: Mango
颤振行和列
在前面的部分中,我们学习了如何创建一个简单的Flutter应用程序及其对小部件的基本样式。现在,我们将学习如何在屏幕上按行和列排列小部件。行和列不是单个窗口小部件;它们是两个不同的小部件,分别是行和列。在这里,我们将把这两个小部件集成在一起,因为它们具有相似的属性,可帮助我们高效,快速地理解它们。
行和列是Flutter中的两个基本控件,它使开发人员可以根据我们的需要水平和垂直对齐孩子。当我们在Flutter中设计应用程序用户界面时,这些小部件是非常必要的。
关键点
- 行和列小部件是Flutter应用程序中最常用的布局模式。
- 两者都可能需要几个子小部件。
- 子窗口小部件也可以是行或列窗口小部件。
- 我们可以拉伸或约束特定的儿童小部件。
- Flutter还允许开发人员指定子窗口小部件如何使用行和列窗口小部件的可用空间。
行小部件
此小部件在屏幕上水平排列其子级。换句话说,它将期望子窗口小部件为水平阵列。如果子窗口小部件需要填充可用的水平空间,则必须将子窗口小部件包装在扩展窗口小部件中。
行窗口小部件看起来不可滚动,因为它在可见视图中显示了窗口小部件。因此,如果我们连续有更多的孩子无法容纳可用空间,则认为是错误的。如果要创建行小部件的可滚动列表,则需要使用ListView小部件。
我们可以使用属性crossAxisAlignment和mainAxisAlignment根据选择来控制行小部件如何对齐其子级。该行的横轴将垂直延伸,而主轴将水平延伸。请参阅下面的视觉表示,以更清楚地了解它。

注意:Flutter行小部件还具有其他一些属性,如mainAxisSize,textDirection,verticalDirection等。在这里,我们将仅讨论mainAxisAlignment和crossAxisAlignment属性。
我们可以借助以下属性来对齐行的子级小部件:
- start:它将从主轴的起点放置子项。
- end:它将子代放置在主轴的末端。
- 中心:它将孩子放置在主轴的中间。
- spaceBetween:它将孩子之间的自由空间均匀放置。
- spaceAround:它将在第一个和最后一个孩子小部件之前和之后均匀地在孩子之间以及该空间的一半之间放置空闲空间。
- spaceEvenly:它将在第一个和最后一个孩子小部件之前和之后的孩子之间平均分配空闲空间。
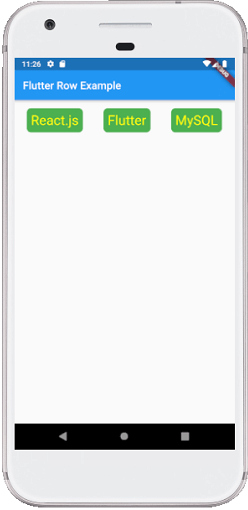
让我们借助一个示例来理解它,在该示例中我们将对齐内容,以使子级之间连续有一个均匀的空间:
import 'package:flutter/material.dart';

void main() { runApp(MyApp()); }
class MyApp extends StatelessWidget {
  @override
  Widget build(BuildContext context) {
    return MaterialApp(
      home: MyHomePage()
    );
  }
}

class MyHomePage extends StatefulWidget {
  @override
  _MyHomePageState createState() => _MyHomePageState();
}

class _MyHomePageState extends State {
  @override
  Widget build(BuildContext context) {
    return Scaffold(
      appBar: AppBar(
        title: Text("Flutter Row Example"),
      ),
      body: Row(
          mainAxisAlignment: MainAxisAlignment.spaceEvenly,
          children:[
            Container(
              margin: EdgeInsets.all(12.0),
              padding: EdgeInsets.all(8.0),
              decoration:BoxDecoration(
                  borderRadius:BorderRadius.circular(8),
                  color:Colors.green
              ),
              child: Text("React.js",style: TextStyle(color:Colors.yellowAccent,fontSize:25),),
            ),
            Container(
              margin: EdgeInsets.all(15.0),
              padding: EdgeInsets.all(8.0),
              decoration:BoxDecoration(
                  borderRadius:BorderRadius.circular(8),
                  color:Colors.green
              ),
              child: Text("Flutter",style: TextStyle(color:Colors.yellowAccent,fontSize:25),),
            ),
            Container(
              margin: EdgeInsets.all(12.0),
              padding: EdgeInsets.all(8.0),
              decoration:BoxDecoration(
                  borderRadius:BorderRadius.circular(8),
                  color:Colors.green
              ),
              child: Text("MySQL",style: TextStyle(color:Colors.yellowAccent,fontSize:25),),
            )
          ]
      ),
    );
  }
}
输出:
当我们运行该应用程序时,我们应该获得如下屏幕截图所示的用户界面。

柱
此小部件在屏幕上垂直排列其子级。换句话说,它将期望垂直排列的子代小部件。如果子窗口小部件需要填充可用的垂直空间,则必须将子窗口小部件包装在扩展窗口小部件中。
列窗口小部件看起来不可滚动,因为它在可见视图中显示这些窗口小部件。因此,如果我们在无法容纳可用空间的列中有更多子代,则认为是错误的。如果要创建列窗口小部件的可滚动列表,则需要使用ListView窗口小部件。
我们还可以使用属性mainAxisAlignment和crossAxisAlignment控制列窗口小部件如何对齐其子级。色谱柱的横轴将水平放置,主轴将垂直放置。下面的视觉表示更清楚地说明了这一点。

注意:列小部件还通过使用与我们在行小部件中讨论的属性相同的属性来对齐其内容,例如开始,结束,居中,spaceAround,spaceBetween和spaceEvenly。
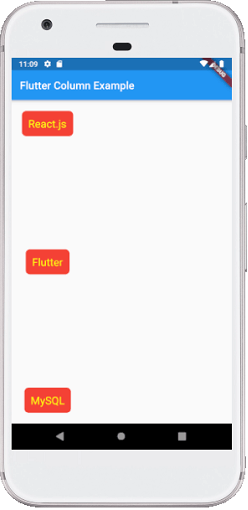
让我们借助一个示例来理解它,在该示例中,我们将对齐内容,以使列中的子级之间平均有一个自由空间:
import 'package:flutter/material.dart';

void main() { runApp(MyApp()); }
class MyApp extends StatelessWidget {
  @override
  Widget build(BuildContext context) {
    return MaterialApp(
        home: MyHomePage()
    );
  }
}

class MyHomePage extends StatefulWidget {
  @override
  _MyHomePageState createState() => _MyHomePageState();
}

class _MyHomePageState extends State {
  @override
  Widget build(BuildContext context) {
    return Scaffold(
      appBar: AppBar(
        title: Text("Flutter Column Example"),
      ),
      body: Column(
          mainAxisAlignment: MainAxisAlignment.spaceBetween,
          children:[
            Container(
              margin: EdgeInsets.all(20.0),
              padding: EdgeInsets.all(12.0),
              decoration:BoxDecoration(
                  borderRadius:BorderRadius.circular(8),
                  color:Colors.red
              ),
              child: Text("React.js",style: TextStyle(color:Colors.yellowAccent,fontSize:20),),
            ),
            Container(
              margin: EdgeInsets.all(20.0),
              padding: EdgeInsets.all(12.0),
              decoration:BoxDecoration(
                  borderRadius:BorderRadius.circular(8),
                  color:Colors.red
              ),
              child: Text("Flutter",style: TextStyle(color:Colors.yellowAccent,fontSize:20),),
            ),
            Container(
              margin: EdgeInsets.all(20.0),
              padding: EdgeInsets.all(12.0),
              decoration:BoxDecoration(
                  borderRadius:BorderRadius.circular(8),
                  color:Colors.red
              ),
              child: Text("MySQL",style: TextStyle(color:Colors.yellowAccent,fontSize:20),),
            )
          ]
      ),
    );
  }
}
输出:
当我们运行该应用程序时,我们应该获得如下屏幕截图所示的用户界面。

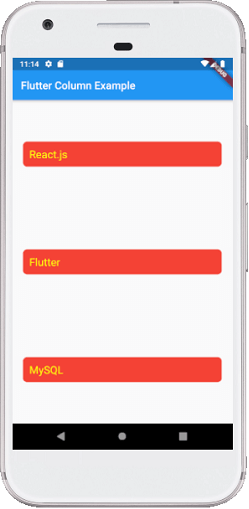
Flutter还允许开发人员将子控件与crossAxisAlignment和mainAxisAlignment的组合用于行和列控件。让我们以上面的列小部件为例,在这里我们将mainAxisAlignment设置为MainAxisAlignment.spaceAround,而crossAxisAlignment是CrossAxisAlignment.stretch。它将使列的高度等于主体的高度。请参见下面的屏幕截图。

行和列小部件的缺点:
- Flutter中的“行”小部件没有水平滚动。因此,如果我们在单行中插入了无法容纳该行的大量子级,则会看到“溢出”消息。
- Flutter中的列窗口小部件没有垂直滚动。因此,如果我们在单列中插入了大量的子项,而其子项的总大小不等于屏幕的高度,则会看到“溢出”消息。