- Flutter中的开关(1)
- R中的开关盒(1)
- R中的开关盒
- jquery 开关类 - Javascript (1)
- js 开关 - Javascript 代码示例
- javascript 开关 - Javascript (1)
- jquery 开关类 - Javascript 代码示例
- laravel 开关 - PHP (1)
- 第 2 层的开关功能
- MATLAB开关(1)
- MATLAB开关
- javascript 开关 - Javascript 代码示例
- 嵌套开关盒(1)
- 嵌套开关盒
- C开关声明
- C#开关声明(1)
- C开关声明(1)
- C#开关声明
- laravel 开关 - PHP 代码示例
- flutter 表
- Flutter(1)
- Flutter
- flutter 表(1)
- Flutter
- flutter 卡(1)
- flutter 卡
- Rust – 开关盒(1)
- Rust – 开关盒
- Arduino开关盒
📅 最后修改于: 2021-01-02 05:18:00 🧑 作者: Mango
颤动开关
开关是一种两种状态的用户界面元素,用于在ON(选中)或OFF(未选中)状态之间切换。通常,它是带有拇指滑块的按钮,用户可以在其中来回拖动以选择ON或OFF形式的选项。它的工作类似于房屋用电开关。
在Flutter中,开关是一个小部件,用于在两个选项(ON或OFF)之间进行选择。它不维护状态本身。为了维护状态,它将调用onChanged属性。如果此属性返回的值为true ,则开关为ON,为OFF则为false。如果此属性为null,则禁用开关小部件。在本文中,我们将了解如何在Flutter应用程序中使用switch小部件。
开关小部件的属性
开关小部件的一些基本属性如下:
| Attributes | Descriptions |
|---|---|
| onChanged | It will be called whenever the user taps on the switch. |
| value | It contains a Boolean value true or false to control whether the switch functionality is ON or OFF. |
| activeColor | It is used to specify the color of the switch round ball when it is ON. |
| activeTrackColor | It specifies the switch track bar color. |
| inactiveThubmColor | It is used to specify the color of the switch round ball when it is OFF. |
| inactiveTrackColor | It specifies the switch track bar color when it is OFF. |
| dragStartBehavior | It handled the drag start behavior. If we set it as DragStartBehavior.start, the drag moves the switch from on to off. |
例
在此应用程序中,我们定义了一个switch小部件。每次切换开关小部件时,都会使用开关的新状态作为值来调用onChanged属性。为了存储开关状态,我们定义了一个布尔变量isSwitched ,可以在下面的代码中显示。
打开您正在使用的IDE,然后创建Flutter应用程序。接下来,打开lib文件夹,并将main.dart替换为以下代码。
import 'package:flutter/material.dart';

void main() => runApp(MyApp());

class MyApp extends StatelessWidget {
  @override
  Widget build(BuildContext context) {
    return MaterialApp(
        home: Scaffold(
            appBar: AppBar(
              backgroundColor: Colors.blue,
              title: Text("Flutter Switch Example"),
            ),
            body: Center(
                  child: SwitchScreen()
            ),
        )
    );
  }
}

class SwitchScreen extends StatefulWidget {
  @override
  SwitchClass createState() => new SwitchClass();
}

class SwitchClass extends State {
  bool isSwitched = false;
  var textValue = 'Switch is OFF';

  void toggleSwitch(bool value) {

    if(isSwitched == false)
    {
      setState(() {
        isSwitched = true;
        textValue = 'Switch Button is ON';
      });
      print('Switch Button is ON');
    }
    else
    {
      setState(() {
        isSwitched = false;
        textValue = 'Switch Button is OFF';
      });
      print('Switch Button is OFF');
    }
  }
  @override
  Widget build(BuildContext context) {
    return Column(
        mainAxisAlignment: MainAxisAlignment.center,
        children:[ Transform.scale(
            scale: 2,
            child: Switch(
              onChanged: toggleSwitch,
              value: isSwitched,
              activeColor: Colors.blue,
              activeTrackColor: Colors.yellow,
              inactiveThumbColor: Colors.redAccent,
              inactiveTrackColor: Colors.orange,
            )
          ),
          Text('$textValue', style: TextStyle(fontSize: 20),)
        ]);
  }
}
输出:
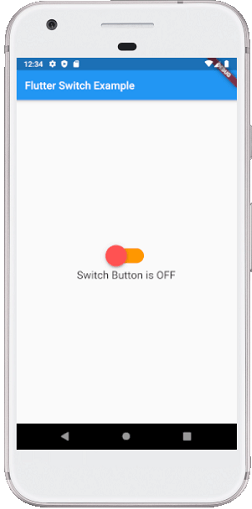
当我们在仿真器或设备中运行应用程序时,我们应该获得类似于以下屏幕截图的UI

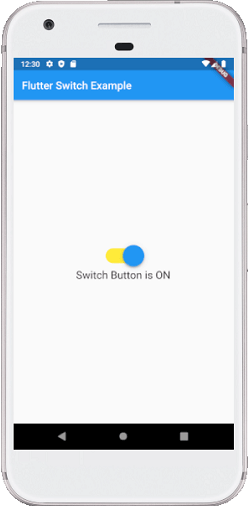
如果我们按下开关,它将把它们的状态从OFF改变为ON。请参见以下屏幕截图:

如何在Flutter中自定义“切换”按钮?
Flutter还允许用户自定义其切换按钮。定制使用户界面更具交互性。为此,我们可以在pubspec.yaml文件中添加自定义开关依赖项,然后将其导入到dart文件中。
例:
打开main.dart文件,并将其替换为以下代码:
import 'package:flutter/material.dart';
import 'package:custom_switch/custom_switch.dart';

void main() => runApp(MyApp());

class MyApp extends StatelessWidget {
  @override
  Widget build(BuildContext context) {
    return MaterialApp(
        home: Scaffold(
            appBar: AppBar(
              backgroundColor: Colors.blue,
              title: Text("Custom Switch Example"),
            ),
            body: Center(
                  child: SwitchScreen()
            ),
        )
    );
  }
}

class SwitchScreen extends StatefulWidget {
  @override
  SwitchClass createState() => new SwitchClass();
}

class SwitchClass extends State {
  bool isSwitched = false;
  @override
  Widget build(BuildContext context) {
    return Column(
        mainAxisAlignment: MainAxisAlignment.center,
        children:[
            CustomSwitch(
              value: isSwitched,
              activeColor: Colors.blue,
              onChanged: (value) {
                print("VALUE : $value");
                setState(() {
                  isSwitched = value;
                });
              },
            ),
          SizedBox(height: 15.0,),
          Text('Value : $isSwitched', style: TextStyle(color: Colors.red,
              fontSize: 25.0),)
        ]);
    }
}
输出:
在模拟器或设备中运行应用程序时,应获得类似于以下屏幕截图的UI:

如果我们按下开关,它将把它们的状态从OFF改变为ON。请参见以下屏幕截图:
