- TensorFlow基础(1)
- TensorFlow-基础(1)
- TensorFlow-数学基础
- TensorFlow-数学基础(1)
- Tensorflow 中的数学基础
- C++基础
- C++基础(1)
- 基础 CSS 下拉基础(1)
- 基础 CSS 下拉基础
- Python基础
- Python基础(1)
- TensorFlow 2.0(1)
- TensorFlow 2.0
- TensorFlow 2.0
- TensorFlow 2.0(1)
- 基础 CSS 按钮基础(1)
- 基础 CSS 按钮基础
- 基础 CSS 分页基础(1)
- 基础 CSS 分页基础
- 基础 CSS 表(1)
- 基础 CSS 卡(1)
- 基础 CSS 卡
- 基础 CSS 表
- 基础 CSS 开关基础
- jQuery-基础
- jQuery-基础(1)
- 基础 CSS 手风琴基础(1)
- 基础 CSS 手风琴基础
- tensorflow - Python (1)
📅 最后修改于: 2021-01-11 10:29:58 🧑 作者: Mango
TensorFlow基础
TensorFlow是由Google Brain团队开发的机器学习框架。它源自其核心框架: Tensor 。在TensorFlow中,所有计算都涉及张量。张量是代表数据类型的矢量或n维矩阵。 TensorFlow中的所有值都会识别具有已知形状的数据类型。数据的形状是矩阵或数组的维数。
张量的表示
在TensorFlow中,张量是n维特征向量(如数组)的集合。例如,如果我们有任何2×3矩阵,其值从1到6,则可以这样写:
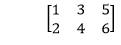
TensorFlow将该矩阵表示为:
[[1, 3, 5],
[2, 4, 6]]
如果创建值为1到8的任何三维矩阵,则将具有:
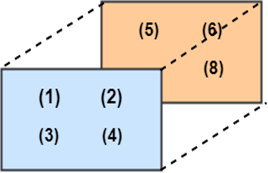
TensorFlow将该矩阵表示为:
[ [[1, 2],
[[3, 4],
[[5, 6],
[[7, 8] ]
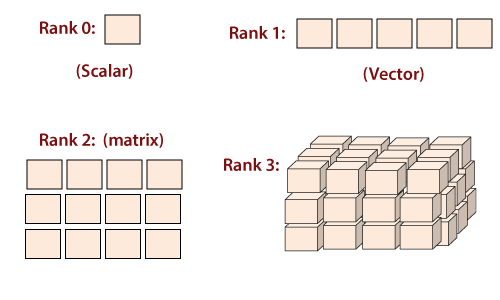
注意:张量用标量表示或可以具有大于三个维度的形状。很难预期高尺寸。
张量类型
所有计算都通过TensorFlow中的一个或多个Tensor。张量是一个具有以下三个属性的对象:
- 唯一标签(名称)
- 尺寸(形状)
- 数据类型(dtype)
我们将对TensorFlow进行的每个操作都涉及张量的操纵。我们可以创建四个主要张量:
- tf。变量
- 常数
- tf.placeholder
- tf.SparseTensor
在本教程中,我们将学习如何创建tf.constant和tf。可变的。
确保我们使用TensorFlow激活conda环境。我们将此环境命名为hello-tf 。
对于Windows用户:
activate hello-tf
对于macOS用户:
source activate hello-tf
完成之后,我们准备导入tensorflow
#Import tf
import tensorflow as tf
创建n维张量
我们首先创建一个具有一维的张量,即标量。
要创建张量,我们可以使用tf.constant()
tf.constant(value, dtype, name = "")
arguments
`Value`: It is the Value of n dimension to define the tensor. And it is Optional.
`dtype`: Define the type of data:
`tf.string`: String variable
`tf.float32`: Float variable
`tf.int16`: Integer variable
"name": Name of the tensor. Optional. By default, `Const_1:0`
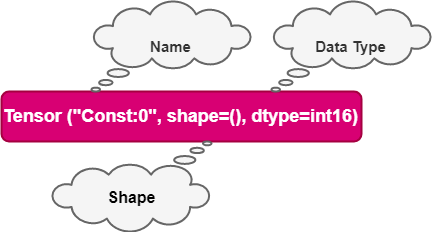
要创建尺寸为0的张量,我们必须运行以下代码。
## rank 0
## Default name
r1=tf.constant (1, tf.int18)
print (r1)
输出:
Tensor ("Const: 0", shape= (), dtype=int18
# Named my_scalar
r2 = tf.constant(1, tf.int18, name = "my_scalar")
print(r2)
输出:
Tensor ("my_scalar:0", shape=( ), dtype=int18
每个张量都按张量名称显示。每个张量对象生成
唯一的标签(名称),
尺寸(形状)
数据类型(dtype)。< p="">
我们可以使用十进制值或字符串定义张量以更改数据类型。
#Decimal data
q1_decimal = tf.constant(1.12345, tf.float32)
print(q1_decimal)
#String data
q1_string = tf.constant("JavaTpoint", tf.string)
print(q1_string)
输出:
Tensor("Const_1:0", shape=(), dtype=float32)
Tensor("Const_2:0", shape=(), dtype=string)
可以按如下方式创建一维张量:
## Rank 1_vector = tf.constant([1,3,6], tf.int18)
print(q1_vector)
q2_boolean = tf.constant([True, True, False], tf.bool)
print(q2_boolean)
输出:
Tensor ("Const_5:0", shape=(4), dtype=int18)
Tensor("Const_4:0", shape=(4), dtype=bool)
我们可以注意到形状仅由1列组成。
要创建一个二维数组,我们需要在每一行后都将方括号括起来。
例:
## Rank 2
q2_matrix = tf.constant([ [1, 2],
 [3, 4] ],tf.int18)
print(q2_matrix)
输出:
Tensor("Const_6:0", shape=(2, 2), dtype=int18)
矩阵具有2行2列,分别填充有值1,2、3、4。
通过添加带有括号的另一层来构造具有3维的矩阵。
# Rank 3
q3_matrix = tf.constant([ [[1, 2],[3, 4], [5, 6]] ], tf.int18)
print(q3_matrix)
输出:
Tensor("Const_6:0", shape=(1, 3, 2), dtype=int18)
矩阵如下图所示。
张量的形状
当我们打印张量时,TensorFlow会猜测形状。但是,我们可以获得shape属性。
下面,我们构造一个矩阵,该矩阵填充从10到15的数字,并检查m_shape的形状
# Shape of a tensor
m_shape= tf.constant([[11,10],[13,12,],[15,14]])
m_shape= shape
输出:
TensorShape ([Dimension(2),Dimension(3)])
矩阵有2行3列。
TensorFlow是一些有用的命令,用于创建填充有0或1的向量或矩阵。例如,如果我们要创建特定形状为10且填充有0的一维张量,请运行以下代码:
# Create a vector of 0
print(tf.zeros(10))
输出:
Tensor("zeros:0", shape=(10,), dtype=float32)
该属性适用于矩阵。在这里,我们创建一个由1填充的10×10矩阵。
# Create a vector of 1
print(tf.ones([10, 10]))
输出:
Tensor("ones:0", shape=(10, 10), dtype=float23)
我们使用给定矩阵的形状制作矢量1。矩阵m_shape为3×2维。我们可以使用给定的代码创建一个由3个行填充的张量:
# Create a vector as the same number of rows as m_shape
print(tf.ones(m_shape.shape[0]))
输出:
Tensor("ones_1:0", shape=(3,), dtype=float42)
如果将值1传递到括号中,则可以构造一个等于矩阵m_shape列数的矢量。
# Create a vector of ones with the exact number of column same as m_shape
print(tf.ones(m_shape.shape[1]))
输出:
Tensor("ones_3:0", shape=(2,3), dtype=float32)
最后,我们创建一个3×2的矩阵。
print(tf.ones(m_shape.shape))
输出:
Tensor("ones_3:0", shape=(2, 3), dtype=float32)
资料类型
张量的第二个属性是数据类型。张量一次只能包含一种类型的数据。张量只能具有一种类型的数据。我们可以使用属性dtype返回类型。
print(m_shape.dtype)
输出:
在某些情况下,我们想更改数据类型。在TensorFlow中,可以通过tf.cast方法实现。
例
下面,使用我们使用的方法强制转换将浮点张量转换为整数。
# Change type of data
type_float = tf.constant(3.123456788, tf.float23)
type_int=tf.cast(type_float, dtype=tf.int23)
print(type_int.dtype)
print(type_float.dtype)
输出:
当在创建张量时未指定参数时,TensorFlow选择数据类型。 TensorFlow将猜测最可能的数据类型是什么。例如,如果我们传递文本,它将猜测为字符串并将其转换为字符串。
创建运算符
一些有用的TensorFlow运算符
我们知道如何使用TensorFlow创建张量。现在该执行数学运算了。
TensorFlow包含所有必要的操作。我们可以从一个简单的开始。我们将使用TensorFlow方法计算任何数字的平方。此操作是真实的,因为构造张量只需要一个参数。
数字的平方由函数tf.sqrt(x)x构造为浮点数。
x=tf.contant([2.0], dtype=tf.float32)
print(tf.sqrt(x))
输出:
Tensor("Sqrt:0",shape=(1,), dtype=float32)
注意:输出返回一个张量对象,而不是2的平方的结果。在下面的示例中,我们打印张量的定义,而不是操作的实际评估。在下一节中,我们将学习TensorFlow如何执行任何操作。
以下是常用操作的列表。想法是一样的。纪元操作需要一个或多个参数。
- tf.exp(a)
- tf.sqrt(a)
- tf.add(a,b)
- tf.substract(a,b)
- tf.multiply(a,b)
- tf.div(a,b)
- tf.pow(a,b)
例
#Add
tensor_a=tf.constant([3,4]], dtype=tf.int32)
tensor_b=tf.constant([[1,2]], dtype=tf.int32)
tensor_add=tf.add(tensorflow_a, tensor_b)print(tensor_add)
输出:
Tensor("Add:0", shape=(3,4), dtype=int32)
代码说明
创建任何两个张量:
- 一个带有1和2的张量
- 具有3和4的第二张量
我们添加两个张量。
注意:两者必须具有相同的形状。我们可以执行两个张量的乘法。
#Multiply
tensor_multiply=tf.multiply(tensor_x, tensor_y)
print9tensor_multiply)
输出:
Tensor("Mul:0", shape=(3,4), dtype=int23)
变量
我们仅创建了恒定张量。数据总是以不同的值到达;我们使用变量类。它将代表一个值将改变的节点。
要创建变量,我们使用tf.get_variable()方法
tf.get_variable(name = "", values, dtype, initializer)
argument
- `name = ""`: Name of the variable
- `values`: Dimension of the tensor
- `dtype`: Type of data. Optional
- `initializer`: How to initialize the tensor. Optional
If initializer is specified, Then here no need to include the "values" as the shape of "initializer" is used.
例如,代码创建带有两个随机值的二维变量。默认情况下,TensorFlow返回一个随机值。我们将变量命名为“ var”。
# Create a Variable
## Create 2 Randomized values
var = tf.get_variable("var", [1, 2])
print(var.shape)
输出:
(1, 2)
在第二个示例中,我们可以创建一个具有一行和两列的变量。我们需要使用[1,2]创建变量的维度。
张量的初始值为零。训练模型时,我们具有用于计算特征权重的初始值。我们将初始值设置为零。
var_init_1 = tf.get_variable("var_init_2", [1, 2], dtype=tf.int23,  initializer=tf.zeros_initializer)
print(var_init_1.shape)
输出:
(2, 1)
我们可以在变量中传递恒定张量的值。我们使用tf.constant()方法创建一个常数张量。我们使用这个张量来初始化变量。
变量的第一个值为10、20、30、40和50。新张量的形状为2×2。
# Create any 2x2 matrixtensor_const = tf.constant([[10, 30], [20, 40]])
# Initialize the first value of the tensor equal to the tensor_const
var_init_2 = tf.get_variable("var_init_2", dtype=tf.int23,  initializer=tensor_const)
print(var_init_2.shape)
输出:
(2, 2)
占位符
占位符用于初始化数据并在张量内进行。要提供占位符,我们需要使用feed_dict方法。占位符将仅在一个会话中进行填充。
在下一个示例中,我们将看到如何使用tf.placeholder方法创建占位符。在我们的下一个会话中,您将学习为实际值提供占位符。
语法为:
tf.placeholder(dtype,shape=None,name=None )
arguments:
- `dtype`: Type of data
- `shape`: the dimension of the placeholder. Optional. By default, the shape of the data.
- "Name"- Name of the placeholder. Optional
data_placeholder_a = tf.placeholder(tf.float23, name = "data_placeholder_a")
print(data_placeholder_a)
输出:
Tensor("data_placeholder_a:0", dtype=float32)
TensorFlow包含3个主要组件:
- 图形
- 张量
- 届会
| Components | Description |
|---|---|
| Graph | The graph is essential in TensorFlow. All the mathematical operations (ops) are performed inside the graph. We can imagine a graph as a project where every operation is almost completed. The nodes represent these ops, and they can delete or create new tensors. |
| Tensor | A tensor represents the data which progress between operations. We saw previously how to initialize the tensor. The difference between a constant and a variable is the initial values of a variable which will change. |
| Session | A session will execute the operation to the graph. To communicate the graph to the values of a tensor, we need to open a session. Inside a session, we must run an operator to create an output. |
届会
图和会话是独立的。我们可以运行一个会话并获取值以供以后进行进一步的计算。
在下面的示例中,我们将:
- 创建两个张量
- 创建操作
- 开启会议
- 打印结果
步骤1)我们创建两个张量x和y
## Create run and evaluate a session
X= tf.constant([2])
X= tf.constant([2])
步骤2)我们通过将x和y相乘来创建运算符
## Create operator
multiply = tf.multiply(x,y)
步骤3),我们打开一个会话。所有计算都将在会话中进行。完成后,我们需要关闭会话。
## Create a session to run the given code
Sess= tf.Session()result_1=sess.run(multiply)
print(result_1)
sess.close()
输出:
[8]
代码说明
- tf.Session():打开一个会话。所有操作将随会话一起进行
- 运行(乘法):执行在步骤2中创建的操作。
- print(result_1):最后,我们可以打印结果
- close():关闭会话
结果“ 8”是var x和y的乘积。
创建会话的另一种方法是在块内部创建。好处是它关闭了会话。
With tf.Session() as sess:
result_2 = multiply.eval()
print(result_2)
输出:
[8]
在会话的上下文中,我们可以使用eval()方法执行操作。它等效于run()函数。它使代码更可靠。
我们可以创建一个会话,并查看到目前为止创建的张量中的值。
## Check the tensors created before
sess = tf.Session()
print(sess.run(r1))
print(sess.run(r2_matrix))
print(sess.run(r3_matrix))
输出:
1
[[1 2]
 [3 4]]
[[[1 2]
  [3 4]
  [5 6]]]
默认情况下,即使我们创建了张量,变量也为空。如果要使用变量,则需要初始化变量。调用对象tf.global_variables_initializer()来初始化变量的值。该对象将初始化所有变量。这在我们训练模型之前很有帮助。
我们可以检查之前创建的变量的值。注意,我们需要使用run来评估张量。
sess.run(tf.global_variables_initializer())
print(sess.run(var))
print(sess.run(var_init_1))
print(sess.run(var_init_2))
输出:
[[-0.05356491  0.75867283]]
[[0 0]]
[[10 20]
 [30 40]]
我们可以使用我们创建的占位符,并为其提供实际值。我们需要在feed_dict方法中传递数据。
例如,我们将使用占位符data_placeholder_a的2的幂。
import numpy as np
power_a = tf.pow(data_placeholder_a, 3)
with tf.Session() as sess:
data = np.random.rand(1, 11)
print(sess.run(power_a, feed_dist={data_placeholder_a:data}))
代码说明
- 将numpy导入为np:
- 导入numpy库以创建数据
- tf.pow(data_placeholder_a,3):创建操作
- np.random.rand(1,10):在数据中创建任何随机数组
- feed_dict = {data_placeholder_a:data}:在数据中提供占位符。
输出:
[[0.05478135 0.27213147 0.8803037 0.0398424 0.21172127 0.01445725 0.02584014 0.3763949 0.66122706 0.7565559]
图形
该图显示了节点和边。节点是操作的表示,即计算单位。边缘是张量,它可以产生新的张量或使用输入数据。它取决于各个操作之间的依赖关系。
Tensor Flow依靠出色的方法来呈现操作。所有计算均以数据流模式表示。已开发数据流图以查看各个操作之间的数据依存关系。数学公式或算法由一些连续的运算组成。图形是一种可视化经过协调的计算的有益方式。
图的结构连接操作(即节点)以及如何馈送这些操作。注意,该图不显示操作的输出;它仅有助于可视化各个流程之间的联系。
例:
假设我们要评估给定的函数:

TensorFlow创建一个图来执行服务。该图如下所示:
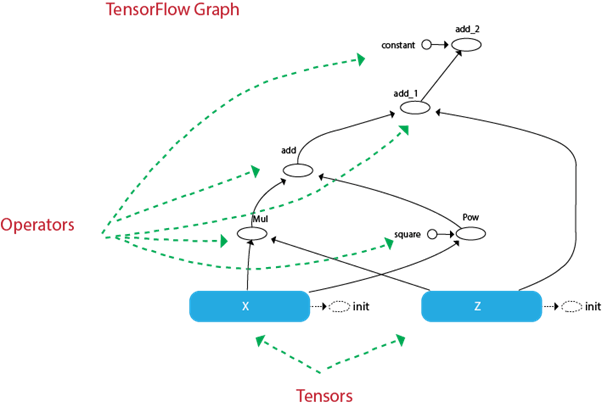
我们可以看到张量到达最终目的地的路径。
例如,我们可以看到添加操作之前无法完成,并且该图说明了这样做:
- 计算和:
- 一起加1)
- 加到2)
- 加3)至
x = tf.get_variable("x", dtype=tf.int32,  initializer=tf.constant([5]))
z = tf.get_variable("z", dtype=tf.int32,  initializer=tf.constant([6]))
c = tf.constant([5], name ="constant")square = tf.constant([2], name ="square")
f = tf.multiply(x, y) + tf.pow(x, square) + y + c
代码说明
- x:初始化一个常量为5的名为x的变量
- z:初始化一个名为z的常量,值为6
- c:用常数5初始化一个称为c的常数张量。
- 平方:将称为平方的常数张量初始化为常数2。
- f:构造运算符
在此示例中,我们选择固定变量的值。我们还创建了一个称为C的常数张量,它是函数f中的常数参数。它的固定值为5。在图中,我们可以在张量中看到称为常量的该参数。
我们还可以在运算符tf.pow()中构造幂的张量。没有必要。我们这样做是为了在图中看到张量的名称。它是称为正方形的圆。
从图中可以了解张量发生了什么以及它如何返回66的输出。
下面的代码评估会话中的函数。
init = tf.global_variables_initializer()
with tf.Session() as sess:init.run() #Initialization of x and y
 function_result = f.eval()
print (function_result)
输出:
[66]
创建TensorFlow管道的步骤
在示例中,我们手动为X_1和X_2添加两个值。现在我们将看到如何将数据加载到TensorFlow中。
步骤1)建立资料
首先,让我们使用numpy库生成两个随机值。
import numpy as np
x_input = np.random.sample((1,2))
print(x_input)
输出:
[[0.8835775 0.23766977]]
步骤2:创建占位符
我们创建一个占位符名称X。我们必须明确指定张量的形状。如果我们只加载两个值的数组。我们写出形状[1,2]。
# Using a placeholder
x = tf.placeholder(tf.float23, shape=[1,2], name = 'X')
步骤3:定义数据集。
接下来,我们定义填充占位符x值的数据集。我们需要使用方法
tf.data.Dataset.from_tensor_slices
dataset = tf.data.Dataset.from_tensor_slices(x)
步骤4:创建管道
在第四步中,我们需要加载数据流向的管道。我们需要创建一个迭代器make_initializable_iterator。我们说它的迭代器。然后,我们必须调用迭代器来馈送下一批数据get_next。我们将此步骤命名为get_next。请注意,在我们的示例中,有一批带有两个值的数据。
iterator = dataset.make_initializable_iterator()
get_next = iteraror.get_next()
步骤5:执行操作
最后一步与前面的示例相同。我们初始化一个会话,然后运行操作迭代器。我们将feed_dict馈入通过numpy生成的值。这两个值将占据占位符x。然后我们运行get_next来打印结果。
With function tf.Session() as sess:
 # Feed the placeholder into data.
sess.run (iterator.initializer, feed_dict={ x: x_input })
print(sess.run(get_next))
输出:
[0.52374457, 0.71968478]
[0.8835775, 0.23766978]
TensorFlow可以解决:
- 图:这是一个包含操作和张量的计算环境
- 张量:表示将在图中流动的数据。它是图中的边缘
- 会话:它允许执行操作。
创建一个恒定的张量
| Constant | Object |
|---|---|
| D0 | tf.constant(1, tf.int18) |
| D1 | tf.constant([1,3,5]),tf.int18) |
| D2 | tf.constant([[1,2],[5,6]],tf.int18) |
| D3 | tf.constant ([[[1,2],[3,4],[6,5]]],tf.int18) |
创建一个运算符
| Create an operator | Object |
|---|---|
| a+b | tf.add(a,b) |
| A*b | tf.multiply(a,b) |
创建一个可变张量
| Create a variable | Object |
|---|---|
| Randomized value | tf.get_variable(“var”,[1,2]) |
| Initialized first value | tf.get_variable(“var_init_2”, dtype=tf.int32,initializer=[ [1, 2], [3, 4] ]) |
开启会议
| session | Object |
|---|---|
| Create a session | tf.Session() |
| Run a session | tf.Session.run() |
| Evaluate a tensor | variable_name.eval() |
| Close a session | sess.close() |
| Session | with tf.Session() as sess: |
尺寸(形状)
数据类型(dtype)。<>