Flutter – 自定义剪刀
在flutter,我们有帮助创建自定义形状的小部件和属性。在本文中,我们将了解一个名为Custom Clipper的属性,我们还将实现它以在我们的 UI 设计中创建曲线形状。
什么是自定义剪刀?
Custom Clipper是一个属性,可以帮助将小部件剪裁成我们想要的任何形状。它剪辑容器的未使用区域以获得所需的形状。
现在我们将使用自定义剪刀创建一个曲线底部形状的应用栏。
第 1 步: custom_shape。dart文件
Dart
import 'package:flutter/cupertino.dart';
import 'package:flutter/material.dart';

class Customshape extends CustomClipper{
  @override
  Path getClip(Size size) {
    double height = size.height;
    double width = size.width;

    var path = Path();
    path.lineTo(0, height-50);
    path.quadraticBezierTo(width/2, height, width, height-50);
    path.lineTo(width, 0);
    path.close();
    return path;
  }

  @override
  bool shouldReclip(covariant CustomClipper oldClipper) {
    return true;
  }

}
Dart
import 'package:flutter/cupertino.dart';
import 'package:flutter/material.dart';

import 'custom_shape.dart';

void main() {
  runApp(MyApp());
}

class MyApp extends StatelessWidget {

  // This widget is the root of your application.
  @override
  Widget build(BuildContext context) {
    return MaterialApp(
      title: 'Flutter Demo',
      debugShowCheckedModeBanner: false,
      theme: ThemeData(
        primarySwatch: Colors.blue,
      ),
      home: MyHomePage(),
    );
  }
}

class MyHomePage extends StatefulWidget {
  const MyHomePage({Key? key}) : super(key: key);

  @override
  _MyHomePageState createState() => _MyHomePageState();
}

class _MyHomePageState extends State {
  @override
  Widget build(BuildContext context) {
    return Scaffold(
      appBar:  AppBar(
        toolbarHeight: 130,
        backgroundColor: Colors.transparent,
        elevation: 0.0,
        flexibleSpace: ClipPath(
          clipper: Customshape(),
          child: Container(
            height: 250,
            width: MediaQuery.of(context).size.width,
            color: Colors.green,
            child: Center(child: Text("GeeksforGeeks",
                                      style: TextStyle(fontSize: 40,
                                                                       color: Colors.white),)),
          ),
        ),
      ),
       body: Container(),
    );
  }
} 说明:在此文件中,我们的自定义形状类扩展到自定义剪刀。自定义剪刀使用两种覆盖方法-
- getclip() :我们在这里定义我们想要如何剪辑路径。
- shouldReclip() :无论我们是否要重新剪辑小部件,它都会返回 bool 值。
getClip() 方法用于自定义形状。为了给出曲线形状,我们使用了path.quadraticBezierTo功能,我们还传递了具有特定高度和宽度的path.lineTo 。我们不想重复,所以我们在shouldReclip() 方法中返回 true 。
第2步:主要。dart文件
Dart
import 'package:flutter/cupertino.dart';
import 'package:flutter/material.dart';

import 'custom_shape.dart';

void main() {
  runApp(MyApp());
}

class MyApp extends StatelessWidget {

  // This widget is the root of your application.
  @override
  Widget build(BuildContext context) {
    return MaterialApp(
      title: 'Flutter Demo',
      debugShowCheckedModeBanner: false,
      theme: ThemeData(
        primarySwatch: Colors.blue,
      ),
      home: MyHomePage(),
    );
  }
}

class MyHomePage extends StatefulWidget {
  const MyHomePage({Key? key}) : super(key: key);

  @override
  _MyHomePageState createState() => _MyHomePageState();
}

class _MyHomePageState extends State {
  @override
  Widget build(BuildContext context) {
    return Scaffold(
      appBar:  AppBar(
        toolbarHeight: 130,
        backgroundColor: Colors.transparent,
        elevation: 0.0,
        flexibleSpace: ClipPath(
          clipper: Customshape(),
          child: Container(
            height: 250,
            width: MediaQuery.of(context).size.width,
            color: Colors.green,
            child: Center(child: Text("GeeksforGeeks",
                                      style: TextStyle(fontSize: 40,
                                                                       color: Colors.white),)),
          ),
        ),
      ),
       body: Container(),
    );
  }
}
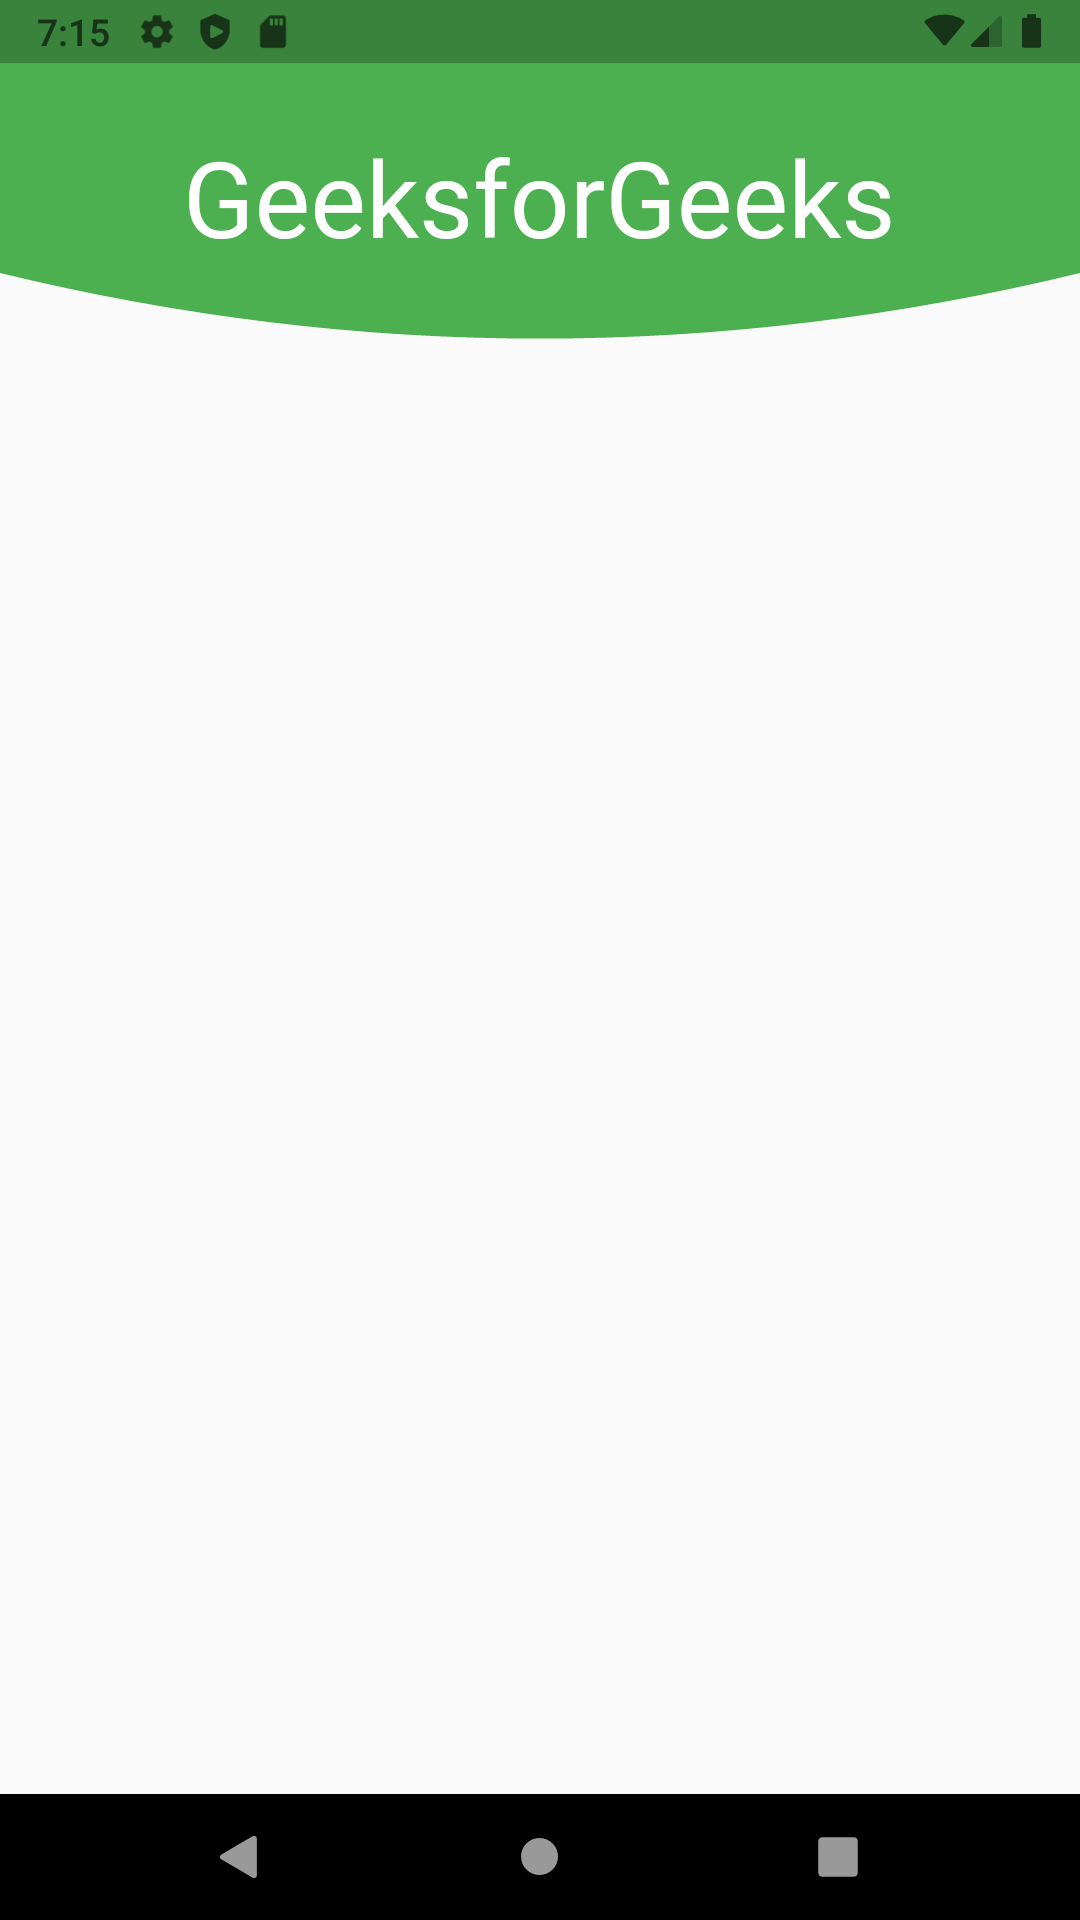
说明:在此主要。在 dart文件中,我们首先创建了一个有状态小部件。之后,我们使用了一个名为灵活空间的应用栏的属性。在这个灵活的空间属性中,我们有一个包含高度、宽度、颜色和文本的容器。我们用剪辑路径包装了这个容器。剪辑路径有一个名为剪辑器的属性。在 clipper 属性中,我们传递了自定义形状类,以便它可以访问custom_shape。 dart文件并为我们提供所需的形状。
输出: