Python|使用 Matplotlib 可视化 NetworkX 中生成的图形
先决条件:使用 Network X 生成图,Matplotlib 介绍
在本文中,我们将讨论如何使用 Matplotlib 在Python中绘制由 NetworkX 生成的图形。 NetworkX不是图形可视化软件包,但软件包中包含了使用 Matplotlib 进行的基本绘图。
第 1 步:在项目文件中导入 networkx 和 matplotlib.pyplot。
Python3
# importing networkx
import networkx as nx

# importing matplotlib.pyplot
import matplotlib.pyplot as plt
Python3
# importing networkx
import networkx as nx
# importing matplotlib.pyplot
import matplotlib.pyplot as plt

g = nx.Graph()

g.add_edge(1, 2)
g.add_edge(2, 3)
g.add_edge(3, 4)
g.add_edge(1, 4)
g.add_edge(1, 5)

nx.draw(g)
plt.savefig("filename.png")
Python3
# importing networkx
import networkx as nx
# importing matplotlib.pyplot
import matplotlib.pyplot as plt

g = nx.Graph()

g.add_edge(1, 2)
g.add_edge(2, 3)
g.add_edge(3, 4)
g.add_edge(1, 4)
g.add_edge(1, 5)

nx.draw(g, with_labels = True)
plt.savefig("filename.png")
Python3
# importing networkx
import networkx as nx
# importing matplotlib.pyplot
import matplotlib.pyplot as plt

g = nx.Graph()

g.add_edge(1, 2)
g.add_edge(2, 3)
g.add_edge(3, 4)
g.add_edge(1, 4)
g.add_edge(1, 5)
g.add_edge(5, 6)
g.add_edge(5, 7)
g.add_edge(4, 8)
g.add_edge(3, 8)

# drawing in circular layout
nx.draw_circular(g, with_labels = True)
plt.savefig("filename1.png")

# clearing the current plot
plt.clf()

# drawing in planar layout
nx.draw_planar(g, with_labels = True)
plt.savefig("filename2.png")

# clearing the current plot
plt.clf()

# drawing in random layout
nx.draw_random(g, with_labels = True)
plt.savefig("filename3.png")

# clearing the current plot
plt.clf()

# drawing in spectral layout
nx.draw_spectral(g, with_labels = True)
plt.savefig("filename4.png")

# clearing the current plot
plt.clf()

# drawing in spring layout
nx.draw_spring(g, with_labels = True)
plt.savefig("filename5.png")

# clearing the current plot
plt.clf()

# drawing in shell layout
nx.draw_shell(g, with_labels = True)
plt.savefig("filename6.png")

# clearing the current plot
plt.clf()
第 2 步:使用 networkx 生成图。
第 3 步:现在使用 networkx.drawing 的 draw()函数绘制图形。
第四步:使用 matplotlib.pyplot 的 savefig(“filename.png”)函数将图形的绘制保存在 filename.png 文件中。
下面是Python代码:
Python3
# importing networkx
import networkx as nx
# importing matplotlib.pyplot
import matplotlib.pyplot as plt
g = nx.Graph()
g.add_edge(1, 2)
g.add_edge(2, 3)
g.add_edge(3, 4)
g.add_edge(1, 4)
g.add_edge(1, 5)
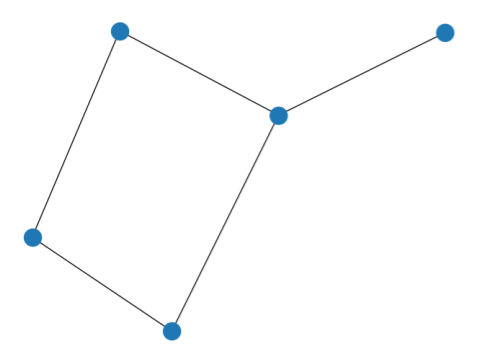
nx.draw(g)
plt.savefig("filename.png")
输出:
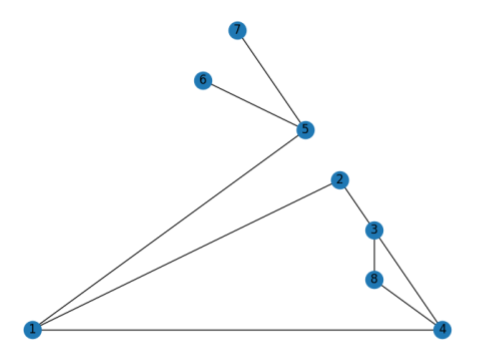
要在节点中添加编号,请在 draw()函数中添加一个参数with_labels=True 。
Python3
# importing networkx
import networkx as nx
# importing matplotlib.pyplot
import matplotlib.pyplot as plt

g = nx.Graph()

g.add_edge(1, 2)
g.add_edge(2, 3)
g.add_edge(3, 4)
g.add_edge(1, 4)
g.add_edge(1, 5)

nx.draw(g, with_labels = True)
plt.savefig("filename.png")
输出:

可以使用 networkx 绘图和 matplotlib 完成不同的图形类型和绘图。
注意**:这里的关键字是指我们可以提到的用于格式化图形绘制的可选关键字。一些一般的图形布局是:
- draw_circular(G, keywords) : This gives circular layout of the graph G.
- draw_planar(G, keywords) :] This gives a planar layout of a planar networkx graph G.
- draw_random(G, keywords) : This gives a random layout of the graph G.
- draw_spectral(G, keywords) : This gives a spectral 2D layout of the graph G.
- draw_spring(G, keywords) : This gives a spring layout of the graph G.
- draw_shell(G, keywords) : This gives a shell layout of the graph G.
例子 :
Python3
# importing networkx
import networkx as nx
# importing matplotlib.pyplot
import matplotlib.pyplot as plt

g = nx.Graph()

g.add_edge(1, 2)
g.add_edge(2, 3)
g.add_edge(3, 4)
g.add_edge(1, 4)
g.add_edge(1, 5)
g.add_edge(5, 6)
g.add_edge(5, 7)
g.add_edge(4, 8)
g.add_edge(3, 8)

# drawing in circular layout
nx.draw_circular(g, with_labels = True)
plt.savefig("filename1.png")

# clearing the current plot
plt.clf()

# drawing in planar layout
nx.draw_planar(g, with_labels = True)
plt.savefig("filename2.png")

# clearing the current plot
plt.clf()

# drawing in random layout
nx.draw_random(g, with_labels = True)
plt.savefig("filename3.png")

# clearing the current plot
plt.clf()

# drawing in spectral layout
nx.draw_spectral(g, with_labels = True)
plt.savefig("filename4.png")

# clearing the current plot
plt.clf()

# drawing in spring layout
nx.draw_spring(g, with_labels = True)
plt.savefig("filename5.png")

# clearing the current plot
plt.clf()

# drawing in shell layout
nx.draw_shell(g, with_labels = True)
plt.savefig("filename6.png")

# clearing the current plot
plt.clf()
输出:
圆形布局

平面布局
随机布局
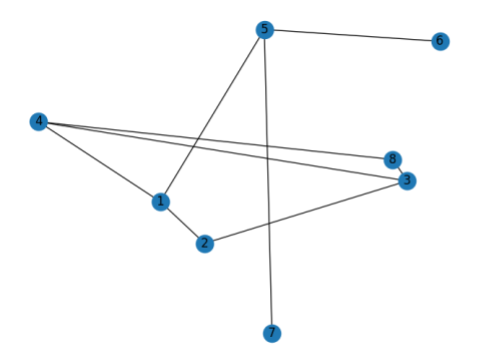
光谱布局

弹簧布局

外壳布局

参考:NetworkX 绘图文档