使用Python OpenCV 进行深度学习
Opencv 3.3 带来了一个非常改进和高效的 ( dnn ) 模块,这使得您可以使用 OpenCV 进行深度学习。您仍然无法在 OpenCV 中训练模型,而且他们可能没有任何这样做的意图,但现在您可以非常轻松地使用图像处理并使用预先训练的模型使用dnn模块进行预测。
这个新版本支持许多大型框架,其中包括:
- 张量流
- 火炬
- 咖啡
客观的
在本文中,我们将引导您完成使用预训练模型的整个过程,使用dnn加载它 模块,使用OpenCV中的blobfromImage方法对图像进行预处理,最后进行预测。
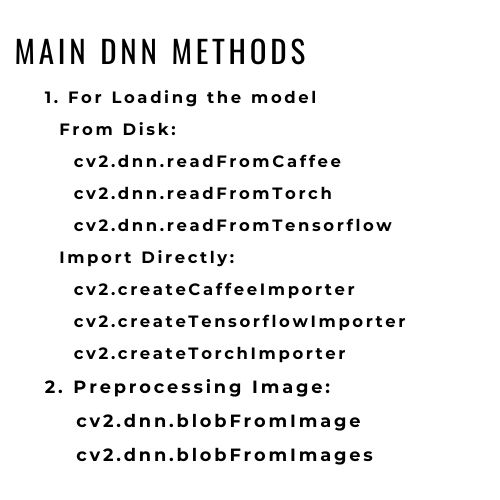
在 OpenCV 中有两种从框架加载模型的方法:
- 如果要直接导入模型,则使用cv2.dnn.createCaffeImporter或更改caffe 到 Torch 或 Tensorflow,具体取决于您使用的框架。
- 如果要从磁盘加载,请使用cv2.dnn.readNetFromCaffe

我们将以用于对象检测的Mobile_net_ssd caffe 模型为例来了解 dnn 模块的工作原理。我们将使用第二种方法,即下载模型文件并使用dnn模块加载模型。
下载模型文件并安装依赖项
您可以在这里下载mobile_net_ssd模型:https://github.com/chuanqi305/MobileNet-SSD/
pip install opencv-python dlib imutils加载模型:
由于我们使用的是caffe模型,我们将使用cv2.dnn.readNetFromCaffe模块来加载我们的模型。您将需要这两种类型的文件来处理使用 dnn 模块的任何预训练模型:
- .prototxt 文件:它们基本上包含您正在使用的模型中的网络层列表。
- caffemodel 文件(在您的情况下,它可能不是 Caffe 模型):此文件包含模型的权重。
您需要这两个文件来创建模型,我们将这两个文件作为参数传递给cv2.dnn.readNetFromCaffe模块来创建我们的模型。
#—–Paths of the model files——–#
proto_file = ‘Model/MobileNetSSD_deploy.prototxt.txt’
model_file = ‘Model/MobileNetSSD_deploy.caffemodel’
现在我们有了文件路径,我们将加载我们的模型:
#———Load The Model——–#
net = cv2.dnn.readNetFromCaffe(proto_file,model_file)
在使用此模型进行预测之前,我们必须对图像进行预处理以将其设置为模型输入的要求,这因模型而异。
图像预处理
因此,我们将为图像预处理定义一些变量。
#——Class Labels of the model——–#
classNames = { 0: ‘background’,
1: ‘aeroplane’, 2: ‘bicycle’, 3: ‘bird’, 4: ‘boat’,
5: ‘bottle’, 6: ‘bus’, 7: ‘car’, 8: ‘cat’, 9: ‘chair’,
10: ‘cow’, 11: ‘diningtable’, 12: ‘dog’, 13: ‘horse’,
14: ‘motorbike’, 15: ‘person’, 16: ‘pottedplant’,
17: ‘sheep’, 18: ‘sofa’, 19: ‘train’, 20: ‘tvmonitor’ }
#——–Scaling parameters——#
input_shape=(300,300) #the required shape for the input image to pass to our model
mean = (127.5,127.5,127.5) #we’ll have to normalize the image pixels, and we’ll use this mean value to do that
scale = 0.007843 # then finally we’ll scale the image to meet the input criteria of the model
dnn 模块为我们提供了blobFromImage( 或 blobFromImages 如果您使用多个图像)方法进行预处理步骤,我们只需传递我们上面定义的缩放参数即可完成预处理步骤,并获得所需的 blob 即输入图像。
#——image preprocessing—-#
blob = cv2.dnn.blobFromImage(img,
scalefactor=scale,
size=input_shape,
mean=mean,
swapRB=True) #since our image is already in the BGR form because opencv by default reads it in BGR format
使用模型进行预测
现在我们已经准备好输入,我们必须使用setInput()将其显式设置为输入 方法,然后将其传递给我们的模型并使用前向方法生成预测。
#——setting input—–#
net.setInput(blob)
#—–using the model to make predictions
results = net.forward()
forward 方法返回一个 4 维列表:
第 3 维有我们的预测,每个预测都是 7 个浮点值的列表。在第 1 个索引我们有 class_id,在第 2 个索引我们有置信度/概率,从第 3 到第 6 个索引我们有检测到的对象的坐标。
让我们直接看看它们在我们的最终实现中是如何使用的。
下面是完整的实现
Python3
import cv2
import dlib
from imutils import face_utils

img = cv2.imread('object (1).png')

#--------Model Path---------#
proto_file = 'SSD_MobileNet_prototxt.txt'
model_file = 'SSD_MobileNet.caffemodel'

#------Variables for the Model ---------#
classNames = {0: 'background',
              1: 'aeroplane', 2: 'bicycle',
              3: 'bird', 4: 'boat',
              5: 'bottle', 6: 'bus', 7: 'car',
              8: 'cat', 9: 'chair',
              10: 'cow', 11: 'diningtable',
              12: 'dog', 13: 'horse',
              14: 'motorbike', 15: 'person',
              16: 'pottedplant',
              17: 'sheep', 18: 'sofa',
              19: 'train', 20: 'tvmonitor'}

input_shape = (300, 300)
mean = (127.5, 127.5, 127.5)
scale = 0.007843

#---------Load The Model--------#
net = cv2.dnn.readNetFromCaffe(proto_file, model_file)

#------image preprocessing----#
blob = cv2.dnn.blobFromImage(img,
                             scalefactor=scale,
                             size=input_shape,
                             mean=mean,
                             swapRB=True)
# since our image is already in the BGR form

net.setInput(blob)
results = net.forward()
for i in range(results.shape[2]):

      # confidence
    confidence = round(results[0, 0, i, 2],2)
    if confidence > 0.7:

          # class id
        id = int(results[0, 0, i, 1])

        # 3-6 contains the coordinate
        x1, y1, x2, y2 = results[0, 0, i, 3:7]

        # print(x1,y1,x2,y2)
        # scale these coordinates to out image pixel
        ih, iw, ic = img.shape
        x1, x2 = int(x1*iw), int(x2*iw)
        y1, y2 = int(y1 * ih), int(y2 * ih)
        cv2.rectangle(img,
                      (x1, y1),
                      (x2, y2),
                      (0, 200, 0), 2)
        cv2.putText(img, f'{classNames[id]}:{confidence*100}',
                    (x1+30, y1-30),
                    cv2.FONT_HERSHEY_DUPLEX,
                    1, (255, 0, 0), 1)
    # print(results[0,0,i,:])

img = cv2.resize(img, (640, 720))
cv2.imshow('Image', img)
# cv2.imwrite('output1.jpg',img) # Uncomment this line to save the output
cv2.waitKey()
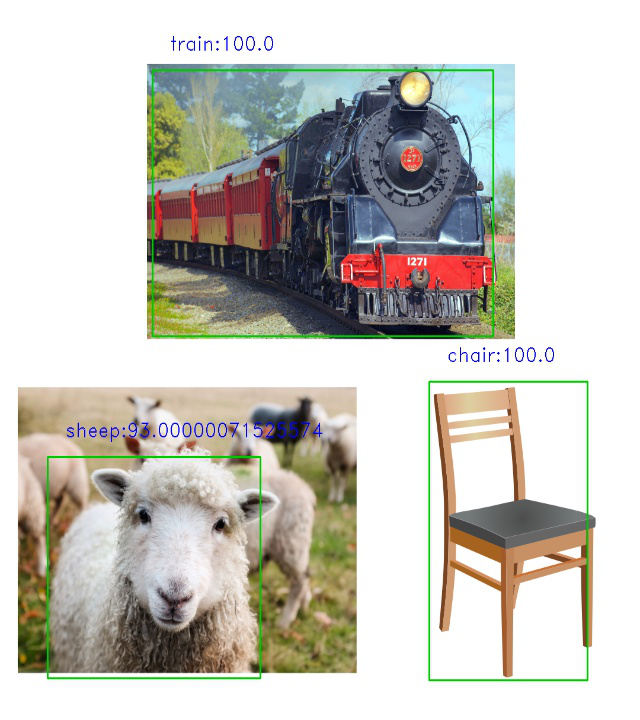
输出:

接下来是什么?
既然您知道如何使用预训练模型,请尝试使用来自不同框架的各种预训练模型,并创建不同的应用程序,如语言翻译、图像分割、风格迁移等。